Sunday, 8 November 2015

Outside Your Comfort Zone

Morning, hope you are all enjoying your weekend. We have another fabulous challenge for you over at the Love to Create Challenge Blog where the theme is Anything Creative/Mixed Media Goes.
This week I thought I would use one of my Stampotique images by Kate Crane combined with my PanPastels. The background has been coloured with DecoArt Fluid Acrylics Cobalt Teal Hue, Cobalt Turquoise Hue and Yellow Green Light; blending the colours with a baby wipe and then drying with a heat tool.
I then placed the Tim Holtz Splotches stencil onto the background and applied Orange and touches of Permanent Red PanPastels over the stencil and then sprayed lightly with hairspray to set the pastels.
I added a touch more shading around the stencilled areas applying Phthalo Green and Turquoise Shade, blending a little further with my finger. I stamped the Stampotique image onto white card with Black Archival Ink and then coloured with my Polychromo pencils. I added a touch of shading around the image so that it does not blend into the backdrop. Tissue Tape grounds the image and adds touches of texture to the design. The sentiment is also a Stampotique stamp.
I added scratchy paint lines and painty circles using Carbon Black DecoArt Media Fluid Acrylic and added delicate splatters of Titanium White Fluid Acrylic. To add a further layer of interest I added delicate stamping using a Tim Holtz background stamp and Watering Can Archival Ink. I also added shading around the edges with PanPastel Black Coarse Pearl Medium.

Thanks so much for stopping by. Tracy x x

http://welove2create.blogspot.co.uk/

Thursday, 5 November 2015

London Fashion

I am showcasing the Vintage Fashion stamp set this week from Artistic Outpost.
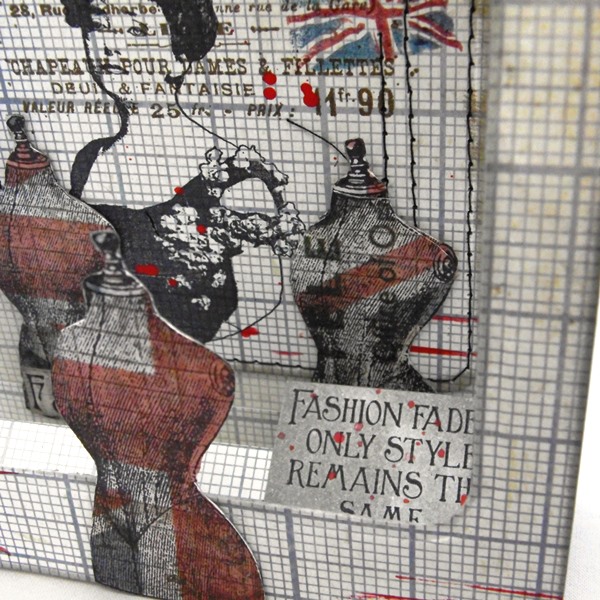
I decided to create a tent card this week using the Vintage Fashion imagery to create a London Fashion style card, very patriotic! I created a 4" x 6" card blank which I covered with Tim Holtz Correspondence Paper Stash and then die cut an arch from the front panel using Our Daily Bread Cathedral Window and Border Die.  I added a touch of shading to all the edges of the card using Hickory Smoke Distress Ink. I used the die cut shape left from cutting out the aperture at the front to the inside of the tent card.
I added background stamping to the back panel using the background stamp from the Vintage Fashion stamp set, stamping with Ground Espresso Distress Ink and I then added the elegant lady over the top of the background stamping using Black Archival Ink. The little Union Jack Flag is from the Loverly London stamp set; applying Distress Markers Faded Jeans and Fired Brick directly to the stamp and then stamping onto the background. I also added machine stitching for added interest and texture.
The Correspondence Paper Stash also had a Union Jack design so I stamped three of the bodice images onto the paper and cut out; adding to thicker card to make them more sturdy and then added them to the tent card.  I also added one of the sentiments to the inside, stamped onto white card and coloured with Hickory Smoke Distress Ink. Adding delicate splatters of DecoArt Media Fluid Acrylic Cadmium Red Hue.
I added the 'Fashion' text to the inside of the tent card again stamped onto Correspondence Paper. I added delicate splatters of Cadmium Red Hue to the inside panel, I love the pops of red.
I added LONDON to the inside panel using the stamp from the Loverly London stamp set and I also added a touch more random machine stitching. I also added scratchy lines of paint using an old credit card for added interest.
I added two more of the small Union Jacks to the outside of the tent card.


I would like to add this to the Craft Stamper Take It Make It Challenge which this month is Anything Goes as long as you use a stamp.

Thanks so much for stopping by. Tracy x x


Tuesday, 3 November 2015

Eileen Hull Art With Heart Challenge New Release

Morning all and welcome to my post for Eileen Hull's Art With Heart Challenge. This month we have something special for you, a NEW RELEASE! You can view the whole range of Stitchlits HERE. Our Challenge theme this month is a STITCH IN TIME which you can interpret anyway you like.
For my first piece I have used the fantastic SEWING BOX, this is an amazing die. I began by colouring each of the die cut pieces with Fossilized Amber Distress Ink and then placing the Tim Holtz Gothic Layering Stencil over the top of each piece and then applying Vintage Photo Distress Ink over the stencil. I also added shading to the edges of each piece.
To embellish I added scrabble letters, a mini spool and brass scissors along with Hitch Fasteners to fasten the top section.
The left had right side top pieces echo each other with the same cordinated embellishments.
This SEWING BOX die is so authentic, I loved decorating it. I added colour to the inside of the boxes, spraying with Fossilized Amber Distress Spray Stain and I then lined each of the boxes with a piece of felt.
I loved adding embellishments to each of the boxes. I think this would also make a fabulous tool box.
Each of the connecting pieces was coloured with Vintage Photo Distress Ink and I added authentic screw brads to each one. I can see this die is going to become a firm favourite!

http://www.eileenhull.com/

Thanks so much for stopping by. Tracy x x

Monday, 2 November 2015

Last Ray of Sunshine for A Vintage Journey

Morning everyone, thanks so much for popping by. Today I have a "Destination Inspiration" post to share over at A Vintage Journey.
To see the full project you just need to click HERE to be magically transported.

Sunday, 1 November 2015

It's Your Special Day

Morning, hope you are all enjoying your weekend. We have another fabulous challenge for you over at the Love to Create Challenge Blog where the theme is Anything Creative/Mixed Media Goes.
I decided to showcase some warm Autumnal tones this week using some of my favourite PanPastel colours.
To begin, I applied DecoArt Media Fluid Acrylics Diarylide Yellow, Hansa Yellow Medium and touches of Vermillion Hue to the background, applying with a baby wipe to blend the colours. I then die cut two circles from scrap card and used the circular apertures as a stencil and then blended PanPastel Orange over each of the circles; applying Permanent Red PanPastel lightly to the edges of each circle.
I applied Magenta PanPastel over Tim Holtz Dot Fade Layering Stencil to add smaller circles to the background for added interest. I stamped the sentiment with Black Archival Ink using Tim Holtz Crazy Talk Stamp Set.
I placed a poppy stencil onto the background and applied Black Coarse Pearl Medium PanPastel over the stencil and I then sprayed the card lightly with hairspray to seal the Pastels. Random machine stitching and Tissue Tape has also been added for further interest to the design. To complete I added scratchy lines with DecoArt Media Fluid Acrylic Carbon Black, using an old credit card and dried with a heat tool.

Thanks so much for stopping by. Tracy x x

http://welove2create.blogspot.co.uk/


Wednesday, 28 October 2015

"Go Team"

Today I am showcasing one of the new releases from Artistic Outpost, the Go Team stamp set. The Artistic Outpost Design Team are all creating with the new release this week and we have a fun Blog Hop to inspire you.
I began by painting my background with London Bus Fresco Finish Paint and drying with my heat tool. I then applied Fresco Finish Crackle Glaze and again dried with my heat tool until I had a matt finish and I then applied a final coat of Little Black Dress and the cracks appear almost immediately. Whilst the paint was still wet I rubbed away some of the areas with a piece of kitchen towel to age my piece a little.
Once my layers of paint were completely dry I then applied a random coat of Gesso to the centre of the card and dried with my heat tool.
I stamped the young boy with Black Archival Ink onto the Gesso area and then dried with my heat tool. I then stamped the same image onto a piece of scrap paper, cut it out to create a mask and placed the mask onto the focal image and then stamped the background image, once again with Black Archival Ink and dried with my heat tool. I added touches of red to the boy using my Polychromo pencils. I added "Go Team" to a twig which I painted lightly with paint and then adhered to the card.
To add further interest I added scratchy lines using an old credit card and London Bus Fresco Finish Paint along with a few splatters of paint.

My fellow team members have created wonderful pieces to inspire you along the blog hop:


Thanks so much for stopping by. Tracy x x


Tuesday, 27 October 2015

Eileen Hull Art With Heart Challenge

This is my second post for our Eileen Hull Art With Heart Challenge this month, my first post can be found HERE. Our theme is Hauntings and Holidays and as this is probably the last chance I will have to make something for Halloween that was the obvious choice for me.
I decided to decorate Eileen Hull's die cut suitcase (this die will be available once again next year) I die cut the suitcase from mountboard and then added DecoArt Media Crackle Paste to areas of the case. I pressed the Sandra Evertson Relic Skull into the wet Paste and then I allowed the Paste to dry completely and then  painted with two coats of DecoArt Media Cobalt Turquoise Hue Fluid Acrylic.
I added layers of DecoArt Media Crackle Paste to the inside of the case along with some areas of DecoArt Media Texture Sand Paste to add texture to the design. Once again I pressed another of Sandra Evertson Relic pieces into the wet Paste and allowed to dry. Once completely dry I then painted with two coats of Cobalt Turquoise Hue.
Once I was happy with my base coat I then added touches of Burnt Umber Fluid Acrylic, paying special attention to the edges and cracks and ridges. I repeated this process throught the case, using a pouncing action with my brush to add the paint. I like to add a little at a time to add layers and I then allowed to dry.
I used my vintage typewriter to add "ENCASED" text to the case and also included some rusty chain, which is actually plastic chain which I have treated with layers of paint.
Once I was happy with the layers of Burn Umber I then added touches of Quinacridone Gold Fluid Acrylic, once again adding a small amount at a time.
For the final layer I added a very small touch of Carbon Black Fluid Acrylic. To tone down the Turquoise a little and to age I applied a dirty wash over the top which I also applied to each of the Relic pieces.
I also applied a wash of Paynes Grey over each of the Relic piecec, this really highlighted the cracks beautifully.

I would like to enter this into the DecoArt Media Mixed Media Haunts Challenge along with the Emerald Creek Halloween Special Challenge.

http://www.eileenhull.com/
Thanks so much for stopping by. Tracy x x