Morning and welcome, today Eileen Hull's Design Team are showcasing a whole range of products to kickstart the holiday season; that could be Autumn, Halloween, Christmas, whatever takes your fancy!
I was on a roll and decided to create three projects whilst I felt inspired! I decorated a Pumpkin, created an Autumnal card and created an ATB using techniques from Tim Holtz tag for September 2016 which you can find HERE.
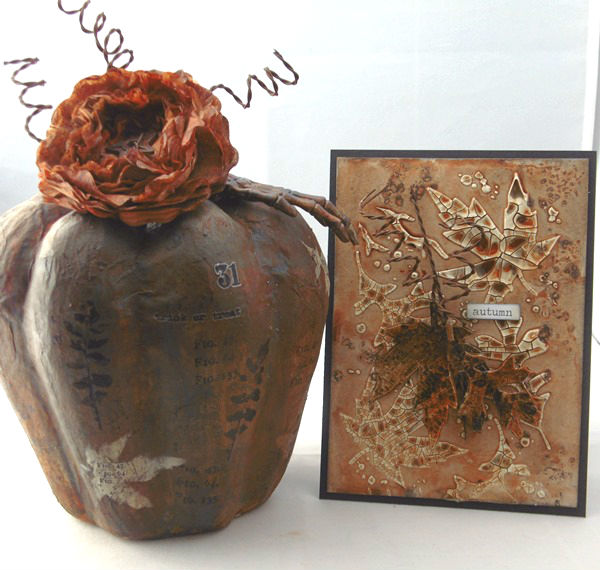
Beginning with the card I used a few of Andy Skinner's techniques to create this rustic card. I began by applying DecoArt Media Crackle Paste over Tim Holtz new leaf stencil allowing to dry completely before moving onto the next step.
Once the crackle was completely dry I then applied a wash of DecoArt Media Fluid Acrylic Dark Grey Value 3. I simply added a small amount of paint to my non-stick craft sheet and then mixed with water. I then dried the first coat of the wash with my heat tool and then added a second coat of the wash; I repeated this process until I was happy. Whilst the paint was fluid and still quite wet on my third coat I added a few sprinkles of coarse sea salt and then allowed to dry naturally.
Once the salt/paint wash was completely dry, I removed any salt particles and then added a wash of DecoArt Media Fluid Acrylic Quinacridone Gold to give that rusty tone and to age further. I applied a couple of coats of the Quinacridone Gold, drying between each application. I cut two leaves from a separate piece I created and this time painted with a more concentrated mix of the same paints. I then used Eileen Hull's Twist and Style Tool to add the spirals of rusty wire behind the leaves for added interest and texture. To complete, I added an 'autumn' sticker. Black Soot Distress Ink has been added around the edges of the panel for definition.
I then moved onto the pumpkin which was so much fun to decorate! I began by once again applying a wash of DecoArt Media Fluid Acrylic Dark Grey Value 3 and then drying with my heat tool. I then repeated the same process several times and on the last layer I again added a few sprinkles of Coarse Sea Salt and allowed to dry. Once completely dry, I removed the salt and then added layers of a wash of Quinacridone Gold and then dried with my heat tool.
For added interest I then used Tim Holtz Leaf Stencil to add stencilled leaves around the pumpkin; applying DecoArt Media Titan Buff over the stencil; using a very light touch and then drying with my heat tool. I used Andy Skinner's Toxic stamp set to add a touch of background stamping using Black Archival Ink; stamping with the stamp as is and not applying to an acrylic block. Stamping is much simplified this way as you can bend the stamp around the curved areas. I repeated this process with the leaves from Tim Holtz Leaf Prints stamp set, again stamping with Black Archival Ink.
The Fig. stamp is from Tim Holtz Undertaker stamp set which I thought worked perfectly with the leaf imagery.
I love my rusty flower which has been cut from coffee filter papers using Eileen Hull's Flower, Romance die. I added Quinacridone Gold and Raw Umber Fluid Acrylic to a spritz bottle, added water and then spritzed the flower with the mixes. I scrunched the flower whilst wet and then allowed to dry completely. Once completely dry I added a touch more intense colour with the paints using my finger. I added one of Finnabair's rusty stars to the centre to add to the rustic tones. Once again I used Eileen Hull's Twist and Style Tool to add the spirals of rusty tin wire.
No pumpkin is complete without a spooky hand!! The hand is made from plastic and once again I coloured with DecoArt Media Fluid Acrylics.
A touch more stamping adds further to the layers of interest.
I love the layers of colour that you can achieve from a few simple washes!
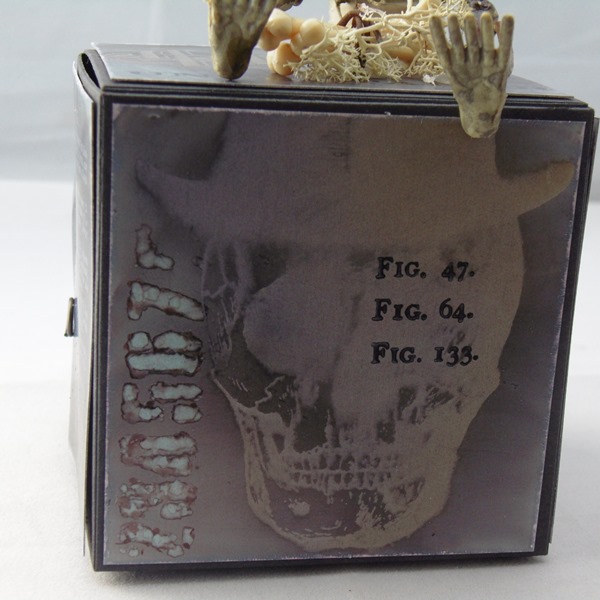
Now onto the ATB created using Eileen Hull's Block, Cube Die which I die cut from black mountboard. I then used Tim's techniques from his September 2016 tag to decorate each side; using the Undertaker stamp set and many stencils to add further interest. I also added further stamping using Black StazOn Ink.
I used Pitch Black and Latte on Yupo and the two colours together gave a purple tinge to the background which I loved. I then stamped the imagery on each side with Archival Ink and then used a soft cloth to remove the ink to reveal the resist.
I love the ghostly effect from the resist which works so well with a touch of overstamping for further detail, love it!
A touch of resist on this panel using a stencil and Alcohol Ink Blending Solution.
I added a jump ring to this skull for added interest; he looks rather dashing with his monocle!
I added touches of white paint to the edges of each panel to lift each panel a little from the black backdrop.
I added the same detail to the top of the ATB along with a plastic skeleton and a few bones from Tim's Idea-ology range.
I left a few drips of hot glue to add further to the texture.
Thanks so much for stopping by. Tracy x x
Showing posts with label Art with Heart Challenge. Show all posts
Tuesday, 6 September 2016
Tuesday, 2 August 2016
Eileen Hull Twist and Style Tool
This month the Eileen Hull DT are showcasing the fabulous Twist and Style Tool. Eileen has a fabulous video HERE to show you how to use the tool, its great fun!
I opted for two ATB's and a coordinated card. The Artist Trading Blocks were created using Eileen Hull's Block/Cube Scoreboards Die.
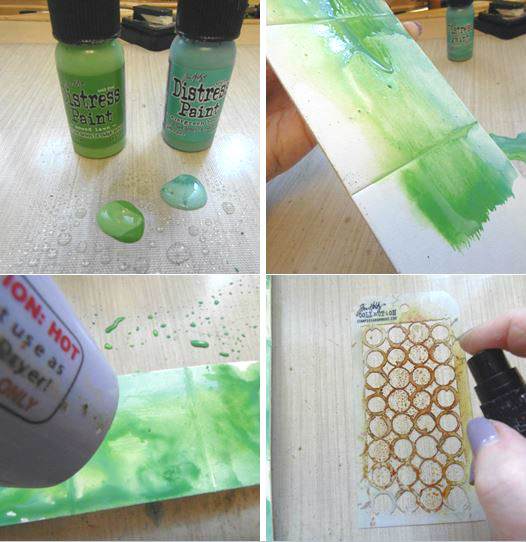
1 I began by die cutting the ATB from mountboard and then I applied Mowed Lawn and Evergreen Bough to a non-stick craft sheet and spritzed with water.
2 Mop up the paint with the die cut pieces.
3 Dry the paint with a heat tool.
4 Take a stencil, apply Vintage Photo Distress Ink directly to the stencil and then spritz with water.
1 Place the inked stencil ink side down onto the die cut pieces and then dab with a piece of kitchen towel.
2 Remove the stencil to reveal the design. Repeat this process for all the die cut pieces.
3 Cut lengths of rusty tin wire, use the Twist and Style Tool to twist and then shape into hearts. Keep the spare lengths of twisted wire for added interest on the projects.
4 Place the wire hearts onto book pages and then pour Liquitex Pouring Medium into the hearts and then allow to dry overnight. Once completely dry, cut out each of the hearts.
I created a coordinated card again using all the techniques above. I added two of the hearts to the card adding paint circles in DecoArt Media Cadmium Red Hue to give a contrast to the design. I also added three of the lengths of twisted wire to the card for added texture.
I love how the text from the Alice book pages are clearly visible within each of the hearts.
I also added some stencilling to the background of the card to add a further layer of interest. I also included some splatters of paint.
I added hearts to the ATB, adding threads of cotton behind for added interest and texture. Again I have added painty circles to the background.
Numbers have been added to the top of the ATB and once again I have added lengths of the twisted wire to echo the design on the card.
Two hearts have been included to the top of the ATB. I love the twisted wire and the Twist and Style Tool makes it so easy.
I echoed the stencilling and circles on each side of the ATB.
Thanks so much for stopping by. Tracy x x
I opted for two ATB's and a coordinated card. The Artist Trading Blocks were created using Eileen Hull's Block/Cube Scoreboards Die.
1 I began by die cutting the ATB from mountboard and then I applied Mowed Lawn and Evergreen Bough to a non-stick craft sheet and spritzed with water.
2 Mop up the paint with the die cut pieces.
3 Dry the paint with a heat tool.
4 Take a stencil, apply Vintage Photo Distress Ink directly to the stencil and then spritz with water.
1 Place the inked stencil ink side down onto the die cut pieces and then dab with a piece of kitchen towel.
2 Remove the stencil to reveal the design. Repeat this process for all the die cut pieces.
3 Cut lengths of rusty tin wire, use the Twist and Style Tool to twist and then shape into hearts. Keep the spare lengths of twisted wire for added interest on the projects.
4 Place the wire hearts onto book pages and then pour Liquitex Pouring Medium into the hearts and then allow to dry overnight. Once completely dry, cut out each of the hearts.
I created a coordinated card again using all the techniques above. I added two of the hearts to the card adding paint circles in DecoArt Media Cadmium Red Hue to give a contrast to the design. I also added three of the lengths of twisted wire to the card for added texture.
I love how the text from the Alice book pages are clearly visible within each of the hearts.
I also added some stencilling to the background of the card to add a further layer of interest. I also included some splatters of paint.
I added hearts to the ATB, adding threads of cotton behind for added interest and texture. Again I have added painty circles to the background.
Numbers have been added to the top of the ATB and once again I have added lengths of the twisted wire to echo the design on the card.
Two hearts have been included to the top of the ATB. I love the twisted wire and the Twist and Style Tool makes it so easy.
I echoed the stencilling and circles on each side of the ATB.
Thanks so much for stopping by. Tracy x x
Labels:
Art with Heart Challenge,
ATB,
Block/Cube Die,
Eileen Hull,
Mixed Media,
Ranger,
Scoreboards,
Sizzix
Tuesday, 1 March 2016
Eileen Hull Art With Heart Challenge
I can't believe another month has passed by and we are now onto March, wow time really is passing by so quickly. Anyway I digress, a new month means the start of a new challenge for the Design Team with Eileen Hull's Art With Heart Challenge.
This month the Design Team are showcasing Sizzix Paper Leather Sheets and Inksheets which come in White, Black, Red, Silver, Gold and Green . To use the Inksheets you need an Inksheets Transfer Pad. There is also a starter kit available HERE. I decided to create a piece using Eileen Hull's Passport Book Die.
I began by die cutting the front and back cover and spine for the Passport Book, die cutting from the Paper Leather Sheets.
I then embossed each of the die cut pieces with Tim Holtz Keyboard Texture Fade and I then sanded the raised areas very lightly.
To highlight the raised areas and add to the aged feel I rubbed over the embossed areas with Vintage Photo Distress Ink, applying the ink directly from the inkpad.
To add further to the ageing process I spritzed each die cut piece with Walnut Stain Distress Spray Stain, mopping up the excess ink with kitchen towel and then drying with a heat tool.
I then bent the die cut pieces to add creases and then applied Gathered Twigs Distress Ink over the creased areas to add further to the leather/aged feel. I also applied Gathered Twigs Distress Ink to the edges of each piece.
I then began decorating the pages for the inside of my Passport Book. For a couple of the pages I added embossed detail using the Inksheets. I used the Tim Holtz Keyboard Texture Fade once again. I am using the BigShot Plus so I used my Platform, Adapter B, Inksheets Transfer Pad, then the Texture Fade with my book page inside with a piece of the white Inksheet on top of the card with the glossy side facing up and then the final cutting pad on top and then run through the machine to emboss.
This shows the embossing and the inksheet next to it.
I spritzed the embossed pages with Walnut Stain and Broken China Distress Spray Stains and then dabbed the excess ink up with a piece of kitchen towel. The embossed area which has the Inksheets applied will resist the ink and leave white highlights.
This is the page completed in the book, as you can see the white areas have resisted the ink.
Inksheets are also fantastic for turning your thinlits dies into stamps. Here I have used Tim Holtz Handwritten Journey Words. Again I am using the BigShot Plus so I have used my Platform, Adapter A, then the Inksheets Transfer Pad, my book page or the card you are using, a black Inksheet with glossy side facing upwards and then the thinlits die facing down and then Cutting Pad on the top and then run through the machine.
As you can see the black ink has been transferred to the page and the die now acts as if I have stamped the sentiment onto my page.
I repeated the same process with a second word, using the same Inksheet.
And the second word is now transferred to my page. The Inksheets add a further interest and use to your thinlits dies.
I also used the black Inksheets with my Texture Fade.
On this page you can see I used the 'discover' die with a white Inksheet; spritzed with Distress Spray Stains and the wording applied with the Inksheets resists the ink and shows in white.
I machine stitched my front and back covers along with the spine to add further interest and texture and I also included a Tim Holtz Baroque Frame which I painted with Titanium White, Cobalt Teal Hue and Carbon Black DecoArt Media Fluid Acrylics; applying the paints with my finger and dabbing off the excess paint with kitchen towel. I also added one of Tim's Found Relative images behind the frame.
A circular piece of rusty tin wire has been added around my focal image along with some vintage pen nibs either side of my 'ADORE' sentiment stamped onto tape, which I have aged with Vintage Photo Distress Ink. I also added splatters of Titanium White Fluid Acrylic.
This picture shows all the layers and texture in more detail.
Each page of the book has been sprayed with Distress Spray Stains and I have added delicate stencilling using a PaperArtsy stencil by Lin Brown; applying DecoArt Titanium White over the stencil.
A touch more stencilling to this page along with more splatters of Titanium White paint.
One of my favourite Tim Holtz stamps added to this page, coloured with Vintage Photo Distress Ink.
A few touches of white paint to lift the whole design.
Inksheets detail using thinlits dies.
Thanks so much for stopping by. Tracy x x
This month the Design Team are showcasing Sizzix Paper Leather Sheets and Inksheets which come in White, Black, Red, Silver, Gold and Green . To use the Inksheets you need an Inksheets Transfer Pad. There is also a starter kit available HERE. I decided to create a piece using Eileen Hull's Passport Book Die.
I began by die cutting the front and back cover and spine for the Passport Book, die cutting from the Paper Leather Sheets.
I then embossed each of the die cut pieces with Tim Holtz Keyboard Texture Fade and I then sanded the raised areas very lightly.
To highlight the raised areas and add to the aged feel I rubbed over the embossed areas with Vintage Photo Distress Ink, applying the ink directly from the inkpad.
To add further to the ageing process I spritzed each die cut piece with Walnut Stain Distress Spray Stain, mopping up the excess ink with kitchen towel and then drying with a heat tool.
I then bent the die cut pieces to add creases and then applied Gathered Twigs Distress Ink over the creased areas to add further to the leather/aged feel. I also applied Gathered Twigs Distress Ink to the edges of each piece.
I then began decorating the pages for the inside of my Passport Book. For a couple of the pages I added embossed detail using the Inksheets. I used the Tim Holtz Keyboard Texture Fade once again. I am using the BigShot Plus so I used my Platform, Adapter B, Inksheets Transfer Pad, then the Texture Fade with my book page inside with a piece of the white Inksheet on top of the card with the glossy side facing up and then the final cutting pad on top and then run through the machine to emboss.
This shows the embossing and the inksheet next to it.
I spritzed the embossed pages with Walnut Stain and Broken China Distress Spray Stains and then dabbed the excess ink up with a piece of kitchen towel. The embossed area which has the Inksheets applied will resist the ink and leave white highlights.
This is the page completed in the book, as you can see the white areas have resisted the ink.
Inksheets are also fantastic for turning your thinlits dies into stamps. Here I have used Tim Holtz Handwritten Journey Words. Again I am using the BigShot Plus so I have used my Platform, Adapter A, then the Inksheets Transfer Pad, my book page or the card you are using, a black Inksheet with glossy side facing upwards and then the thinlits die facing down and then Cutting Pad on the top and then run through the machine.
As you can see the black ink has been transferred to the page and the die now acts as if I have stamped the sentiment onto my page.
I repeated the same process with a second word, using the same Inksheet.
And the second word is now transferred to my page. The Inksheets add a further interest and use to your thinlits dies.
I also used the black Inksheets with my Texture Fade.
On this page you can see I used the 'discover' die with a white Inksheet; spritzed with Distress Spray Stains and the wording applied with the Inksheets resists the ink and shows in white.
I machine stitched my front and back covers along with the spine to add further interest and texture and I also included a Tim Holtz Baroque Frame which I painted with Titanium White, Cobalt Teal Hue and Carbon Black DecoArt Media Fluid Acrylics; applying the paints with my finger and dabbing off the excess paint with kitchen towel. I also added one of Tim's Found Relative images behind the frame.
A circular piece of rusty tin wire has been added around my focal image along with some vintage pen nibs either side of my 'ADORE' sentiment stamped onto tape, which I have aged with Vintage Photo Distress Ink. I also added splatters of Titanium White Fluid Acrylic.
This picture shows all the layers and texture in more detail.
Each page of the book has been sprayed with Distress Spray Stains and I have added delicate stencilling using a PaperArtsy stencil by Lin Brown; applying DecoArt Titanium White over the stencil.
A touch more stencilling to this page along with more splatters of Titanium White paint.
One of my favourite Tim Holtz stamps added to this page, coloured with Vintage Photo Distress Ink.
A few touches of white paint to lift the whole design.
Inksheets detail using thinlits dies.
Subscribe to:
Posts (Atom)