Showing posts with label Eileen Hull. Show all posts

Monday, 6 May 2019

Sketched Mini Book

Welcome, today I have a mini accordion, decorated using my A6 Stamp Sketched Happiness #177 from AALLandCreate. All products are available from our Stockists, which you can find HERE.
I love creating miniature projects and today I have a little accordion book. I began by die cutting my book using Eileen Hull's Needle Book Die from mountboard and I then brayered Dina Wakley Paints onto the background, using Tangerine, Lime, Turquoise and Magenta, applying the layers very lightly to my substrate.
Both the front and back covers were stamped with my quirky flowers from my Sketched Happiness stamp set.
I incorporated an accordion into my book, again adding layers of paint with my brayer. I added stamping using VersaFine Clair Ink and then added touches of colour with Gel Pens.
Torn vintage book pages add a touch more interest along with delicate splatters of white paint.
I also die cut a circle from scrap card and then used the aperture as a stencil, applying Picked Raspberry Distress Oxide Ink over the aperture, giving a further layer of interest.
I love the sentiments on this set and stamped them throughout my accordion.
Thanks so much for stopping by and leaving a comment. Tracy x x

AALLandCreate Web Page
AALLandCreate Facebook Page
AALLandCreate Fanatics Facebook Page
AALLandCreate Boutique.


Friday, 26 April 2019

Find Beauty in the Ordinary

Welcome, today I have a small mixed media book, decorated using my A4 Stamp Eclectic Silhouette #113 from AALLandCreate.
 
I began by adding some subtle stencilling to my background and then adding colour, applying Distress Oxide Bundled Sage to a piece of Acetate, spritzing with water and then pressing the ink onto my background.  I allowed the ink to dry naturally.
I opted to use the Dragonfly this time around from my A4 stamp, adding a couple of layers to the wings for added dimension.
I applied Dina Wakley Fuchsia Acrylic Paint to my stamp, adding a light layer of paint to the stamp and applying the paint with a Brayer. I then stamped the image onto my background. Remember to clean your stamp after using paints.
I added a subtle touch of Crackle Paste to the background and also incorporated a mini spanner for the body, adding further dimension to the design.
A couple of Jump Rings add further interest along with a few delicate splatters of Lime Acrylic Paint.
I used a Distress Crayon over Stencil #39 and then blended the colour with my finger to blend.
Thanks so much for stopping by, I really appreciate your comments and feedback. Tracy x x
AALLandCreate Web Page
AALLandCreate Facebook Page
AALLandCreate Fanatics Facebook Page
AALLandCreate Boutique.


Friday, 2 November 2018

Field Notes Journal

Today I would like to share a journal I created using Eileen Hull's Journal Die combined with my Numbered Botanical A4 Stamp #110 from AALLandCreate. You can find a list of our stockists HERE.
I adored making this journal and I was delighted with how the detail combined so well for this piece. For this piece I decided to stamp my image onto thick white card first and then die cut the journal die pieces from mountboard and I then attached the pieces I wanted to the die cut mountboard pieces.
I added a mica tile to my cover and then stamped the fern once again onto white card and distressed a little with some Vintage Photo Distress Oxide Ink and I then added a couple of layers of Seth Apter's Baked Texture Vintage Beeswax and that really added some wonderful texture to my cut out piece.
I stamped one of my numbers from this stamp set onto one of Tim Holtz wooden pieces and once again coated with a layer of Vintage Beeswax to age a little further.
I added a rusty nail and some splatters of black paint to add a further layer of interest. I also added some machine stitching to the binding and added a few Art Stones for added dimension. I was delighted with how this piece turned out.
 This picture shows the detail on the back of the journal and the added stitching to the spine.
Thanks so much for stopping by. Tracy x x
This is the stamp used in my journal today and available from our stockists.


AALLandCreate Web Page
AALLandCreate Facebook Page
AALLandCreate Fanatics Facebook Page
AALLandCreate Boutique.

Monday, 1 October 2018

Don't Forget To Fly

Welcome today I have a little book for you decorated using my Butterfly stamp from AALLandCreate. You can find the stamp HERE.
I recently had a play day at my lovely friend Anne Redfern's house along with Rita and Annie and it was an absolutely fantastic day to just spend time with like-minded creatives. I started the covers of this book at Anne's house and then continued with the process once I arrived home. Eileen Hull's Passport Book is one of my favourite dies and has so many possibilites when combined with different mediums.
I painted my covers and also incorporated lots of texture to create a wonderfully tactile piece.
I also incorporated added texture, applying Texture Paste over Autour de Mwa's stencil #28 Broken Circle which you can find HERE.
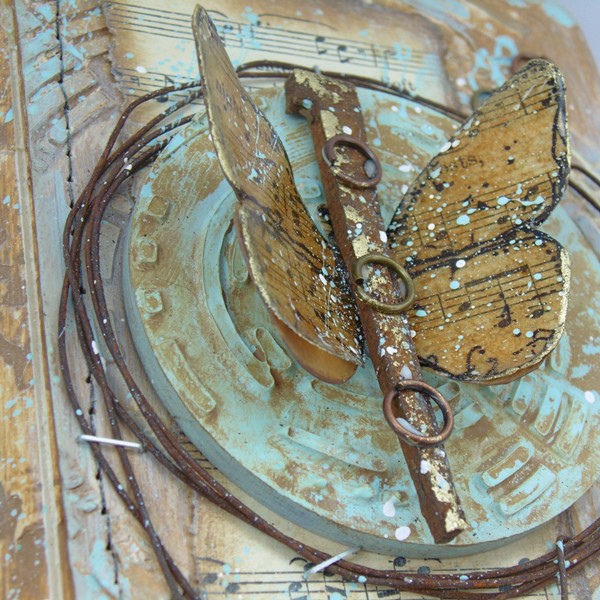
I stamped my butterfly image onto music paper and then applied Seth Apter's Baked Texture Vintage Beeswax over the wings, adding several layers for added texture. I also applied some delicate touches of gold with Pebeo Wax.
I also incorporated an ATC Coin to give further dimension along with some rusty tin wire and some jump rings added randomly to the background. The focal piece is backed onto a piece of torn music paper.

The products used in ths piece are shown below:

Thanks so much for stopping by. Tracy x x

AALLandCreate Web Page
AALLandCreate Facebook Page
AALLandCreate Fanatics Facebook Page
AALLandCreate Boutique.

Friday, 10 August 2018

Artsy Needle Book

Welcome to my weekly post for AALLandCreate. Today I am combining my A4 stamp and heart stamp with Eileen Hull's Needle Book Die.

You can find a list of our stockists for the AALLandCreate stamps HERE.
I love creating miniature pieces and Eileen's Needle Book die is perfect. I began by die cutting my piece from mountboard and then brayering paints onto my substrate, in this case Distress Paints Peeled Paint and Twisted Citron.

I used my A4 Layered Grunge stamp and my heart stamps for this piece and they worked beautifully together.
I created an accordion for the Needle Book and machine stitched around the outside edges for added extra texture.
I added lots of stamped layers including second generation stamping to my DREAM text so that it acted as a shadow in the background. I also added texture, applying texture paste through Autour de Mwa' stencil.
This is the stencil I used to add that much needed texture to the background.
I love using greens in my artwork, they are so fresh and uplifting. I also added numbers in the background stamped using my A4 Layered Grunge stamp set.
Book page hearts and delicate splatters of paint add further interrest to my design.
I also incorporated some delicate splatters of white paint.
From this picture you can just make out the second generation stamping in the background.
Finally the back of my needle book.

Thanks so much for stopping by. Tracy x x

AALLandCreate Web Page
AALLandCreate Facebook Page
AALLandCreate Fanatics Facebook Page
AALLandCreate Boutique.

Tuesday, 10 July 2018

Eileen Hull Book Club 2 / Clearsnap ColorBox Blends

Hi and welcome, today I am showcasing Eileen Hull's Book Club 2 dies along with Eileen's fantastic ColorBox Blends Inks. You can find Eileen's release HERE.

This week I am showcasing Eileen's Sizzix ScoreBoards XL Die - Book and Pages, Trinket Box and Frame along with the Sizzix ScoreBoards XL Die - Wrapped Journal. I wanted to showcase how these dies all work together beautifully when combined with Eileen's Inks.

The Clearsnap ColorBox Blends can be used on Fabric, Paper, Card, Wood, Clay etc. The inks are easy to hold with a simple to use applicator and the inks hold more than 10 x the ink of a traditional inkpad. They have a convenient sponge applicator to keep your hands clean and they blend beautifully.
As we are experiencing somewhat of a heat wave here in the UK I thought I would opt for a summer themed piece this time around.
Die cut the Wrapped Journal from mountboard.
Apply Texture Paste over a stencil, in this case I used a stencil designed by Autour de Mwa from AALLandCreate.
I applied texture across the whole frontage of the Journal and allowed to dry naturally.
I then applied a coat of Buff Paint by Dina Wakley to tone down the white of the mountboard and to give an aged feel to my piece.
I then wanted to age my piece a little more so I used Eileen's ColorBox Blends Inks, and Nutmeg was perfect for this process. I began by priming my ink, pressing the applicator onto my non-stick craft sheet to get the ink flowing into the sponge applicator.
I then lightly applied the colour over the texture. I love how the colour rests in the crevices of the Texture Paste.
I repeated this process for the whole Journal.
To remove some of those harsh lines I then blended the ink with a damp babywipe. I also added random Texture Paste to the inside of my Journal and repeated the same process and then dried the front and back with a Heat Tool.
I added some random stamping, again usng the ColorBox Blends along with my A4 Layered Grunge Stamp.
I was able to add random stamping around my Journal, adding yet more layers of interest.
Here you can see random numbers from my stamp set added to the background.
I then coloured a clay piece, a seahorse with the Bay ColorBlends Ink, applying the ink directly to the clay piece.
I sprized some of the ink with water and then painted the crevcies with the ink.
I now needed to add more layers of colour to give depth to my clay piece.
I opted for Bay, Beach and Leaf to add layers of colour and depth to my piece.
I took time to add layers of colour until I was happy with the depth of colour and then dried the ink with a Heat Tool.
I also added touches of the Bay ColorBox Blends to the outside of the Journal.
I added some drift wood pieces to the background and added a frame for added dimension (a gift from my friend Olga). The frame was also coloured with ColorBox Blend Inks.
I love all the layers and textures on this piece. I also incorporated some delicate splatters of paint for a further layer of interest along with some wire, wrapped randomly around the frame.
I incorporated some natural twine and added jump rings for added interest.
I also added a Seasonal ChitChat Sticker to the body of my seahorse and added twine to fasten the Journal.
Some further random stamping using my A4 Layered Grunge Stamp Set
I opted to add a shadow box to the inside of my Journal rather than create a traditional Journal. I used the box element from the ScoreBoards XL Die - Book and Pages, Trinket Box and Frame which makes a perfect shadow box for the inside of the Wrapped Journal.
I coloured the shadow box element with ColorBox Blends as before and also incorporated a vintage doily and some cheesecloth fabric for added texture. My seahorse sits on a wooden heart covered with vintage text book pages.
I added the word Dream to the inside of my Journal.
Mini shells also offer further texture to my design along with a circular piece of rusty tin wire.
A touch more stamping to the inside cover.
I love how both these dies worked so well together.
A touch more stamping here and there around the Journal and some shading to the edges completes my piece.
Thanks so much for stopping by. Tracy x x