Wednesday 29 September 2010

Spools Of Fun

It's time for another DT piece for The Stamp Attic and I was given some great products to play with..........
......the SPOOLS kit from the Collections Elements range, not on line yet but you can telephone Wendy on 01235 760821 if you would like to purchase any.  I took this picture so that you could see exactly what you get in the kit.  There is plenty in the kit to make quite a few spools as I cut my card lengths in half to create different sizes/thickness.
I have photographed the two spools together first so that you can see the difference in size, but then I have taken each one outside to give you better detailed pictures.  The hardest thing about this DT piece was actually taking good photographs LOL.  These are so addictive, I promise you once you have made one you will want to make lots using differing themes.  My two spools are created using a STEAMPUNK theme and a general SEWING theme.
This is my STEAMPUNK spool which has been covered with the Graphic 45 Steampunk Debutante Collection paper.  Very simple to do, just roll the card up and use PVA to glue the pieces together and I found it easier to use a couple of elastic bands to hold the spool into place until it was fully dry.
I have added one of Tim's watch faces to the top of my spool and I have die cut some Gadget Gears using Tim's Alterations die.  I have hung some gears from my spool, simply attaching with jump rings.
I have added a heart, using Tim's Heart Wings die which I have then embossed using the Cogs Cuttlebug folder.  The heart was painted with Claudine Hellmuth Traditional Tan paint and StazOn Timber Brown ink rubbed over the top with my finger, a small Idea-ology Sprocket was added to one corner.  I have also added the text STEAMPUNK using the new Sizzlits CHIP BLOCK alphabet die.
My second spool is a lot smaller than the first, again decorated with the Graphic 45 paper.  I have also added a small bodice which is also from the Collections Elements range, which I have coloured with DI Antique Linen and Brushed Corduroy.
The top and the base have also been decorated with the Graphic 45 paper, from the reverse side.  All the edges on both spools have been sanded to add to that aged feel.  I have added a button from my button box to the top, but the kit does come with plain buttons ready for you to decorate with co-ordinated papers.
To complete, I have added three buttons to the top and some thread around the centre.  I will be having another play with these spools, think I will try a Halloween one next.  All the products I have used in these pieces are available from THE STAMP ATTIC.  Until the next time.... Tracy xx

WOYWW 29th September

Morning all you WOYWW'ers, hope you are all well.  Time for another spot of nosing but if you are new to this then pop over to our esteemed leader, Julia HERE and you will find all the details you need.

This picture was taken on Tuesday afternoon as I did not plan to do any crafting after this as I have a pile of ironing calling me, well screaming at me actually.  Well my desk, as usual is pretty tidy, but you all know me by now and know that's just the way I am.  There is a couple of spools on my desk which are for my next DT piece for The Stamp Attic and will be posted after this, they were great fun to make.  I also have a few spare die cut gadget gears which I will use on another project at a later date, no wastage here LOL.  I also have the same two Christmas cards on my easels from a couple of weeks ago, still not managed to complete them, time just keeps disappearing on me.
Towards the left of my desk I have my new paint brush box which I managed to find in an antiques emprorium place and I love it, but I do need to find it a better home, in fact I am in the mood for a swap around in my craft room, I'm itching to re-organise, just need some more of that valued commoditiy....TIME.  Well I am hoping to visit a few more desks this week as I am giving myself some relax time today, well after the ironing that is.  Have a good day all,  Tracy xx

Monday 27 September 2010

Curiously Distressed

I would like to enter my next piece for the following challenges as time is in short supply yet again this week:-
Compendium Of Curiosities Challenge with Linda - Wrinkle Free Distress (page 33 of the book).
The Sunday Stamper with Hels - To use BLACK in your art.
Simon Says Stamp and Show with Linda and the team - Show Your Distress and Sanded Project
The Stampman Challenge Blog - Altered and a fantastic Blog Hop too, simply click on The Challenge Blog to be transported over there.
Lots To Do Challenge - Alter It.
It is my Nephew's 16th Birthday in a couple of weeks so I thought I would alter a skull and make an alternative Birthday card for a change.
1) Paint the skull with a couple of coats of Gesso and allow to dry.  Once dry add texture paste to the top.
2) Paint with yellow ochre acrylic paint and add highlights of lavender, using only a little paint.
3) With Tim's swirl mask in place, sponge black ink on top of the mask and remove, repeat this process around the skull.
4) Add stamped text randomly using DI dusty concord.
5) Use background stamp, Punk Plaid and stamp randomly around the skull using DI dusty concord.
6) Sponge black around the eyes, mouth and nose and add some washers to add to that grungy feel.
7) Sand the edges of the skull with sandpaper.
8) Stamp the heart with wings onto white card using dusty concord ink and sponge with Adirondack butterscotch ink and adhere to the top of the skull.
9) Cut a piece of mountboard or cardboard slightly bigger than the skull.  Cover the board with paper from Tim's Lost and Found Paper Stash.  Sand the edges of the card.
10) Using Tim's Haunted Mansion set of stamps, stamp the Witch Hazel label onto card, cut out, sand the edges and adhere.  I also stamped one onto tissue paper and added that to the bottom of my board.
11) Stamp small skulls around the outer edges of the board.
12) Stamp the cages (Invoke Arts) onto Lost and Found card, cut out and adhere.  Add skull to one and Birthday to the other.  Stamp bird from the Haunted Mansion set onto card, cut out and add to the cage.  Add a couple of black hearts to complete.
13) I bet you were wondering where my Wrinkle Free Distress technique was..... look below.
On the reverse of this piece I have added a tag, decorated using the Wrinkle Free Distress technique, stamped images and embellishments.

Have a good day,  Tracy xx

Friday 24 September 2010

A MIXED BAG.....

I have a bit of a mixed bag for you tonight, first off being The Play Date Cafe Challenge, and again we have a fantastic inspiration photo to work from......
..... I really like these colours in the picture but I don't think I could have my kitchen the same, the silver is a little clinical for me, I like the warmth of wood but I have enjoyed playing around with the colours.
I have used the Paperbag Studios Doodles and Daters sheet and added HOME IS WHERE THE HEART IS using random letters.
For my second card I have inked the background with DI Shabby Shutters and stamped the text with StazOn Ultramarine.  I have simply punched out three squares from white card, stamped the Iris and sponged the edges with DI and completed with two metal corners and a sentiment.
My third card is another simple contribution.  I have used a Crafters Workshop template and sprayed with Altered Originals Lime Spray and Crafty Notions Blueberry Spray and then removed the template.  I have used a shadow stamp inked with DI Shabby Shutters and stamped the Iris with StazOn Ultramarine.  To complete, I have added a butterfly, sentiment and co-ordinated buttons.

As I said earlier this is a mixed bag so I would also like to add my tag for the Sunday Stamper Challenge where Hels has chosen the theme of MOVIES.
I have used Tim's Lost and Found Paper Stash for my tag, I would have really struggled without this as I don't have many stamps that could be associated with Movies, I did however have one..... The Admit One Ticket from Tim's 100th Collection which I stamped onto a sheet from the paper stash.

Have a good evening everyone, Tracy xx

Thursday 23 September 2010

Vintage Shrooms & Blowing My Own Trumpet

Over on The Stampotique Designers Challenge Blog we are challenged to create something VINTAGE.  Must admit I did struggle with this one, but then that's what challenges are all about, challenging us to work outside our comfort zone.
I decided to work with Jo Capper-Sandon's Shroom this week, I absolutely love this image and always enjoy working with it and Mushrooms always look VINTAGE right LOL.
1) Cut a piece of cream card approx. 4.5" square to create a card blank.
2) Stamp the mushroom onto scrap paper and cut out.  This will be for masking purposes.
3) Cut a piece of kraft card apporx. 4" square.  Stamp the first mushroom and then take the mask and place over the top of the image and stamp the other mushrooms into place.
4) Matt the kraft card onto a remnant of fabric and fray the edges.  Sew both pieces together, add pieces of text from a an old gardening book and hand stitch one of the mushroom heads with brown cotton.
5) Stamp the mushroom onto shrink plastic, cut out and use your heat tool to shrink.  Add to one of the mushrooms with a brad.  Add the entire piece to the card blank.
6) Stamp a mushroom head onto the text of an old gardening book, cut out and add to the top of one of the mushrooms.  Paint the mushroom heads with DI brushed corduroy.
7) Using a Dymo machine add "MUSHROOMS" text to the card coloured with DI brushed corduroy.  Add a sentiment to complete.

I also thought I would take this opportunity to BLOW MY OWN TRUMPET as the saying goes....... I am absolutely THRILLED to have been published in Stampers' Sampler Magazine and even more chuffed the fact that I have made the FRONT COVER, Yippeeeeeeeeeeeeeeeeee!!!!!!  This has made my week and I was ready to burst so had to share it with someone LOL, hope you don't mind.  If you would like to purchase a copy they are available from THE STAMP ATTIC here in the UK.
Thanks for popping by, enjoy your Thursday, Tracy xx

Wednesday 22 September 2010

Christmas GRUNGE

Morning all, I have created another Christmas piece for today's posting, the idea being that if I try and produce all my Christmas cards over the next two months I can have December free to do whatever I want...... well that's the plan, we will see if it comes to fruition.
I am entering this piece for The Compendium of Curiosities Challenge with Linda, who has set the challenge this week of Alcohol Ink Agate on Grunge.  I can't believe it is week 15 of the challenge already but I am loving this challenge, THANKS Linda.  If you would like to join Linda and the rest of us then click HERE and you will be transported over to Linda's place for all the details.  I would also like to enter this for the Simon Says Stamp and Show challenge where the theme is SHOW YOUR GRUNGE.
I have drawn around a book page onto Grungepaper for the base piece and then applied the Alcohol Ink Agate technique to this piece shown on page 53 of the book.  The Alcohol Ink colours are Stonewashed, Sail Boat Blue, Cloudy Blue and Pearl mixative.   My snowman has been stamped with StazOn timber brown and I have added twigs for his hands and buttons to his body.  I have used the new Tim Holtz Rosette once again as I am loving using this and its so effective, and I have added white paint dabber to the top edges to add to that frosty feel.  Adding lots of snowflakes to the bottom and the addition of Christmas sentiments completes my piece.  Think this will be for my son Ryan, cross fingers he likes it.  Have a great Wednesday everyone, see you in Blogland, Tracy x x

Mushrooms on WOYWW

Morning all, it's Wednesday, another week, another WOYWW.  If you have never joined in with this phenomenon, pop over to Julia's place HERE for all the details.
Nothing much has changed on my desk this week, for two reasons really, 1) I have been working on magazine articles for Making Cards and 2) I have been working hard in the garden clearing things away ready for Winter.  The Christmas cards from last week are still in the same position, the only thing that has changed is the addition of the Compendium of Curiosities/Simon Says Stamp and Show challenge piece which I will post after this.    Talking of gardens, I just had to take this picture for you all:-
I could not resist................ don't you think these mushrooms look just like ornaments, you know the ceramic mushrooms you can get that when the wind blows they knock together and chime LOL.  The things I do now I have a blog, I am sure I am losing the plot LOL.  Have a fantastic Wednesday everyone, see you in blogland.  Tracy x x

Friday 17 September 2010

From My House To Yours

Afternoon everyone, its time for The Play Date Cafe Challenge again, the weeks are certainly flying by in my household.  The colours this week have been chosen by Sarah Anderson and I really love that house and the large cactus and white picket fence.  However, I did struggle to find the energy and motivation to make something with these colours.  It was my daughter's birthday yesterday and she wore me out LOL. 
I decided to use a Maya Road accordion this week which I have decorated with stamps, embellishements, ribbons and sentiments.
The accordion has been covered with BoBunny paper throughout.  One of the houses has been embossed with snowflakes using an embossing folder and I have sanded the snowflakes to give a distressed look, in fact I have sanded the edges of every page to give that distress feel throughout.  I stamped Christmas text onto white card using an old PSX stamp and then punched out small squares from this text for the windows.  Each window has been sponged with DI ink tumbled glass and fired brick added to the edges of each one.  The doors have had the same treatment.  I have used the new Tim Holtz die alphabet called CHIP BLOCK to add the numbers to each door, cut from red Core'dinations card stock.  I have also used the new Tim Holtz Paper Rosette die too and I absolutely love it, so effective and I have added 25 to the centre.
I have lay the accordion flat so that you can see the detail.  I have also used the new Paperbag Studios Doodles & Daters stamp sheet for some of the stamping and in fact Paperbag Studios are sponsoring The Play Date Cafe Challenge this week which is fabulous.  The hearts, doors, roof edging and flower are the items I have used from the set.  The heart has been stamped onto red Core'dinations card and had Glossy Accents applied.  I have also added Maya Road branches and bird which have been coloured with DI ink tumbled glass with highlights of Adirondack Snow Cap paint dabber added to give that Brrrrrrr feel for Winter.  I have sponged through sequin waste in some areas with  Snow Cap paint dabber and added Co-ordinated ribbons and a few snowflakes to complete this side.
This is the reverse of the accordion.  I have added FROM OUR HOUSE TO YOURS (as this will probably be sent to my Sister-in-Law for Christmas).
I would also like to enter this piece for The Stampman Challenge Blog where the theme this time around is DISTRESS.
Thanks for popping by, I'm off to relax a little and pop over to The Stampman Challenge Blog and The Play Date Cafe Challenge to check out some wonderful pieces of art, have a good afternoon, Tracy x x

Wednesday 15 September 2010

Seasonal Masking

I thought I would make something for my husband this time and make a start on my family Christmas cards/art.  I am enterering this piece for The Compendium Of Curiosities Challenge over at Linda's place, where the theme this week (Challenge 14) is MASKS BASICS (page 58 of the book).   I would also like to enter this for The Sunday Stamper Challenge with Hels and the challenge this week is BLUE, RED or BLUE and RED together.  My piece is obviously very RED!
I used a bare chipboard piece from an album which is from Papermania.
  1. Paint the bare chipboard piece with Gesso.
  2. Once dry paint with Distress Crackle Paint Tea Dye.
  3. Using Tim Holtz Ransom Alphabet masks place Noel onto the chipboard piece.  Sponge over the entire piece with DI ink fired brick, working into all the crackles.  Remove mask.
  4. Apply Adirondack Gold Paint Dabber to the edges of the chipboard and add a Christmas brad.
  5. Die cut Heart Wings from Grungepaper.  Sponge the heart pieces with DI ink fired brick.  Apply a generous layer of Rock Candy Crackle Paint, I applied this in a random fashion so that some areas were patchy to add to that grungy feel.
  6. Add eyelets to one of the hearts and sponge with a little StazOn timber brown to tone the colour down a little.  Add a swivel clasp and a Philosophy tag and adhere the pieces to the chipboard.  Add a memo pin with the addition of the Christmas ticket from the Odds and Ends stamp set from Tim.
  7. To complete, add 3 rusty snowflakes and a key to each heart.

I am quite pleased with how this turned out and that is one less piece to make for Christmas LOL.  Have a great day all, see you soon, Tracy xx

WOYWW 15th September

Morning all, it's WOYWW, time to nose around at everyone's desk on a Wednesday.  If you are new to this phenomenon, pop over to Julia's place HERE and you will be transported in a jiffy to her place for all the details.
I took this picture at half six this morning so the light was not too good.  Well on my desk this morning is my challenge piece which will be posted next and work in progress for my next project.  I have a couple of Christmas cards on my desk, one of which is not quite finished.  I also have a couple of purchases, one being a Tim Holtz set from his 100th collection and a couple of other stamp sets that I could not resisit LOL.  I'm not very good on the resisting to purchase front I'm afraid, think its because I have a nice empty cupboard to fill LOL.
Just to the left of my work area I have another shelf unit, with yet more of my stamps oh and the little black bag has Tim's Idea-ology stored in there.  I do have some card stored in the top but that will be moved for my beloved stamp storage.  Well I am off to have a nose around at everyone's desk with a brew and then I need to sort out presents for my daughter Laura who is 10 tomorrow (going on 40) I might add LOL.  Have a wonderful Wednesday all,  Tracy xx

Sunday 12 September 2010

Stampotique Designers Challenge

The Stampotique Designers Challenge this time around is Birthday, so I thought I would take this opportunity to make my daughter a birthday card, she will be 10 on September 16th.  Laura is not really a girly girl so I thought the Stampotique stamps would fit in perfectly.
My card is 9" long and 6" wide and I have scored my card at 3" and 6" to give me my accordion.  The card is coloured with DI inks shabby shutters and dusty concord and spritzed with a little water.  I have sponged through sequin waste with black ink and added a row of triangles to the top which I simply cut from some old K & Co paper.  My images are all stamped with StazOn black ink. 
This is the other side of the accordion.  I have added some old safety pins and skull charms from a cheap necklace I purchased some time ago. 
The text has been printed on my computer and a few daisies added for a little girly touch, but not too much LOL.
I have also added some skull rub-ons to give it more of a grungy feel. 
It's a good job Laura does not read my blog.  I even had to make this at midnight last night as it's the only time Laura is not following me around the house asking what I'm doing.  I will also make a box for the card but that will have to wait for another day as I am really tired after spending the afternoon at a Pug party with my Pug pup.  We all had a great time playing Pug musical chairs, Pug pass the parcel, Pug races and Pug fancy dress LOL.  I will grow up one day, but not quite yet LOL.  Have a good evening everyone, Tracy x x

Thursday 9 September 2010

Play Date Cafe, Tag Tuesday & Stampotique Challenges

At The Play Date Cafe this week it's colour splash time, with a choice of 3 splashes of colour from the inspiration picture above.  So we are to use black & white as the base colours with..... PINK, COPPER or GOLD.  I really struggled this week for inspiration but I persevered to come up with some simple designs for the colour splash.
I decided to use this daisy stamp from Outlines which has fantastic detail and looks wonderful just simply stamped with black ink.  I punched a large heart from copper metal, stamped with a section from the stamp and adhered to the card to give my highlight of colour.
For my second card I simply punched out a medium square from copper metal and added this as my splash of colour.  This stamp is so detailed it does not need much else apart from a splash of colour.
For my third contribution I added a piece of black card embossed using one of Tim Holtz Texture Fades and simply cut the image up into strips to give me a different look to the card.  I have added a highlight of pink with small pink nail head stickers.

I would also like to enter these cards for the Stampotique Designers Challenge where the theme this week is a Birthday theme.

It is also time for Tag Tuesday and Louise has chosen the theme of Butterflies.
I used another of Tim Holtz Texture fades on my tag.  Coloured the tag with Adirondack butterscotch and cranberry ink.  I die cut the Cage from the Caged Bird die and added buttons to the bottom of the cage.  I have added a paper cast butterfly to the top of the cage and printed the In Flight text on the computer and coloured with inks.   Have a good evening, Tracy x x

Wednesday 8 September 2010

Free As A Bird

This is going to be rather a long post I'm afraid.  I have created a Christmas piece for the following challenges:-

The Sunday Stamper Challenge with Hels which is USE EVERYTHING.... that is your favourite.  In my piece this week I have used all my favourite things which are 1) birds, I love birds in art and in nature/garden 2) hearts, I collect hearts and love them in jewellery, around my house, in my art etc 3) rusty objects, I love rusty objects around the garden, in my home, I just love that old vintage, rusty type things 4) Christmas, just because I love Christmas.

The Compendium Of Curiosities Challenge with the lovely Linda and the challenge this week is Grungepaper Flowers. I just love flowers full stop so this challenge works in beautifully with my piece this week too.  Oh and there are some fantastic prizes on offer this week, really yummy and I have timed my post just at the right time to win, well that's what I am telling myself anyway, you have to think positive LOL.

The Simon Says Stamp and Show Challenge which this week is a special one with a blog hop and a fantastic prize on offer.  The theme this week is Holiday Fun and my theme is Christmas.

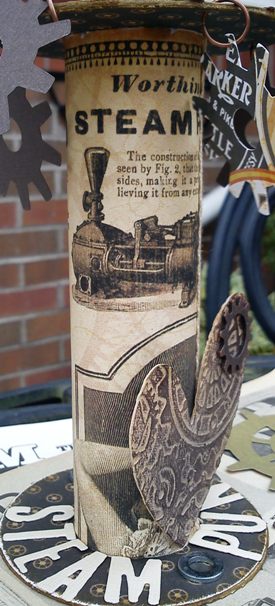
This is the first page of my book which I have put together with a book ring.  I have painted each page with two coats of Gesso and then painted with acrylic paints.  I have also spritzed some pages with gold Crafty Notions spray and sponged each page with a generous coating of DI ink fired brick.  All the edges of the book have been sponged with gold Adirondack acrylic paint dabber.  My first page also has a Grungepaper Flower added (see page 65 of the book) which I have die cut from an old hymn book.   The bird and cage have been cut from copper metal using Tim Holtz Caged Bird Alterations die.  I have stamped text on the actual book with StazOn timber brown ink using an old Hero Arts stamp Long Writing Background.  The birdcage has been sanded lightly to age it a little and the bird has had some text added.  I have also added some holly using a Martha Stewart punch.
This is the reverse of the first page.  I have painted a piece of red card with Gesso and stamped the owl using DI ink fired brick, added some hand stitching, Christmas sentiment and snowflakes.
Second page has been embossed using a Cuttlebug folder (snowflakes).  I have added a green border with several hearts punched from it along with two red hearts and Christmas sentiment.  A bird cage has been added (sanded as before) along with a Maya Road bird.  I have coloured the bird with DI ink fired brick and added Christmas text.  A Tattered Floral has been added to the top (cut from Grungepaper) and DREAM added to the bottom of the cage.
The reverse shows the reverse of the embossing I did at the front.  I have added a border to the right this time punched with holly using the Martha Stewart punch.  I have used the leftovers from cutting out the birdcage and placed the bird inside the cage (but he is not caged really as there are no bars), which I have coloured with DI ink fired brick and added some text.  A heart has been added for his wing and he is also holding a heart from his beak.  I have added a metal heart to the top of the cage which has been coloured with StazOn inks blazing red and olive green.
The third page shows a stitched bird cage with a rusty heart added along with A Season Of Miracles sentiment from Outlines.  I have die cut a snowflake from the top left of the page.  I have added a snowflake to the top of the cage and created a wreath using the Martha Stewart holly punch.
The reverse shows the hand stitched bird cage from the other side, text has been added to the centre along with a die cut bird.  I have added gold dabber to the bird.  A snowflake has been added which is from the cut I made at the top of this page along with a Christmas sentiment.  The top of the cage has the Heart Wings added from Tim Holtz Alterations die which I have cut from shrink plastic.
The fourth page has been created with all the leftovers I had and I have added Free As A Bird using my Dymo.
The reverse shows a piece of red card painted with Gesso and a Christmas Bird added using StazOn blazing red and olive green inks.  A Christmas ribbon has been attached to the bottom and secured with staples.  I have also punched a small snowflake from the top left of this piece and then added to the page.  I have used a heart I had leftover from a previous project (cut using Tim Holtz Heart Wings die), embossed with a Cuttlebug folder and coloured with DI ink fired brick adding highlights of gold dabber. The same treatment was added to the crown.
The fifth and final page has a cage and bird added, cut from metal and coloured with StazOn inks blazing red, olive green and timber brown.  I have hand stitched one side of the cage to the page, added a metal heart along with some holly and ribbon.
The reverse shows a red piece of card coloured with Gesso and a Christmas bird stamped with StazOn blazing red and olive green ink.  I have hand stitched this piece to a remnant of fabric and adhered to the page.  Holly and a Grungepaper Tattered Floral has been added to complete my book.
One completed book bound together using a book ring.  I have added remnants of red and green ribbon to the book ring to complete my Christmas project.  Hope you like and have not fallen asleep after such a long post LOL.  Have a great Wednesday everyone, Tracy x x