Showing posts with label Travel Trailer. Show all posts

Monday, 3 April 2017

Take The Scenic Route

Today I have step by steps for you combining Tim Holtz Distress Oxides with Eileen Hull's fabulous dies.
I created a card using Eileen Hull's Thinlits Travel Trailer combined with Eileen's Dots, Flowers and Rick-Rack set (I used the Rick-Rack embossing folder in this case).
I began by applying Vintage Photo Distress Oxide to a non-stick craft sheet and spritzing with water.
I cut a piece of white card 5" x 7" and then swiped the card through the beads of ink.
Spritz the card with a little more water.
Dry the ink with a heat tool.
Dip the card into any remaining beads of ink and then this time add bigger drops of water to the background.
Dry the card with a heat tool once again. Repeat these steps until you are happy with the coverage of ink.
Add Broken China Distress Oxide to a non-stick craft sheet and spritz with water.
Dab the card lightly onto the beads of ink.
Spritz the card lightly with water and then dry with a heat tool and repeat if necessary.
Blend Vintage Photo Distress Oxide Ink around the edges of the card.
Spritz the card lightly with water once you have finished blending ink around the edges.
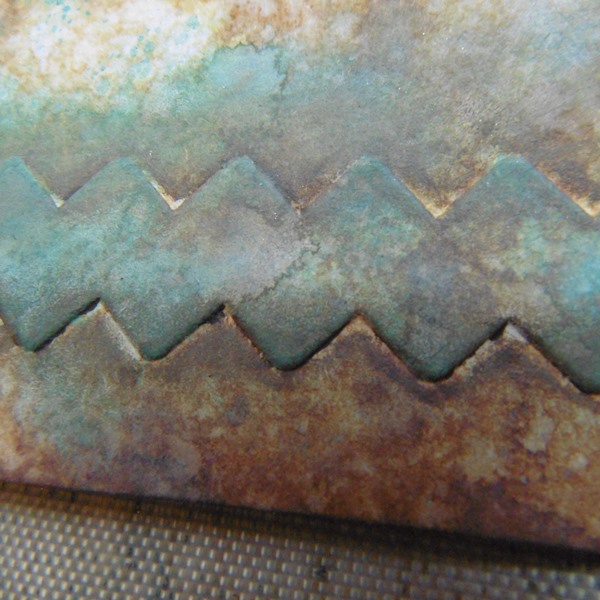
Dry the card thoroughly. From this picture you can see how the ink oxidises once you add water. You also have a chalky like matt finish.
This close up picture gives you the detail and finish achieved from the inks.
Take one of Eileen's Embossing Folders, in this case I used the Rick Rack border.
Sandwich the card between the Embossing Folder and run through a die cutting machine to emboss.
Highlight the embossed area by applying Broken China Distress Oxide to the raised areas, applying with an Ink Blending Tool.
Spritz the embossed border lightly with water and then dry with a heat tool.
Scribble Distress Crayon around the Rick Rack embossed area to add definition and smudge the crayon with a finger.
I love the shading the Crayon adds to the embossed area.
Die cut Eileen's Trailer from white card.
Colour the Trailer with the Distress Oxides, applying with an Ink Blending Tool or piece of Cut 'n' Dry Foam.
Spritz the ink with water and then dry with a heat tool.
Continue to colour the Trailer parts with Distress Oxides and then assemble.
Add some Tim Holtz Chatter Tape for added interest.
Take an old container and apply White Paint to the rim of the container, applying with a finger.
Press the container onto the background of the card.
The circle acts as a spotlight for the focal image.
Add delicate splatters of white paint to add a further layer of interest to the background.
This is the completed card which I matt onto a layer of card coloured with Broken China Distress Oxide Ink. I also added a Quote Chip for added interest.
I love how all the layers are visible in the design.
The Oxides add a total different feel to the background.
I also added a touch of shading around the Trailer to age a little further.
The touches of white really lift the design.
Thanks so much for stopping by, hope you enjoyed the step by steps. Tracy x x


Tuesday, 11 October 2016

And The Adventure Begins......

Time for our monthly post for Eileen Hull and this month the team are showcasing cards. I was inspired by Eileen's Paper Trail adventures for my card this month.
I was inspired by Eileen's own Trailer to create my card using Eileen's Travel Trailer Die.
I began by placing Tim Holtz Layering Stencil onto my card and applying DecoArt Media Crackle Paste over the stencil.
I love the dimension the Paste gives to the design. I allowed this layer to dry completely before proceeding with the next step.
I applied a small amount of 'A Bit Jaded' Infusions to the background and spritzed with water, allowed it to sit for a few moments and then dried with a heat tool.
I then die cut the Travel Trailer from white card.
I added touches of Distress Crayon to add further to the aged, grungy feel.
I painted my Travel Trailer with DecoArt Media Fluid Acrylics Cobalt Teal Hue, Quinacradone Gold, Burnt Umber and touches of Carbon Black. Before applying the paint I did add a few touches of Texture Sand with my finger to add further to the old aged feel of the Trailer.
I added dots of the same paint using the end of my paintbrush to give a further layer of interest.
I also added splatters of Burnt Umber Paint to the background and added cotton threads behind my Trailer for added texture.

Thanks so much for stopping by. Tracy x

Tuesday, 6 October 2015

Eileen Hull Art With Heart Challenge

This month the team are combining Graphic 45 Papers with the fabulous Eileen Hull dies and the challenge theme for our Art with Heart Challenge is October Hauntings and Holiday Calendar.
This month I was inspired by Eileen Hull's paper trail; she is visiting many places in her own Trailer and demonstrating to many shops all over the USA. I thought I would create my own Halloween Travel Trailer combined with the Book, Passport.
I began by die cutting the Passport Book from mountboard which I had covered with the Graphic 45 Rare Oddities Papers. The front cover has also had a niche cut from the centre using Tim Holtz Sized Arches and I added shading to all the edges with Ground Espresso Distress Ink.
I added a Prima mini magnifying glass to the skeleton's face on the inside of my aperture and created a box to fit at the back to create a niche that would house my skeleton's and clay bony  hand. The mini plastic skeletons and clay bony hand were painted with DecoArt Media Fluid Acrylics; first painting each piece with Titan Buff, drying with a heat tool and then adding a wash of Carbon Black and Quinacridone Gold mixed with water and once again drying with a heat tool. I also included a small Tim Holtz Heirloom rose which I again coloured with DecoArt Media Fluid Acrylics and added to one of the bony fingers. I die cut "Rare Oddities" from the Graphic 45 paper using a Tim Holtz Thinlits Label, again adding shading with Distress Ink around the edges. To add a touch more texture I machine stitched the front and back cover to the spine.
I added three sets of pages all decorated with Graphic 45 paper and all the edges shaded with Ground Espresso Distress Ink. I think Eileen's Passport Book would be perfect to add pictures to from your Halloween Celebrations that you could then look at year after year.
I added BOO to the top of my book using Alpha Parts along with a few white Remnant Rubs for added interest. I also nestled a die cut bat, which I cut from book pages and then used Fimo Liquid to do an image transfer of the text page. The Fimo Liquid dries clear when baked in the oven and gives a 3D like appearance.
The die cut Trailer has also been covered with Rare Oddities paper and I have added a metal strip across the trailer for added interest and die cut windows from the Trailer using Tim Holtz Mini Openings Set. I then added little wood strips to the windows to give a type of log cabinn feel and added skulls to the windows which were once again coloured with DecoArt Media Fluid Acrylics.
I added wood strips/twigs to the top of the trailer, once again to add to the log cabin type of feel and I also added three plastic skulls which I painted with DecoArt Media Fluid Acrylics. The outside areas of the trailer were painted with DecoArt Carbon Black Fluid Acrylic. I also added Label Letters to add "Halloween Trail" to the Trailer and then applied a coat of DecoArt Matte Medium to protect all the areas.
Hope you can all join in with the fun challenge this month.

http://www.eileenhull.com/


I would also like to enter this piece into the DecoArt Mixed Media Haunts Challenge running through until the end of October. The DecoArt Design Team have produced wonderful pieces to inspire us during October.

Thanks so much for stopping by. Tracy x x