Showing posts with label House/Pocket Stitchlits Die. Show all posts

Tuesday, 6 March 2018

Organising With Eileen Hull Dies

Hi and welcome, today I have a post showcasing Eileen Hull's dies and their endless possibilities for storage ideas.
I have used Eileen's Sizzix ScoreBoards XL Card Box, Planner Storage and Organiser Die for today's project. This die is absolutely fantastic for storage and you can adhere more than one together to create storage for your craft items and when made they are incredibly strong. I have use Eileen's House Pocket Thinlits Die to create a coordinating card to go inside, making a perfect gift idea for a fellow crafter.
I die cut the ScoreBoards XL die from mountboard and then applied Dina Wakley's Cheddar Acrylic paint inside and out, applying the paint with a piece of Cut 'n' Dry Foam and I then dried the paint with a heat tool.
I die cut the front section once again and then die cut flowers from the cut out piece using Eileen's Stitchy Flowers and Leaf Thinlits Die.
I then lightly brayered Dina Wakley's Turquoise Acrylic Paint over the top of the die cut piece. I love how the paint highlights the embossed areas outside the flowers from my die cutting process.
I then added very light touches of Fuchsia Acrylic Paint.
I added light touches of Turquoise Acrylic Paint to my storage piece and then adhered the tabs together to create my Card Storage Box.
I adhered my die cut top layer to the Storage Box and added flowers into the die cut flower apertures. This die also comes with the label to add to the side of the Storage Box, however, on this occassion I added mine to the front for added decoration. I stamped butterflies onto painted card using my stamps from AALLand Create, which you can find HERE.
I die cut a coordinating card from white card using Eileen's House Pocket Die and again coloured with the same paints. I added stamped images using my stamps from AALLandCreate.


These are my stamps that I used combined with Eileen's dies.
I added two butterflies to the top and machine stitched through the centre of the butterflies. I left the cotton threads to add more texture to my design.
I added a few delicate splatters of White Acrylic Paint to add a further layer of interest.
The House Pocket die cut fits perfectly into my Storage Box.

Thanks so much for stopping by. If you pop along to Eileen's Blog you will see more inspiring projects from my fellow DT members.
Tracy x x 


Sunday, 13 August 2017

Sizzix Maker Challenge with Eileen Hull Heartfelt House Pocket Die

Over the next few weeks Sizzix have a Maker Challenge and this time around they are showcasing Eileen Hull's House Pocket Die. Pop by Eileen's Blog HERE for all the details. Eileen also did a fabulous Facebook Live which you can also view on Eileen's post.
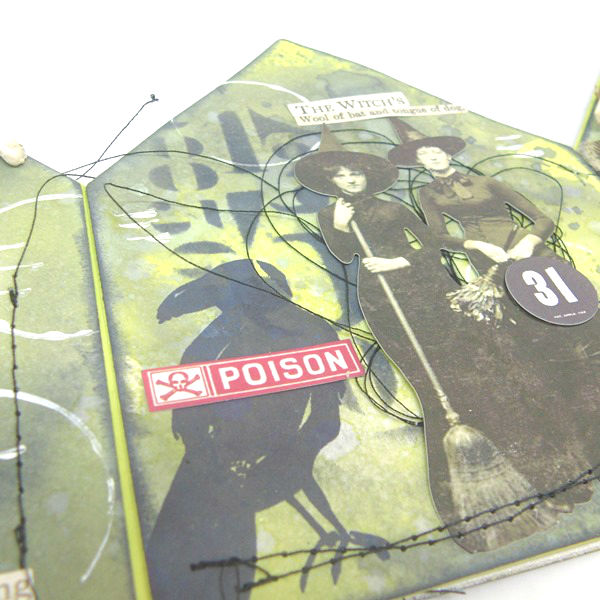
This is what I created with Eileen's House Pocket Die, an accordion decorated both sides using Distress Oxides using the steps below.
I die cut a the House Pocket from 300gsm white card and then drew around the shape to create my accordion.
I die cut separate pieces to decorate and add to the accordion.
I added Twisted Citron and a touch of Black Soot Distress Oxides to a non-stick craft sheet and spritzed with water.
I then dabbed my die cut piece into the beads of ink.
Spritzed the card once more and then dried the ink with a heat tool.
I then added more Twisted Citron Oxide Ink to the non-stick craft sheet, spritzed with water and dabbed the card once again into the ink. With Oxides I like to build up many layers of the colour to get the effect I am looking for. The Oxides are a Die/Pigment fusion and therefore you can build up the layers without creating mud.
I then spent lots of time adding layers to each die cut piece. I also added shading around the edges of each die cut piece blending the Oxides around the edges and then drying the ink with a heat tool. I stamped the Raven on this panel and also created a mask so that I could add further stamping.
I then used the background stamp from the On The Farm stamp set and added some background stamping with Black Archival Ink.
I love spending time adding layers to my pieces, that is the fun part for me.
I added one of the Ancestors to the Raven and gave him a hat and also included a Transparent Tile and further Idea-ology along with a skull bead. I love adding random stitching as I think it adds wonderful texture and a further layer of interest to the design.
I continued adding layered details to each panel and also included some stencilled layers too.
I love this Ancestor and I added some Tape to ground him along with some wooden numbers and skull bead.
This is the detail on the reverse of the accordion. I also added some white highlights and markings.
More random stitching and some layers stapled into place using the Tiny Attacher. I also used the new web stamp behind the Raven on this panel.
Further random machine stitching for texture, leaving some of the loose threads for added interest.
I love these Cabinet Cards, I gave this lady her own Witch Hat and again added machine stitching and layered elements.
Thanks so much for stopping by, I hope you get the chance to join in with this fabulous challenge. There are some fabulous prizes on offer.

If you would like to join in the challenge, click HERE.

Tracy x x

Tuesday, 21 March 2017

Eileen Hull New Release - Heartfelt Collection

Wecome back to my third post showcasing Eileen Hull's new release showcased at Creativation (CHA) 2017. You can view the whole range HERE.
This week I am showcasing two of Eileen's dies the first one being the Scoreboards XL Die - Basket.  I opted for a piece full of colour this week. If you would like to see my previous posts for Eileen's New Release you can find week 1 - Mixed Media Journal  (HERE) and week 2 Masculine Journal (HERE).
I die cut the basket from mountboard and decided on my paint colours for the background.
I began to add my layers of colour, applying with my finger.
I dried each layer of paint so that I did not get any muddying of colours.
I then continued to add layers of colour with my fingers. Do not think about this too much, simply add the colour randomly to the background and then dry with a heat tool.
I continued to add the layers of paint and I also added some circles using an old lid. Applying the paint to the lid and then pressing the lid onto the background and then drying with a heat tool.
I added some scratchy lines with an old credit card and black paint.
A touch of paint has been added through Tim Holtz Chevron Layering Stencil for further interest.
Die cut a heart from white card and then draw around the hearts onto the background using a white pen.
I then applied Broken China Distress Paint around the outside of the hearts. Add a couple of layers of paint and then dry with a heat tool.
I added Hitch Fasteners to attach the handles to the basket.
I also added a Tim Holtz Sticker and delicate splatters of white paint for further interest.
I added a stitched 'SUNSHINE' to my basket full of sunshine (again another new release from Eileen).
I love the touches of black that randomly appear in the hearts. I also added a touch more scribbly lines around the hearts using a white pen.
The next release is Eileen's House/Pocket Stitchlts Die. This die could quite easily be used as a house or a pocket. I die cut two of my houses from corrugated card to give wonderful texture to my pieces.
I began by brayering Squeezed Lemonade over the corrugated card, using only a light touch. I then brayered a layer of Picked Raspberry Distress Paint over the card and dried with  my heat tool.
I took an image of me when I was a child and then did an image transfer onto the background using DecoArt Matte Medium. I love the ghose like image which I think works perfectly on the design.
I added a second image transfer onto my second house.
I used a PaperArtsy stencil to add LIFE to the top of my house, adding white highlights with a white pen.
I scribbled distress pen onto a non-stick craft sheet and then added a shadow around my images with a waterbrush.
Delicate splatters of paint and painty circles have also been added.
I also added Remnant Rubs for further interest and stamped my sentiments with Black Archival Ink. I also applied Vintage Photo Distress Ink to the edges of each house.
Thanks so much for stopping by. Tracy x x