Showing posts with label Fernli Designs. Show all posts

Friday, 2 September 2016

A Vintage Journey - Create Inside A Frame

Welcome to another new month with A Vintage Journey, our challenge this month is to "Create Inside A Frame" and our host this month is the lovely Julia.

This is what Julia had to say about the challenge:

"For this month’s challenge we would like you to create something inside a frame. Whatever you use show us how you have incorporated a frame on your vintage; shabby; mixed-media; art journalling; industrial or steampunk project".

I have just received the new releases from IndigoBlu and this seemed the perfect opportunity to combine those products with this month's challenge along with incorporating Fernli Designs laser cut tag.

I began by applying the Super Thick Slap It On over the laser cut tag, applying with a palette knife, using the Hearts Layering Stencil.
I then removed the stencil and dried with my heat tool.
I stamped the owl from the IndigoBlu "Owl Always Love You" stamp using Black Archival Ink and then placed my frame over the design and marked exactly what area I wanted to show within my frame using a pencil mark.
I cut around the stamped image to fit my frame.
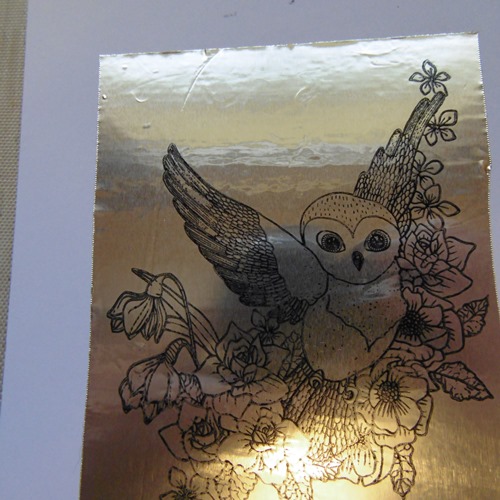
I stamped the owl once again but this time onto Metal Foil Tape (sorry about the glare), using StazOn Black Ink.
I painted the tag from Fernli Designs with Black Gesso, applying one good thick layer over the stencilled hearts.
I applied the Gesso to both the tag and the small frame and dried with a heat tool.
The owl was cut from the Metal Foil Tape.
I applied FlitterGlu to a piece of  Phat Foam to create a sticky inkpad, working the glue into the foam with a palette knife.
I dabbed the Phat Foam glue pad onto the frame to apply sticky glue randomly around the frame.
I repeated the same process around the tag.
I then applied Luscious Pigment Powders in Blue and Gold, applying with a soft brush.
I continued to blend the Luscious Pigment Powders across the tag until I was happy with the blend of colours and then spritzed lightly with water to activate the binding agent which then makes them permanent. I repeated the same process for the frame.
To add a touch more interest to the frame I also added Megaflakes Chocolate Box, addig randomly around the edges of the tag.  I repeated the same process to the small frame.
I added a touch of colour to the flowers shown inside the frame with pencil crayons.
I also added twine to the back of the frame for added texture and added delicate splatters of red paint for a contrast.
I stamped the flowers from the IndigoBlu stamp onto Metal Foil and then cut them out and added to the frame and tag for further interest. I also included the fabulous sentiment from the same stamp. This would make a perfect alternative design for a Valentines.
I added metal wire around my focal image to add a touch more texture to the design.
Our sponsor this month is DecoArt; our randomly chosen winner is in for a real treat!

Thanks so much for stopping by. Tracy x x


Friday, 26 August 2016

Believe

Today I am back with another piece for Fernli Designs using their fabulous laser cut crafting supplies.
I love these Fairy House Tall, fantastic for altering and I opted for a seasonal make this time around.
I began by applying a coat of Gesso drying with my heat tool and then adding a coat of DecoArt Media Fluid Acrylic Cadmium Red Hue again drying with my heat tool. Next I applied Texture Paste over Tim Holtz Layering Stencil and allowed to dry. I then applied a coat of DecoArt Media Crackle Paint which I did not apply too thickly as I wanted a thiner more subtle crackle. If you want good thick huge cracks simply apply a thicker coat.
I love the crackle and how the red is clearly visible below and I love the added texture and dimension from the stars, subtle but I like it.
Twigs have been added to the roof for a real rustic feel and I painted the edges of the roof edges with the same red paint.
I added a small house inside, adding a santa image from Artistic Outpost Snowy Woods stamp set. I added twigs around the edges of the house again to add to the rustic feel of my piece and to add further texture and dimension to my design.
Three Stars have been added, again from Fernli Designs, painted red and stamped with the month of December. I added a circle of rusty tin wire along with a rusty tin star.
Thanks to Tina and Lou for inviting me, I have loved altering this house which could be used in so many ways; a fairy house, bird house, forest house, halloween house; there are endless ideas.

Thanks so much for stopping by. Tracy x x 

Fernli Designs Shop
Fernli Designs Facebook

Monday, 15 August 2016

Be Yourself!

I am thrilled to have been invited back to be a Guest Designer for Fernli Designs, who supply a fantastic quality range of laser cut designs.

For my first piece I chose to use one of the fabulous Tags which I combined with Tim Holtz products.
I began by applying one coat of Gesso to the tag to give a good base for my next layer of paints.
I applied Evergreen Bough and Mowed Lawn Distress Inks to a non-stick craft sheet and spritzed with water.
I mopped up the beads of paint with the tag; these tags are so sturdy and will take anything that you throw at them!
I continued to mop up the paint from the sheet; drying each layer between applications. I love the blend of colours.
I placed the Tim Holtz mini stencil over my tag and then applied Gesso lightly over the numbers using a piece of Cut 'n' Dry Foam.
The white really pops against the background and adds a further layer of interest to my design.
For my next layer I applied Black Soot Distress Ink to the reverse of the number stencil and then spritzed with water.
I then placed the stencil ink side down and then dabbed with a piece of kitchen towel and then dried with my heat tool.
I had a second background prepared using the Gesso Resist technique, colouring the background with Distress Inks. I stamped my focal image onto the background and then cut out the image.
I shaded around my focal image with a black pencil and then added some scribbly lines with a white pen.
I included a number embellishment from Tim's Idea-ology range to echo the numbers in my background.
To spotlight the focal image further, I added a painted circle around the image using an old lid.
For further interest I also included splatters of red and white paint to the background and repeated the sentiment from the focal image, adding to the top of my tag. I also applied Black Soot Distress Ink to the edges of my tag for definition.
Thanks so much for stopping by. I will be back soon with a second piece for Fernli Designs.

Tracy x x 

Fernli Designs Shop
Fernli Designs Facebook

Monday, 8 June 2015

Embrace Possibilities

Today I have my third Guest Design piece for Fernli Designs.
I have used the Fernli Extra Large Tag which I have decorated with DecoArt Media products. I coloured the background with DecoArt Media Mists Primary Magenta, Orange and Yellow and then used Andy Skinner's Mega Crackle Technique.
The focal piece is a Sandra Evertson Prima piece from her Archival Cast Embellishment range which I coated with DecoArt Crackle Paint, allowed to dry and then painted with Orange and Yellow Media Mists. I then painted over the top with a dirty wash and applied a coat of Ultra-Matte Varnish. I also stamped the text 'think' 'visualise' and 'create' using Visible Image stamps. I then added the hand to the top of my heart, added DecoArt Texture Sand around the edges and once again painted with Crackle Paint and coloured with Orange and Yellow Mists and then applied a dirty wash and finally applied a coat of Ultra-Matte Varnish. I added a Remnant Rub to the top of the hand.
I stamped the word INSPIRE from Visible Image to my design using Black Archival Ink and from this picture you can see the texture from the wonderful crackle and the rusty elements.
I added stamped circles using Finnabair' stamps and added rusty wire circles to each stamped piece for added texture and dimension.
I addd a further three stamped circles to the bottom of the tag again adding rusty wire to each.
Behind my focal piece I added a piece of Chicken Wire from Fernli which I rusted by applying a coat of Quinacridone Gold, then applying Carbon Black Antiquing Cream, and rubbing away some of the top coat with a baby wipe. I then applied a top coat of Ultra-Matte Varnish.
I stamped the word DREAM and 'embrace possibilities' to the bottom of the tag.
I added a circle of rusty wire around my focal image and also added some coils of rusty wire to the top.
I would like to add this to the Craft Stamper Make it Take it Challenge for June which this time around is all about TEXTURE and my piece is extremely tactile!

Thanks so much for stopping by. Tracy x x