Showing posts with label Christmas. Show all posts

Friday, 18 December 2020

Bird Collage

 Morning everyone, today I have a simple Christmas Card using my Pinecone stamp set #389.

I created this piece on a Facebook Live and you can catch the video on replay below:

I will add some close up shots below.

This is the inside of my card to coordinate perfectly with the front of the card.


Thanks so much for stopping by. Tracy x x


Sunday, 13 December 2015

A Vintage Journey - Secret Santa

Welcome, so glad you could pop by. Today myself and the team from A Vintage Journey are sharing with you the Secret Santa handmade gifts we gave and received.

Let me start by showing you the gift I received from the lovely Astrid.
I was so thrilled to receive a piece of Astrid's handmade artwork, it is gorgeous and so tactile and I have it on display as I type. Pop by Astrid's blog for all the wonderful detail, this really is a treasure. A huge thank you Astrid.

Now to the gift I created which was sent to the lovely Brenda Brown.
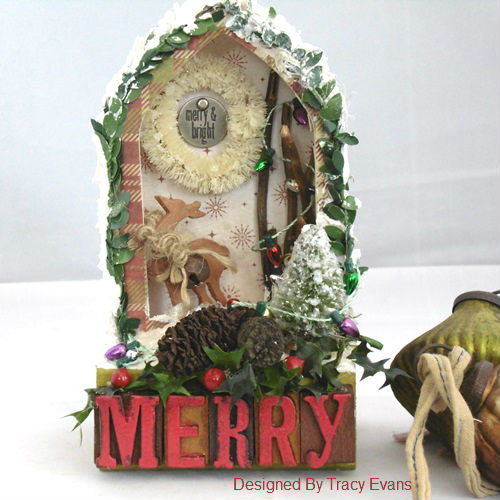
I wanted to create something that Brenda could bring out each year to display with her cards, something that was vintage and dimensional. My fellow team member from another Design Team Lisa inspired me to create this piece.
The arch shadow box is created using Tim Holtz Arch Frame die combined with Eileen Hull's 3D die, which enables you to make any die cut shape 3D. I then used the Sized Arches to create the front panel. I covered the die cut pieces with Tim Holtz Merriment and Yuletide Paper Stash. Once I had all my pieces stuck together I then added Texture Paste around the edges to give the appearance of snow and added Distress Stickles Dry Glitter Clear Rock Candy over the wet Texture Paste to give some shimmer. To add further to the festive feel I added some foliage around the outside edges using Tim Holtz Boxwood Twine.
I die cut the Mini Reindeer from white card, die cutting five layers and adhering them together to give me a dimensional Reindeer that would stand. I then painted the die cut piece with Vintage Photo Distress Paint, adding touches of Ground Espresso Distress Ink around the edges for shading. I added natural twine and a rusty bell to the reindeer for added interest.
I added a Mini Wreath and a Token embellishment to the centre, adding Dry Glitter to the Wreath for added sparkle.
I added some twigs from my garden to add a natural element to the design along with some mini Christmas lights.
Natural mini pinecones, faux ivy and berries have also been included.
To complete I added some Holiday Letterpress which I coloured with Wendy Vecchi  Red Geranium Embossing Powder.
Pop by A Vintage Journey Blog to see all the wonderful handmade gifts we shared.

Tracy x x


Thursday, 3 December 2015

Christmas Robin

I have a Christmas card this week for my weekly post for Artistic Outpost.
I created a mixed media backdrop for the Robin from the Birds of a Feather stamp set.
I brayered a piece of white card with Broken China, Salty Ocean and Dusty Concord Distress Paints, applying the colour very lightly with the brayer so that some of the white areas are still visible.
I added some delicate stencilling using a layering stencil and Dusty Concord Distress Ink along with random circles of paint using lids from my products.
 I added a tree die cut from white card and added dimension to the Robin, stamping him twice with Black Archival Ink, cutting him out and adhering with hot glue.
I also added scratchy paint lines with an old credit card and Dusty Concord Distress Paint along with some delicate splatters of Picket Fence Distress Paint. I love how all the layers of paint are visible.

Thanks so much for stopping by. Tracy x x


Wednesday, 24 June 2015

Artistic Outpost Blog Hop

Welcome to the monthly Artistic Outpost Blog Hop. This month the Design Team are showcasing imagery from the Holiday Stamp Category.
I am showcasing the MIDWINTER stamp set this month, set against a brayered background. I placed one of Wendy Vecchi's Frames into the centre of my card and then brayered over the frame with Broken China followed by touches of Brushed Pewter Distress Paints. The Brushed Pewter adds a wonderful shimmer to the background. I then flicked touches of each paint to the background to give delicate splatters. I then removed the Frame which leaves an aperture for my focal imagery.
I placed the Star Layering Stencil into the centre of the aperture and applied Broken China Distress Ink over the stencil. I then stamped the stag with Potting Soil Archival Ink, placed  a mask over the first image and then stamped him once again. I also added the sentiment to the top of the aperture.
I added a decorative bow, coloured with Broken China Distress Ink and I added touches of SnowTex to add to the frosty/snowy feel of my piece. I also attached a token and addes some foliage which is covered with Distress Glitter adding yet more shimmer to the design.
This picture highlights the shimmer from the glitter a little more and you can also see the layers added to my design with the stamping and stencilling.
I die cut 25 from card and then coloured with Broken China Distress Ink and then added a coat of Clear Rock Candy. I also added touches of SnowTex to the aperture.
I also decorated the inside of my card, again with a brayered background and stamped the stag and sentiment once again.

My fellow team mates have created fabulous pieces of art to inspire you along your journey.


Thanks so much for stopping by. Tracy x x