Monday 31 December 2012

Mad Tea Party

It's New Year's Eve and we are breaking in 2013 with a crazy week of projects this week with Simon Says Stamp and Show.  Do you love a good tea party? Do you like to break the rules and do your own thing? Use wild colours and a bold design, take the theme literally as I did or break all the rules and send 2012 out with a bang and one Mad Tea Party. There are no rules!

Ring in the new year with a Mad Tea Party, raise your tea cup with me and enjoy the New Year with a refreshing cup of tea.
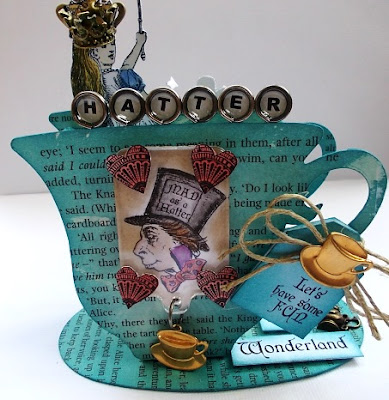
No Mad Tea Party is ever complete without a quirky tea cup, tea always tastes better in a tea cup. I always associate blue with Alice's dress and so my cup was coloured with broken china Distress Ink and covered with book pages from an Alice in Wonderland book. My Alice In Wonderland characters are courtesy of Crafy Secrets Greetings From Wonderland Stamps, coloured with blue, neutral, red/yellow Pitt Pastel Pencil. There is nothing finer than a refreshing cup of tea!
I began by covering a piece of thick card with book pages from an Alice in Wonderland book, adhering with Glue n' Seal.
I then die cut my 3D tea cup from the card using a Sizzix die and coloured with broken china Distress Ink to coordinate with Alice's dress. Fold as directed on the score lines and add tape to adhere. I used Wonder Tape as it is much stronger and holds everything in place securely.
Once I adhered everything into place it was then time for the fun part of decorating all the sides of my 3D tea cup.  I added Greetings From Wonderland from the Crafty Secrets stamps, stamping with black archival ink and colouring the edges with broken china Distress Ink. I added a tea cup charm for added interest and dimension.
I added the Mad Hatter to a fragment charm, colouring him with Pitt pencils and ageing the edges with vintage photo Distress Ink adding a red heart to each corner and a brass tea cup attached with a jump ring. I also added a brass tea cup and some natural twine to the handle along with a tag stamped with Let's have some FUN.
I added HATTER to memo pins adhered with Glossy Accents to add another little quirky touch to my tea cup.
Alice has been added to the inside of my cup and I also stamped her on to acetate to get a reverse image so that she appeared from both angles when my cup was turned around. She has been given a regal touch with a crown. Alice has also been added to the reverse side of my cup along with the White Rabbit and the sentiment I'm late, I'm Late, I'm Late.

For more great ideas please pop over to the Simon Says Stamp and Show blog and take a look at my fellow team members they have created some inspirational projects. Remember there is also the chance to win a $50 prize from Simon Says Stamp.  I always look forward to seeing your creations each week.

Thanks so much for stopping by and leaving a comment, much appreciated.  Enjoy your week. Tracy x x  

Products Used:

Crafty Secrets Greetings From Wonderland Stamps
Faber-Castell Pitt Pastel Pencils - Blue, Neutral, Red/Yellow
Distress Inks - Broken China, Vintage Photo 
Archival Inks - Black
Ranger Glue n' Seal
Wonder Tape
Blue Moon Teapots Meal Charms
Tim Holtz Idea-ology - Fragment Charms, Jump Rings, Memo Pins
Neutral Twine
Glossy Accents


 

Thursday 27 December 2012

CELEBRATE

I love the classy images on the Auld Lang Syne plate from Artistic Outpost.
I love classy black and white and I thought would be perfect to showcase the very glamorous image on my card.
I used an ornate background stamp for my background stamping with black archival ink, adding a little black ink to the edges.  I then stamped the glamorous image onto white card adding black corners cut using the ATC and corners die. I then added CELEBRATE to the side of my image and Happy New Year to each corner of my card. 
When I saw that she was holding a top hat I knew instantly that I wanted to use one of Wendy Vecchi's black top hat embellishments somewhere on my card.  I also added a little black and white twine to the back of my hat for added texture and interest.  I also added CELEBRATE to the top of my hat.

Thanks so much for stopping by. Tracy x x

Monday 24 December 2012

Seasonal ATC's

Both myself and Simon Says Stamp and Show would like to wish you all a Happy Christmas and health and happiness for the New Year.  We do not have a challenge this week just some fabulous arty inspiration for the holidays, our opportunity to thank you for your continued readership and support throughout the year.

I had great fun creating three seasonal ATC's,  showing that mini pieces of art can still be BIG on impact!
I love giving at Christmas and ATC's are the perfect way to send a little special piece of art to a crafting friend, something that will be truly appreciated and long lasting. This is one of three ATC's using many different techniques included the embossed background using the Snowflurries Texture Fade adding pitch black Paint Dabber to age a little. The dimensional focal images are created using Tim Holtz Holiday Collections stamps adding to Fragment Charms for added dimension. Embellishments include seasonal Chitchat stickers and a Christmas Muse Token attached with jump rings.
This is the ATC cut using the ATC and Corners die adding metal foil tape to the top and embossing with the snowflurries texture fade.
This is the same ATC now coloured with a black Paint Dabber to age a little.
I stamped one of the images from the Holiday Collections stamp set onto white card using black archival ink and coloured with vintage photo Distress Ink. I then added a fragment charm to two areas of the image to create my dimensional pieces.
These are the two fragments completed and ready to be assembled onto the ATC.
My second ATC uses more traditional seasonal colours along with white highlights to lift the image from my inky background.
To create the background press broken china and faded jeans Distress Ink onto a non-stick craft sheet.
Press the ink quite firmly onto the non-stick craft sheet and spritz with water until you have beads of ink.
Swipe the ATC through the beads of ink and then heat set.  It is important to heat set betwen each application of ink to prevent any mudding of colours.  There is plenty of ink left which I dabbed the ATC into to created blotches of colour.
This is the ATC using all the ink, now ready for a good spray of Perfect Pearls Mist blue patina.
To complete the inky background blend faded jeans ink around the edges for definition.
Stamp the focal image with manganese blue archival ink. Add white highlights and white dots around the edges of the ATC to lift the image a little from the background.  I have also added Chitchat stickers coloured with broken china ink and Melissa Frances pearls for added dimension.
I have added part of the reindeer image to a fragment charm for a little more interest and dimension to my ATC.
My third and final ATC uses more traditional colours
For this ATC I coverd my background with various tissue tapes and coloured with peeled paint and pine needles Distress Ink.
 
Cut a circle from white card (I used a Spellbinders die to cut my circle). Ink the stamp with black archival ink, place uppermost onto a flat surface and press the circle onto the stamp.
Add extra fine glitter to Santa's beard and hair.
Once the glitter is completely dry colour the image with fired brick Distress Ink for a real Christmas feel.
To colour Santa's face add a little fired brick Distress Marker to a non-stick craft sheet and use a fine water brush to colour.
Give santa rosy cheeks and a little colour to his face, hand and jacket.
Once I had finished colouring I then added gold Paint Dabber to the edges.
Stamp the image once again onto white card and cut out BELIEVE and colour as before, adding gold Paint Dabber to the edges.
I added four Melissa Frances pearls which I coloured with gold mixative to coordinate with all my stamping and embellishments and to add to the traditional feel of this ATC.
I also added corners, coloured with fired brick Distress Ink.
A wish Chitchat sticker completes my third ATC.
These are my three ATC's all together.

For more great ideas please pop over to the Simon Says Stamp and Show blog and take a look at my fellow
team mates creations.


Thanks so much for stopping by and leaving a comment, much appreciated.  Enjoy the HOLIDAY SEASON. Tracy x x 


Products Used:

Tim Holtz Stamps - Holiday Collections
Tim Holtz Snowflurries Texture Fade
Paint Dabber - Pitch Black, Gold
Fragments Charms
Seasonal Chitchat Stickers
Christmas Muse Tokens
Jump Rings
Tim Holtz Alterations - ATC & Corners Die
Metal Foil Tape
Archival Inks - Black, Manganese Blue
Distress Inks - Vintage Photo, Broken China, Faded Jeans, Fired Brick, Peeled Paint, Pine Needles
White Gel Pen
Non-Stick Craft Sheet
Perfect Pearl Mist Blue Patina
Heat Tool
Melissa Frances Pearls
Tissue Tape
Spellbinders Nestabilities Standard Circle Large
Extra Fine Glitter
Distress Markers
Fine Waterbrush
Alcohol Ink - Gold Mixative

Friday 21 December 2012

It Was The Crown That Set Her Apart From The Others

A vintage card using the If The Crown Fits stamp plate from Creative Expressions.

My silhouette image has been given a regal touch with the crown above her head. The background is a piece of white card coloured with brushed corduroy and walnut stain ink and then spritzed with water.
I have added two stamped keys either side of the silhouette and added to mini tags stamped with CROWN and SPARKLE both from the same stamp plate.
I thought the sentiment from Wendy Vecchi's Regal Art Stamp Set was perfect for my piece and has been stamped with black Archival Ink and coloured with Distress Inks adding black soot the the edges for definition. I have also added three dimensional flowers using the Spellbinder Spiral Blossom Three die, colouring with Distress Inks and added black soot to the edges. To add to the regal element I have added golden jewels to the crown.
To complete I have added a black key embellihsment and matt and layered my decorative piece onto kraft and black card stock.

I would also like to take this opportunity to wish all my followers and visitors a Happy Christmas and very Best Wishes for 2013.

Thanks so much for stopping by. Tracy x x

Wednesday 19 December 2012

RUSTIC CHRISTMAS

Another rustic Christmas card using the fabulous MIDWINTER plate from Artistic Outpost.
I have stamped the foliage in the background using black archival ink and then blended brushed corduroy and walnut stain over the top and spritzed with water and then matt and layered onto kraft and black card stock.
I've cut a bauble from cream card and stamped the cabin inside the bauble and coloured with brushed corduroy and walnut stain inks, again spritzing with water. I have also added a few pine cones around the outside edge.
I've cut a dimensional poinsettia from kraft card, stamping each layer with the Ephemera Background to add further interest and colouring with Distress Inks, adding a heart button threaded with twine to the centre.
I have added the sentiment to the bottom of my card, stamped onto cream card and coloured with Distress Inks. A wooden bauble echoes the larger focal image which has again been threaded with twine to add to the natural rustic feel of my card.  I have also added a festive Chitchat sticker to the top of my bauble.
Two further seasonal Chitchat stickers have been added to the top of my card along with twine and coordinated button to the top of my bauble.
To complete I have stamped the cabin once again on the inside of my card.

Thanks so much for stopping by and leaving a comment. Tracy x x

Monday 17 December 2012

A Seasonal Gift

Simon Says Stamp and Show's challenge this week is Gift-spiration. Whether making gifts, gift wrap, ornaments, home decor pieces or hand crafting your cards, the holiday season is upon us and we would love to see how you are inspired.

I decorated two seasonal candles perfect for decorating any home at Christmas.
I love to light candles at Christmas and they are a perfect inexpensive gift for a friend, simple to decorate and long lasting. The ornate reindeer from the Reindeer Flight stamp set decorates one of the candles and the background stamp from the Seasons Silhouettes stamp set is added to the smaller candle.  For added dimension I have included two wonderful decorative buttons from Cosmo Cricket. No gift is complete without a coordinating tag also showcased below.
I have included step by steps for the decorated candles this week as I thought you may like to see just how simple they are to decorate and very inexpensive too.  Stamp the image onto white tissue paper using StazOn ink, I used timber brown.
Cut around the image, you do not have to be exact here as you will not see the tissue once we have added to the candle.
Use a tiny amount of glue stick to adhere the image to the candle.
Take a piece of greaseproof paper, wrap around the candle, ensuring there is enough at the back of the candle for you to grab hold of whilst you heat with your heat tool. This will also ensure you do not burn your fingers during the next stage. Heat the candle with your heat tool, you will notice that the greaseproof changes slightly during this process as the image melts slightly into the paper. Do not over heat the candle.  Remove the greaseproof paper and your image will appear on the candle.
As you can see the image keeps all the detail, its fabulous.
This close up shot highlights the wonderful detail in the reindeer and no detail has been lost during the heating process.
I added BELIEVE to the bottom of my candle using the same process this time using one of the words from the background stamp in the Seasons Silhouettes stamp set. For a little more interest I have wrapped natural jute around the top of my candle adding a Cosmo Cricket Elements Cheer Button and a Christmas Muse Token attached with a jump ring.
Turning the candle slightly I have added snowflakes, from the Reindeer Flight stamp set.
The smaller candle was done in several steps adding each element individually and then heating with my heat tool.
Again I have added natural jute and a Cosmo Cricket Elements Cheer Button and a Christmas Muse token to decorate.

I have added different words all the way around my candle, I love the professional finish this simple technique gives.
These candles would make a perfect gift for one of my crafting friends!
I thought a coordinated tag would be perfect for this gift set. I have stamped the reindeer onto a tag cut using the Tag and Bookplate die, using StazOn timber brown ink.
I stamped the reindeer once again onto a piece of scrap paper and cut out to create a mask for the next step.
Place the mask onto the stamped image on the tag.
With the mask in place ink up the background stamp from the Seasons Silhouettes stamp set using vermillion archival ink and touches of coffee and stamp onto the tag. Remove the mask.
Once all the stamping is complete, blend fired brick Distress Ink around the tag using an ink blending tool, adding walnut stain around the edges for definition.
Once the background is coloured, spritz with water to add a little more interest. I have also added white highlights to the reindeer with a white gel pen to lift the image from the background. Add a Cosmo Cricket Elements Cheer Button, threaded with natural twine.  25 has been added to the bottom of the tag cut from dark brown card using the Alphabetical die.
I have added twine to the top of my tag along with a Christmas Muse Token attached with a jump ring.

For more great ideas please pop over to the Simon Says Stamp and Show blog and take a look at my fellow team members they have created some inspirational projects. Remember there is also the chance to win a $50 prize from Simon Says Stamp.  I always look forward to seeing your creations each week.

Thanks so much for stopping by and leaving a comment, much appreciated.  Enjoy your week. Tracy x x 


Products Used:

Tim Holtz Reindeer Flight Stamp Set

Tim Holtz Seasons Silhouettes Stamp Set
Cosmo Cricket Elements Cheer Buttons
StazOn Ink - Timber Brown
Ranger Collage Glue Stick
Natural Jute
Tim Hotlz Idea-ology - Christmas Muse Tokens, Jump Rings
Tim Holtz Alterations - Tag and Bookplate Die, Alphabetical Decorative Strip Die
Archival Inks - Coffee, Vermillion
Distress Inks - Fired Brick, Walnut Stain
Ink Blending Tool
Non-Stick Craft Sheet
White Gel Pen