Today I have step by steps for you combining Tim Holtz Distress Oxides with
Eileen Hull's fabulous dies.
I created a card using Eileen Hull's
Thinlits Travel Trailer combined with Eileen's Dots, Flowers and Rick-Rack set (I used the Rick-Rack embossing folder in this case).
I began by applying Vintage Photo Distress Oxide to a non-stick craft sheet and spritzing with water.
I cut a piece of white card 5" x 7" and then swiped the card through the beads of ink.
Spritz the card with a little more water.
Dry the ink with a heat tool.
Dip the card into any remaining beads of ink and then this time add bigger drops of water to the background.
Dry the card with a heat tool once again. Repeat these steps until you are happy with the coverage of ink.
Add Broken China Distress Oxide to a non-stick craft sheet and spritz with water.
Dab the card lightly onto the beads of ink.
Spritz the card lightly with water and then dry with a heat tool and repeat if necessary.
Blend Vintage Photo Distress Oxide Ink around the edges of the card.
Spritz the card lightly with water once you have finished blending ink around the edges.
Dry the card thoroughly. From this picture you can see how the ink oxidises once you add water. You also have a chalky like matt finish.
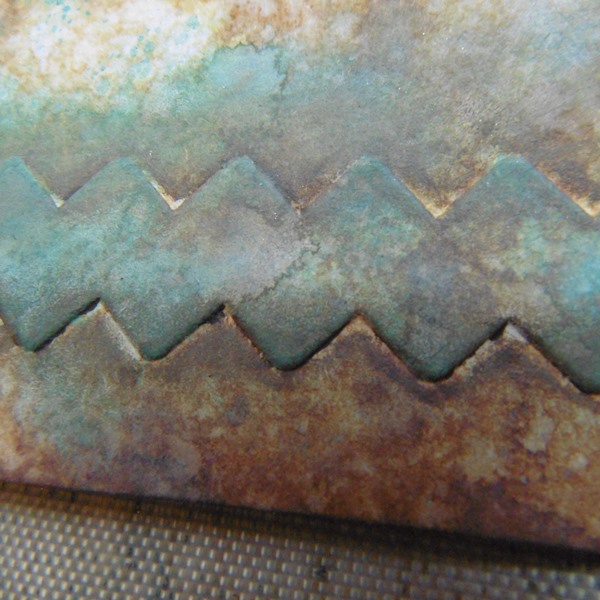
This close up picture gives you the detail and finish achieved from the inks.
Take one of Eileen's Embossing Folders, in this case I used the Rick Rack border.
Sandwich the card between the Embossing Folder and run through a die cutting machine to emboss.
Highlight the embossed area by applying Broken China Distress Oxide to the raised areas, applying with an Ink Blending Tool.
Spritz the embossed border lightly with water and then dry with a heat tool.
Scribble Distress Crayon around the Rick Rack embossed area to add definition and smudge the crayon with a finger.
I love the shading the Crayon adds to the embossed area.
Die cut Eileen's Trailer from white card.
Colour the Trailer with the Distress Oxides, applying with an Ink Blending Tool or piece of Cut 'n' Dry Foam.
Spritz the ink with water and then dry with a heat tool.
Continue to colour the Trailer parts with Distress Oxides and then assemble.
Add some Tim Holtz Chatter Tape for added interest.
Take an old container and apply White Paint to the rim of the container, applying with a finger.
Press the container onto the background of the card.
The circle acts as a spotlight for the focal image.
Add delicate splatters of white paint to add a further layer of interest to the background.
This is the completed card which I matt onto a layer of card coloured with Broken China Distress Oxide Ink. I also added a Quote Chip for added interest.
I love how all the layers are visible in the design.
The Oxides add a total different feel to the background.
I also added a touch of shading around the Trailer to age a little further.
The touches of white really lift the design.
Thanks so much for stopping by, hope you enjoyed the step by steps. Tracy x x


12 comments:
Love this!
Love
Amanda x
Hi Tracy. What a fabulous creation. I love those oxide inks and the colours you have used look amazing together too. Thanks for a brilliant tutorial too. Hugs Rita xxxx
So informative Tracy, fabulous instructions from start to finish, what a delightful creation. I so love that die.. Hugs Tracey xx
total Tracy fabness!! I love your style Tracy and this is wonderful. =)
A truly fabulous tutorial Tracy and I just love your finished card, those colour tones are my favourites! Love the trailer too, outlining it with the circle really makes the trailer stand out beautifully! Hugs, Anne xx
Wow, what a fab card ! I also love how you applied the DI Oxides in two stages; brown first, blue second. I haven't tried that. Must give it a go !
Corrie x
Love everything about this, Tracy, the colours, content. Its brilliant
:D
Heheh - this is just soooo CUTE but in such a EYE CATCHING way Tracy. Love the colors and the background is perfect. What a treat to see! Xj.
A fabulous post Tracy, love your use of the Oxides and especially the embossed part of the card with them and what a beautifully finished project. Xxx
Beautiful Tracy, I now know that I NEED these Distress Oxides! Have a lovely week xx
So gorgeous Tracy! and thank you so much for sharing your steps!
hugs,Jackie
Fantastic card ! Tracy Love it x
Post a Comment