Hi everyone and welcome. Hope you are all keeping well.
I thought I would take a few moments to show a few of my Thrinchies in a little more details with a few close up pictures.
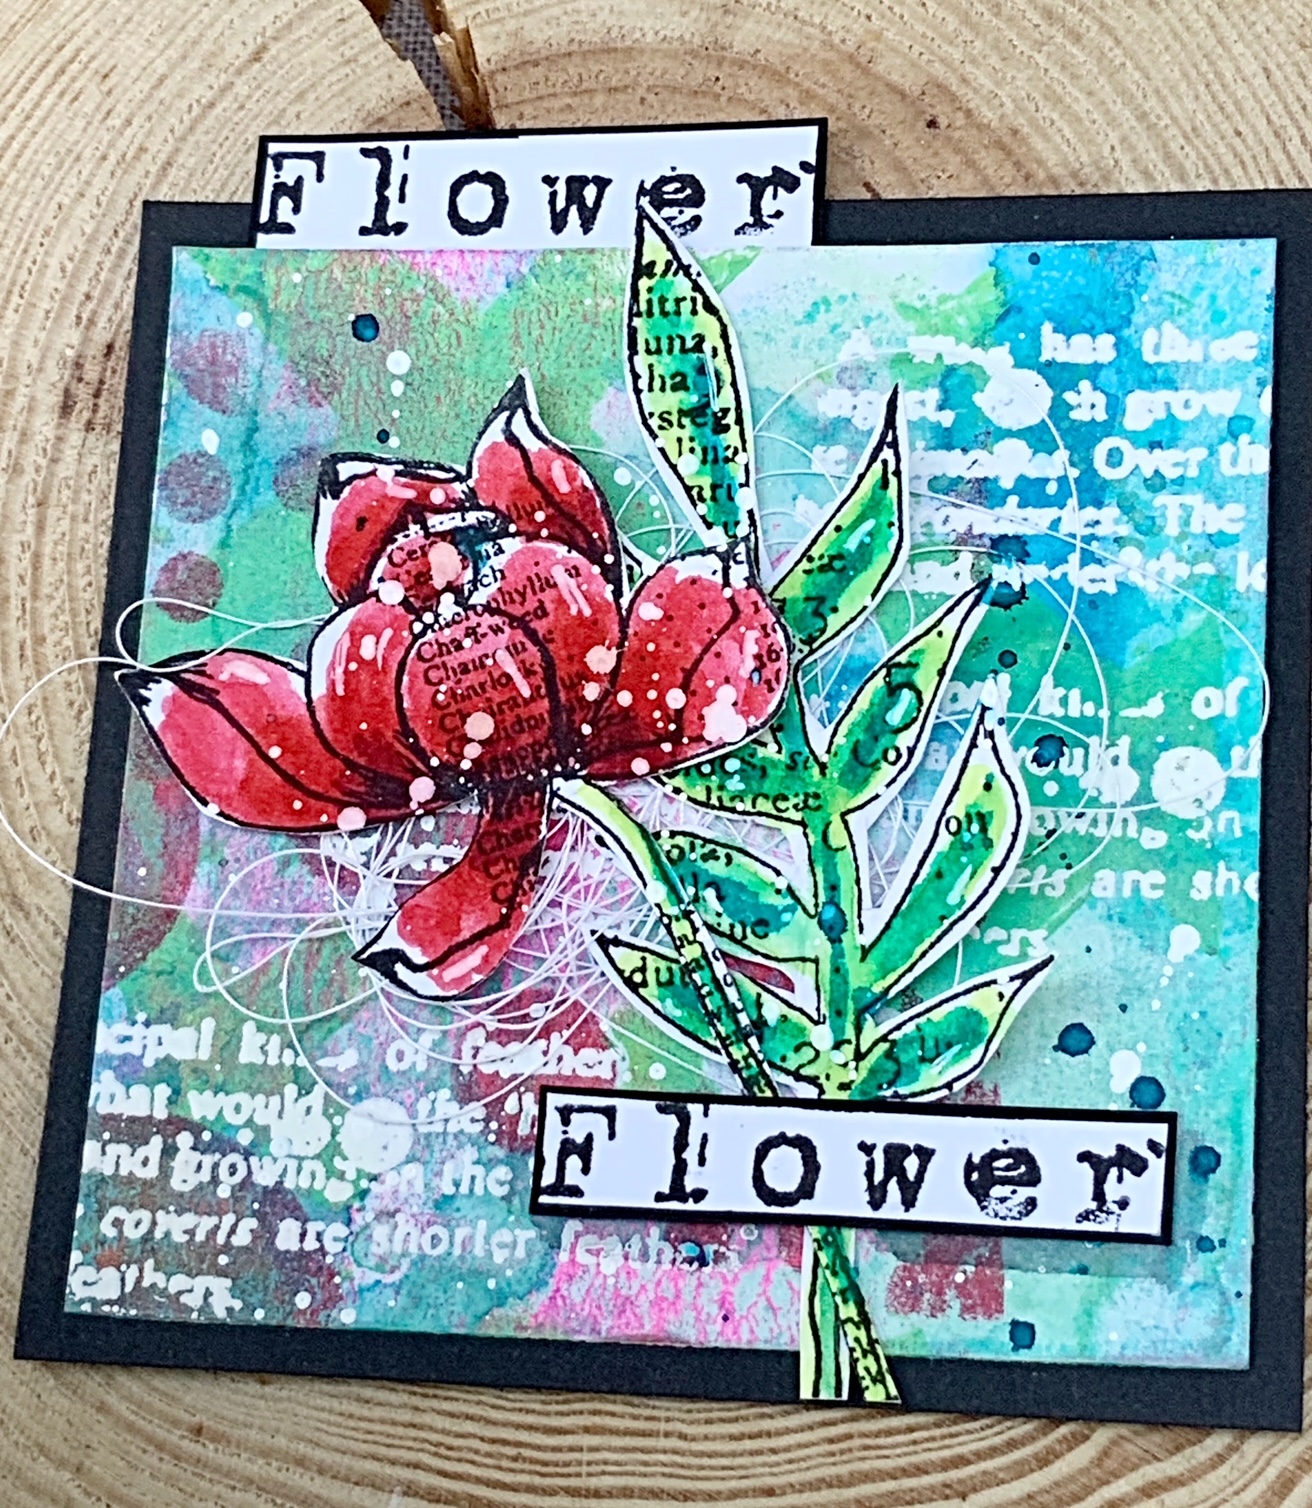
For those of you wondering what a Thrinchie is, well its a 3 x 3 inch square piece of art. AALLandCreate are holding a challenge at the moment that runs through to the 30th September. If you pop along to my Facebook Group HERE, you can find all the details, if you wish to join in.
I find it quite surprising how much you can actually fit onto a small square piece of card.
I love the vibrancy of this piece and the touches of white embossing.
The close up picture shows all the detail beautifully.
All these small pieces of art could quite easily be converted into a card format too.
I love the blend of colours on this piece and I will definitely be using these colours again.
I wanted all my Thrinchies to work together as I have now added them to a book.
This challenge has given me the opportunity to revisit so many stamps, which I love and also mixing old with new images too.
Today I am popping by with a seasonal card using my Robin and Nuthatch A6 Stamp Set.
I love the vintage tones on this piece which I created with Distress Oxide Inks. This card is part of one of my on line workshops. There are several cards in this workshop along with a book.
This close up shows the detail of the background and the beautiful layered elements.
I added a few stars to the backdrop and then added touches of background stamping with my background stamp from my A5 Follow Your Own Path.
I now have another card for Christmas to add to my selection.
Its been a long while since I have posted on my blog. Why? I was under the impression that a lot of blogs now receive less visits and that most people now don't visit a blog. Following a comment from a lovely Facebook Friend, Jennifer, I thought I would revisit this.
What do you like to see on a blog post. I post frequently on Facebook, Youtube, Instagram and often post my artwork on all these platforms. Is it still worthwhile posting here?
Over the past few months I have continued with my passion of designing stamps and gardening and in that repsect nothing much has changed, apart from the fact I have aged of course.
I will add a few links to my recent YouTube videos below, just in case there is anyone who visits here and may have missed my posts.
In the video above I create a journal page, something I love creating, I love the freedom of just creating for the joy of creating and I also love the fact that I can look back on each spread for inspiration in the future.
Another passion, creating cards, and this one is a favourite, I love the vintage tones in the background with the pop of colour in the flower and pot.
Something else I love doing is mixing new releases with old and this video showcases that perfectly.
The video is part of my snippets range of videos where I create more paired back pieces. I am loving creating these.
I have also been creating a series of Christmas Cards and these have been a joy and also means I am ahead of the game for once and no more rushing around thinking up ideas at the last minute.
If you would like to see more of my Youtube Videos, the link below will take you straight to all the uploaded videos. Simply click on the highlighted text.
If you would like to receive notifications when I upload a video, simply press the bell in YouTube, top right of the page.
I also have a dedicated Facebook Group, where I post all my artwork and new releases and we have a wonderful, friendly community. The group also has a full PDF document with all my stamp releases along with a PDF document for all my 77 workshops so far. Feel free to ask to join, link below:
Thanks you so much for all of your amazing support of my creative journey. If you would like to join any of my on-line workshops, please feel free to email me, address below:
Morning everyone, today I am showcasing my Border Stamp "Fragile Fragments" #538 combined with my A6 Stamp Quirky Friends #466.
I love the heart stamp, so many possibilites. Today I have created a little video for you to showcase the step by steps. Video is below:
I hope you enjoy the video and feel inspired to create.
Below are some close up shots of the card and one of the main reasons I have finalised a blog post so that you can zoom in on all the detail which is often missed in a video.
Thank you so much for taking the time to stop by. Tracy x x
Begin by adding low tack tape around the edges of the card, to leave an aperture in the centre in which we blend Picked Raspberry and Ripe Persimmon in the backgroun of your card. Stamp the A7 Daisy stsamp "Indulge in Daisies" #541 with Nocturne VersaFine Clair Ink. Blot the image with copier paper and then add touches of further colour to the petals with gel pens.
From this close up you can see the brightness the gel pens bring to the design.
I have also included a papercast of the leaf, to bring further texture to my piece.
Atouch of machine stitching adds further interest and texture to the design.
The pop of black and white also add brightness to the piece and the black washi tape echoes the black stamping in the background along with the black stitching.
I hope you enjoyed seeing the close ups in this design, I loved creating this piece.
Afternoon everyone, hope you are all well. Today I thought I would pop by and share a youtube video with you and some close up photos of my Poppy card.
Nice simple card, but maybe if you are not one of those watching the football tonight lol, you can catch up on the video in some quiet time.
Below are some close up photos so you can see the detail further.
I have added the youtube vide below. Sometimes I think close up pictures show the detail a little better. I hope you enjoy the process.