Thursday 21 December 2017

Merry and Bright

Hi all and welcome. Today is my last post before Christmas. I wanted to stop by and wish you all a wonderful peaceful Christmas and Best Wishes for 2018. Thank you all for your wonderful support over the last twelve months. Hope you all have a wonderful creative 2018.

Today I have a seasonal post for you using Eileen Hull's ScoreBoards XL Die Book and Pages, Trinket Box and Frame.
I began by die cutting each piece from mountboard and then covering each piece with a thin layer of Texture Paste.
These are my die cut pieces assembled. I also had the oval piece from the aperture which I added to the inside of my shadow box element.
Once the Texture Paste was dry I then painted all my die cut elements with Antique Linen Distress Paint and whilst the paint was still wet I added touches of Vintage Photo Distress Paint, dried the paint a little and then rubbed some of the paint away with a damp baby wipe. The inside of my shadow box element I added a Tim Holtz Trohpy Antlers piece along with some foliage die cut using Tim's Festive Greens.
This picture showcases the wonderful dimension from the die cut pieces. I love this die.
I added a quote chip to the inside of my shadow box and added some highlights of red with red paint added to the berries on my Festive Greens and some red cotton thread.
The stags head was painted with gold paint and I added a few highlights with Prima Wax. I also included lots of sparkle with Distress Dry Glitter.
My flower has been die cut using Eileen's Stitchy Flower and Leaf die. I painted the flower with red paint and added touches of gold around the edges of the petals.
I blended Ground Espresso Distress Ink around all the edges and added more Festive Greens foliage behind my flower.

Thanks so much for stopping by.

Tracy

xxxx

Thursday 14 December 2017

AALLandCreate New Release

I can't quite believe I am being let loose on Hochanda once again on Saturday 16th December at 8am and 2pm. Hope you can join me. I don't think I have ever crafted quite so early, well not without my pyjamas on anyway!
Here is one of my samples that will be on the show and was also shown on last months show so I thought I would showcase this design today.
I also decorated the inside of my cards. Both panels were brayered with Dina Wakley Heavy Body Acrylic Paints, adding light layers until I was happy with the depth of colour.
Once I had brayered my paints I then added a further layer with Black Soot Distress Ink, applying the ink directly to the stencil, spritzing with water and then placing the stencil, ink side down onto my background. You can find the stencil HERE.
I added the DREAM sentiment from my set of stamps which you can find HERE.
I die cut two circles from white card and then brayered a touch of colour onto each circle and then applied Black Ink around the edges of each circle for definition. I then stamped the eye stamp with Black Archival Ink. The eye stamp will be back in stock very soon but is available from some of our stockists if you check our website HERE.
I also added some Tissue Tape and delicate stamping in the background along with some delicate black splatters of paint. The stamping in the background is using this stamp HERE.

Thanks so much for stopping by.

Tracy
xxxx


Tuesday 12 December 2017

AALLandCreate New Release

Hi and welcome today I have a further sample for you using the wonderful AALLandCreate new release.

I opted to combine the AALLandCreate stamps with one of my favourite dies the ScoreBoard XL Passport die. I applied Texture Paste over the AALLandCreate Stencil which you can find HERE.

Once the Paste was completely dry I then applied Dina Wakley's Heavy Body Acrylic paint over the top.
I machine stitched my front and back covers and added stamped pages inside. I also repeated the stencilling on the back of the cover. To highlight the wonderful texture further I applied DecoArt Metallic Lustre Gold Rush over the top of the raised areas.
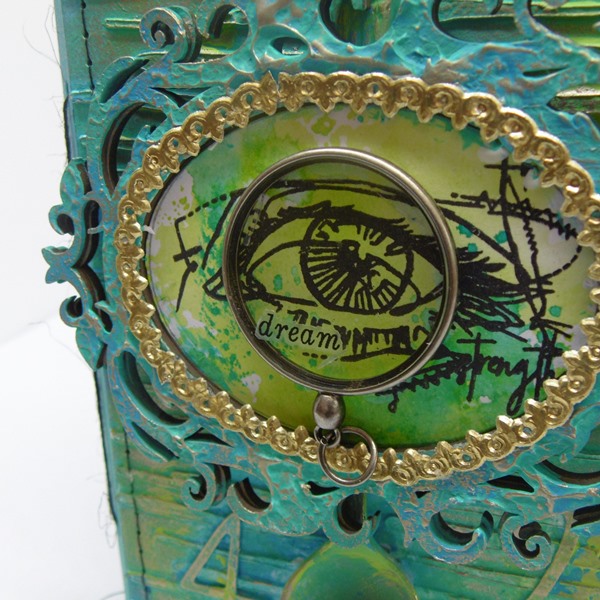
I applied Texture Paste to a wooden frame, applying the Paste with a Palette knife randomly and applying using a dabbing motion to give more Texture to the Paste. Once the Paste was dry I then added a coat of Dina Wakley Heavy Body Acrylic Paint and added Metallic Lustre over the top.  I also added a gold trim around the edges of the frame to give a further opulent feel to the piece.

I coloured a piece of white card with Distress Inks and then stamped the eye image onto the inked card using Black Archival Ink. The eye stamp is available HERE. We also have a list of stockists on the site too.
Before adding any layers of paint I addede some numbers to the book to add a further layer of interest. I also included a little spoon which I also painted with paints and added a few touches of Metallic Lustre.
I also added a monocle to the top of the eye to highlight further and also included an eye created from Shrink Plastic.
I added some stencilling to the inside of my book using the wonderful compass stencil, which you can find HERE. I then stamped the eye over the top of the stencilling.
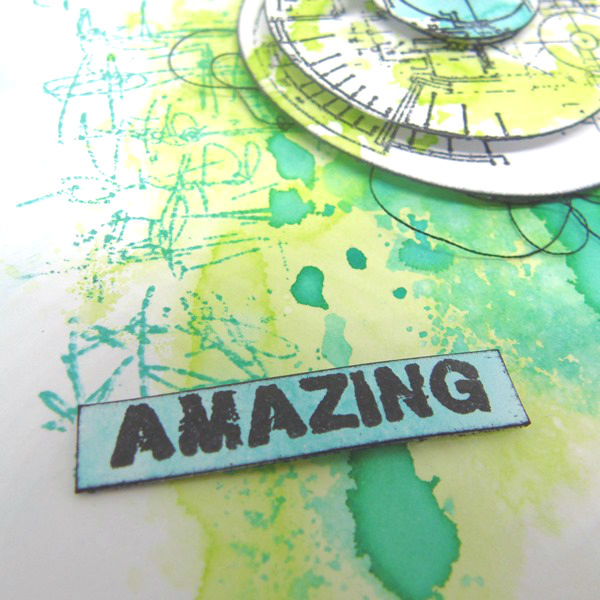
This page showcases the wonderful light bulb images along with some stencilling using Stencil Number 9 which you can find HERE. I also included a touch of background stamping using Stamp Number 25 which you can find HERE.
I added further stamping and stencilling to the other pages using Distress Oxides.
Thanks so much for stopping by. Tracy x x


Wednesday 6 December 2017

We Wish You A Merry Christmas

Today I have a little canvas created using Tim Holtz products.
  1. Give the canvas board a coat of Gesso and then dry.
  2. Place the Stars Layering Stencil onto the background and then apply Grit Paste over the Stencil and then allow to dry.
  3. Paint the canvas with a layer of Distress Paint Antique Linen and whilst the paint is still wet add a few touches of Vintage Photo Distress Paint, especially around the stars to give a light layer of darker colour.
  4. Scribble Gathered Twigs Distress Crayon around the outside edges of the canvas and then smudge the crayon with your finger.
  1. Paint the Foundry Frame with a coat of Gesso and then dry. 
  2. Paint the Frame with a second layer, this time with Antique Linen Distress Paint and then dry the paint with a heat tool.
  3. Paint a top coat onto the Frame with Ground Espresso Distress Paint and then dry lightly. Take a damp piece of kitchen towel and wipe away some of the paint to reveal some of the colour below and some of the metal highlights.
  1. Add Christmas Remnant Rubs around the Frame.
  2. Add a wood piece and a wishbone to the centre of the Frame.
  1. Add a PaperDoll to the frame, adding foam tape behind to build him up a little so that he stands proud away from the frame. Add cotton threads and cheesecloth behind for added texture.
  1. Add Prima Metallique Wax around the edges of the canvas to give some metallic touches.
  2. Add a Quote Chip to the base of the PaperDoll to ground the image and then add some Grit Paste around the edges to act as snow.
  3. Add some pearls and a small tree to the top of the Quote Chip and then add a few more touches of Grit Paste for added texture.
  1. Add a small amount of Candied Apple Distress Paint to a Non-Stick Craft Sheet, dip a wet paintbrush into the paint and then lightly flick the paint across the background of the canvas. Repeat the same process with a White Posca Pen.
  2. Add Star Adornment embellishments to the background to add further dimension.

  1. To complete the canvas I added a few delicate scratchy lines with Black Soot Distress Paint around the edges of the canvas.

Thanks so much for stopping by.

Tracy
xxx

Tuesday 5 December 2017

AALLandCreate New Release

Welcome, today I have a card showcasing the new release from AALLandCreate.
I created a background using Distress Inks, applying the ink to a piece of acetate and then smooshing the ink across the background.
I added a touch of stamping to the background using Bipasha's stamp which you can find HERE. I also added chevrons to the background stamped with Distress Inks, again from the same stamp set.
I added the sentiment Amazing from Olga's stamp set which you can find HERE.
I wanted to add some dimension to my design so opted to die cut three circles from white card, added a touch of colour with Distress Inks and stamped the compas stamp onto each of the circles and then adhered them together aligning the image. I also added a game spinner for added interest.
I also included three circular page reinforcers for added interest to my background and I love the black against the colours.
Thanks so much for stopping by.

Tracy
xxx


Monday 27 November 2017

May Your Days Be Merry & Bright

Hi and welcome. Today I have decorated a Tim Holtz Etcetera tag, another seasonal make.
  1. Apply a coat of Gesso to the Etcetera tag, covering both front and back with one coat.
  2. Apply a coat of Antique Linen Distress Paint and then whilst the paint is still wet apply a light layer of Brushed Corduroy Distress Paint randomly to the tag, this adds delicate darker layers to the background.
  3. Place the Stars Layering Stencil onto the background of the tag and then apply Texture Paste over the stencil.
  4. Once the Paste is completely dry apply IndigoBlu Flitter Glue to some of the raised areas of the stars and allow the glue to dry clear and tacky and then apply MegaFlakes to the top of the stars. Repeat the same process to apply MegaFlakes to the edges of the tag.
The MegaFlakes add a touch of opulence to the design and add a lovely metallic touch. 
  1. Die cut five layers of the Stitched Ovals from white card.
  2. Colour each die cut piece with Vintatge Photo Distress Oxide Ink.  Adding Walnut Stain Distress Oxide Ink to the edges of the top oval for added dimension.
  3. Adhere all the die cut ovals together to create a dimensional frame.
  1. Die cut the reindeer from white card and then colour with Distress Oxide Inks. Apply a layer of Prima Metallique Wax White Gold around the edges of the die cut frame and around the edges of the reindeer.
  2. Add a small piece of cheesecloth for added texture along with some Bouquet Flowers, applying Distress Ink around the edges of each of the petals to coordinate with the background of the tag.
  1. Ink the Bauble from Tim Holtz Cling Cling Foam Stamp Set with Vintage Photo Distress Oxide Ink and stamp the Bauble onto the edge of the tag, repeat this a couple of times, stamping with the same ink and using the Stamping Platform. Repeat the same process for the second bauble. 
  2. Add the tops to the Baubles using Black Archival Ink.
  3. Add touches of MegaFlakes to each of the Baubles and add scribble a black border around each of the Baubles for definition.
  1. Add delicate splatters of gold paint to the background and then dry with a heat tool.
  2. Add three coils of rusty wire for added texture and interest.
  3. Add Clippings Stickers to the inside of the oval frame and to the top of the tag.
  1. Add Star Adornments to the background of the tag to give further interest and dimension to the design.
  2. Scribble Vintage Photo Distress Crayon around the edges of the tag and then smudge with a finger.
  1. To complete the tag add a small Decorative Deer to the inside of the oval frame.
Thanks so much for stopping by. Have a lovely week.

Tracy
xxx


Sunday 26 November 2017

'Tis The Season

Hi and welcome. Today I have a seasonal card. I am in the midst of lots of deadlines but I have taken a few hours break to make a few more seasonal cards.
I created a textural card using a bauble stencil along with texture paste. I applied the texture paste randomly to give more texture to the design.
I then sprinkled some Infusions 'A Bit Jaded' onto my card and then spritzed with water. I am using a 300gsm card so this can take all the medium that I am applying.
I also added a touch of the Infusions to the inside of my card just to add a little more detail to my design.
I love the touches of walnut in the Infusions, it adds to the vintage feel of the card.
I added some Distress Crayon Salty Ocean around the outside of my bauble and smudged with a finger. I also included a ChitChat Sticker and an Adornment Star embellishment. I added a few scribbly lines around the outside of my card for a touch more detail.
Thanks so much for stopping by.

Tracy
xxx