Showing posts with label Stampers Anonymous. Show all posts

Friday, 27 October 2017

Raven Accordion

Hi and welcome, today I have another accordion for you. I have been gardening most of the week, preparing the garden for Winter and my poor back needs a break so I had a little creative time this morning.

I created a tag accordion using Tim Holtz Tag and Bookplate Die, colouring the background of each background with Distress Oxides Wilted Violet and Twisted Citron. The Oxides really appeal to me as I love adding lots of layers to my designs. I began by adding a layer of Twised Citron Distress Oxide, applying the ink directly to a Non-Stick Craft Sheet and then spritzing with water and then mopping up the ink with the tag and spritzing once again with water and then drying with my heat tool. I repeated this process a few times to add layers of the same colour to each tag. I then repeated the same process with Wilted Violet, but this time added a little less colour so that the green layer was still visible.
My next layer was a mono print using Tim Holtz linen stencil, applying Black Soot Distress Ink to the stencil, spritzing with water and then placing the inked stencil, ink side down onto my background and then dabbing with a piece of kitchen towel.
I then applied white paint to the same stencil, applying the paint to the stencil with a piece of Cut 'n' Dry Foam and then placing the stencil paint side down and dabbing lightly with a piece of kitchen towel to ensure good contact with the card. I love the delicate lighter layer this gives to my design.
I applied Dusty Concord Distress Paint to the edges of an old tin lid and then pressed the lid onto the background of the tag, I repeated this on all three tags. I then blended Dusty Concord Distress Paint around the inside of the circle using my finger. Whilst the paint was still wet I then added touches of Wilted Violet Distress Paint to add shading, blending the two colours together with my finger. To add a litle lightness to the centre of the circle I applied a light layer of Twisted Citron Distress Paint, again applying with my finger.
I used my Stamp Platform to stamp the Raven as I wanted a really dark black image so I stamped several times using Black Archival Ink.
I added some shading around each of the circles with a Black Soot Distress Crayon, smudging the edges with a damp baby wipe.
I distressed the edges of each piece and then blended Wilted Violet Distress Oxide Ink around the edges and then spritzed with water and dried with my heat tool. I also added some Clippings Stickers for a further layer of interest.
I added some delicate splatters of white paint along with some scratchy paint lines using an old credit card.

I am quite pleased with how all the layers look on this piece.

Thanks so much for stopping by. Have a lovely weekend.

Tracy
xxx

Friday, 29 September 2017

A Vintage Journey Tag Friday

Welcome to my Tag Friday post with A Vintage Journey.
I opted to decorate one of Tim Holtz medium Etcetera tags. This was fun to create as there was no pressure just a few hours to simply create for the fun of it.
I coated the tag with a layer of Gesso to give me a good base and then painted the tag with Broken China Distress Paint adding touches of Gesso to lighten.
I applied Crackle Paste over the Screwed Layering Stencil which I thought was perfect for a masculine piece. I then used Gathered Twigs Distress Crayon to add a further layer of colour, blending with my finger and a damp baby wipe.
I added corrugated card, which I always think adds wonderful texture to a piece and I added a few touches of Broken China Distress Paint with my finger along with a light blend of Gathered Twigs Distress Ink. I also added a touch of background stamping using the background stamp from the On The Farm stamp set and Potting Soil Archival Ink.
I applied Gathered Twigs Distress Crayon around the edges of the tag which gives definition to the design and draws the eye in to the focal imagery. I also included Nailheads for added texture and dimension along with a few Remnant Rubs for added layered interest.
I had a vintage clock face in my stash and incorporated this into my design which was perfect for my Paper Doll image to sit. I added Clippings Stickers behind for further interest and also included a Quote Chip. A few black paint splatters add a further layer to my design.
I also incorporated a couple of Ruler Pieces and a hanger from Tim's Idea-ology range. I also added some design tape and some scratchy lines to the edge of my tag using an old credit card and black paint.

Thanks so much for stopping by.

Tracy
xxx

Tuesday, 19 September 2017

Eileen Hull New Release - Sizzix Book Club

The Eileen Hull DT have some fabulous sneak peeks for you this month of Eileen Hull's soon to be released Sizzix Book Club Collection


Here is my next sneak peek. These dies are absolutely fantastic and amazingly versatile.

I will have step by step details closer to the release day.


Eileen is happy to introduce new three-in-one dies that serve multiple purposes to fit into every area of your creative life. There are three new ScoreBoards Dies for sturdy project bases and three die sets to embellish them.

Each die may be used in so many ways - on books, cards, gift boxes, home decor projects, and for storage and organisation.

Imagine a die that can create a box, a book, and a frame all on one die - we now have that with this new release.

The Book Club collection will be releasing this Autumn.

Watch this space!

Tracy
xxx

Monday, 11 September 2017

A Vintage Journey - Destination Inspiration - Arriving at Terminal 2

Welcome to the start of a new week and another Destination Inspiration piece for A Vintage Journey.
Here is a sneak peek of my project. I have step by steps for you over on A Vintage Journey blog, simply click HERE and you will be magically transported to see all the details of my piece.

Hope you enjoy.

Tracy
xxx

Monday, 28 August 2017

Curiosity

I am taking a little break next week from deadlines and just taking some time to relax and maybe create a couple of pieces just for fun.
After some weeding I decided to use the leftovers on my desk to create this card. The background is created with Distress Oxides Vintage Photo and Black Soot. I did a mono print with Tim Holtz Crossed Layering Stencil to add a further layer of interest to the background.
I had this apeture of the Raven and did not want to just bin it so thought I would add it to my design, adhering it to one of the images from Tim Holtz Regions Beyond Paper Stash. I also added the die cut raven, painted black for further interest and gave hima witches hat. No Raven is complete without a Witches Hat!!
I had these plastic halloween fence type embellishments on my desk and thought I would create a frame for my focal imagery.
I added a few Remnant Rubs and also included some delicate splatters of white paint.
I also included some decorative tape and an Index Clip for added interest.
It was fun to create with items that were just left on my desk.

Have a lovely week. Tracy x x

Monday, 21 August 2017

Ravens

Welcome, today I have been creating a Halloween card.
The background is created with Distress Oxides Twisted Citron and Black Soot, adding layers to get the desired depth.
I then created a mono print using the new Tim Holtz Crossed Layering Stencil and Black Soot Distress Ink.
I stamped the two Ravens with Black Archival and added a few delicate splatters of White Paint. I also added the Happy Halloween sentiment from the Pumpkin Head stamp set.
I love how all the layers are visible adding so much detail to the background.
I added random machine stitching for added texture and also included a Transparent Tile which I stapled into place. This Raven is holding onto a skull bead.
And this Raven is holding onto a spider.
Thanks so much for stopping by. Tracy x x

Sunday, 13 August 2017

Sizzix Maker Challenge with Eileen Hull Heartfelt House Pocket Die

Over the next few weeks Sizzix have a Maker Challenge and this time around they are showcasing Eileen Hull's House Pocket Die. Pop by Eileen's Blog HERE for all the details. Eileen also did a fabulous Facebook Live which you can also view on Eileen's post.
This is what I created with Eileen's House Pocket Die, an accordion decorated both sides using Distress Oxides using the steps below.
I die cut a the House Pocket from 300gsm white card and then drew around the shape to create my accordion.
I die cut separate pieces to decorate and add to the accordion.
I added Twisted Citron and a touch of Black Soot Distress Oxides to a non-stick craft sheet and spritzed with water.
I then dabbed my die cut piece into the beads of ink.
Spritzed the card once more and then dried the ink with a heat tool.
I then added more Twisted Citron Oxide Ink to the non-stick craft sheet, spritzed with water and dabbed the card once again into the ink. With Oxides I like to build up many layers of the colour to get the effect I am looking for. The Oxides are a Die/Pigment fusion and therefore you can build up the layers without creating mud.
I then spent lots of time adding layers to each die cut piece. I also added shading around the edges of each die cut piece blending the Oxides around the edges and then drying the ink with a heat tool. I stamped the Raven on this panel and also created a mask so that I could add further stamping.
I then used the background stamp from the On The Farm stamp set and added some background stamping with Black Archival Ink.
I love spending time adding layers to my pieces, that is the fun part for me.
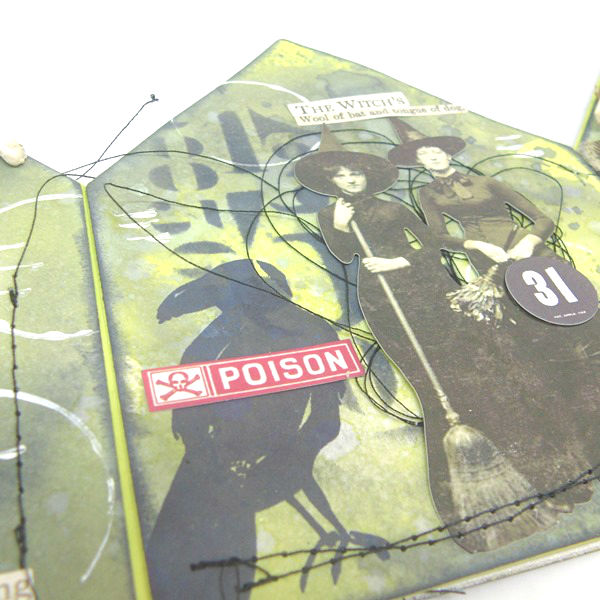
I added one of the Ancestors to the Raven and gave him a hat and also included a Transparent Tile and further Idea-ology along with a skull bead. I love adding random stitching as I think it adds wonderful texture and a further layer of interest to the design.
I continued adding layered details to each panel and also included some stencilled layers too.
I love this Ancestor and I added some Tape to ground him along with some wooden numbers and skull bead.
This is the detail on the reverse of the accordion. I also added some white highlights and markings.
More random stitching and some layers stapled into place using the Tiny Attacher. I also used the new web stamp behind the Raven on this panel.
Further random machine stitching for texture, leaving some of the loose threads for added interest.
I love these Cabinet Cards, I gave this lady her own Witch Hat and again added machine stitching and layered elements.
Thanks so much for stopping by, I hope you get the chance to join in with this fabulous challenge. There are some fabulous prizes on offer.

If you would like to join in the challenge, click HERE.

Tracy x x