Showing posts with label IndigoBlu. Show all posts

Monday, 11 September 2017

A Vintage Journey - Destination Inspiration - Arriving at Terminal 2

Welcome to the start of a new week and another Destination Inspiration piece for A Vintage Journey.
Here is a sneak peek of my project. I have step by steps for you over on A Vintage Journey blog, simply click HERE and you will be magically transported to see all the details of my piece.

Hope you enjoy.

Tracy
xxx

Friday, 1 September 2017

ITAC 2017 - The International Tournament of Art and Craft with AALLandCreate

Welcome to a very special post. This post marks the fourth leg in our very exciting International Tournament of Art and Craft 2017 with AALLandCreate.

The fourth leg of our Tournament is Africa.

To find out all the details of the second challenge, please click on the link below:


I have joined in the second challenge just for fun. if you would like to join in the challenge and view all the projects in more detail with tips, advice and details of how they were inspired, please click on the link above. Don't forget when submitting your artwork to use the hashtags #itac17, 'itac17challenge4, #aallandcreate


I created a mixed media piece just for fun, as I was inspired to just join in. How will you interpret the challenge.

The ITAC Tournament is open to everyone to participate and there are lots of prizes on offer too!

Over the next six weeks the talented artists above are all collaborating to bring you six weeks full of inspiration and we would love to inspire you to take part in this fun collaboration. You will also spot on this poster that we have some fabulous sponsors for our challenge and we would also like to take this opportunity to thank them for their involvement. 

The Deadline and the end of the ITAC Tournament is 24th September 2017 and the most important thing is to have FUN!
 

I love sharing ideas and this collaboration is all about sharing and working together with like-minded creatives from around the world and we hope you will enjoy our inspiration and are inspired to join us on this creative journey. 


I am absolutely delighted to have been included in this collaboration and I look forward to seeing how you are all inspired each week.

If you would like to stay in touch with what is happening each week in our ITAC Tournament simply click on the link below:

 Challenge - Africa - Tracy Evans


Each week designers will be posting top tips about their projects and how they were inspired by each challenge.


Thanks so much for popping by and enjoy the ITAC Tournament.


Tracy x x 


Thursday, 13 July 2017

Shine

Today my post showcases products from IndigoBlu.
I painted my frame with IndigoBlu Pantry White and Townhouse Teal acrylic paints. I mixed them together to give me a slightly lighter tone. I then applied touches of Ripe Persimmon Distress Paint over the frame, applying with my finger and using only the smallest amount of paint.
I cut a piece of card to fit my frame and then stamped the lightbulb from the Shine Bright Stamp set with Black Archival Ink. I then created a mask and stamped the background stamps with Archival Inks Saffron and Vermillion, adding both inks to the stamps. The background stamps from this set are so versatile and could also be used on their own.
I stamped the bulb twice more onto white card, blended Ripe Persimmon around the edges and then adhered on top of the first stamped image. I then stamped the bulb for a third time and coloured with Distress Inks Ripe Persimmon and Fired Brick. I applied the Inks to a piece of acetate and then sptritzed with water and them smooshed the ink onto the bulb and then dried with a heat tool. I then applied several layers of clear embossing powder onto the top of the bulb and then placed the cut out piece into the fridge. I then removed from the fridge and bent the bulb to create cracks.
You can see the cracks more clearly from this picture. I rubbed over the top of the the clear embossing powder with Potting Soil Archival Ink to remove some of the shine. I also added the wording 'shine' to the top of the bulb again from the same stamp set.
I added some cotton threads behind the bulb for added texture. Having three layers to the bulb gives wonderful dimension to the piece. I painted some of Tim Holtz Typography Letters with Ripe Persimmon Distress Paint and adhered to the frame. Black Chatter Design Tape has also been added behind for some contrast. I also included an Idea-ology Gear and an old vintage penn nib.
I had some bulbs in my stash which I coloured with Rust Alcohol Ink and I also wrapped some rusty wire around each for added texture. The number stamp in the background is also from the IndigoBlu stamp set, one I will use manu times.
Delicate splatters of paint and two of Tim Holtz Index Clips complete my piece.

Thanks so much for stopping by. Tracy x


Friday, 21 April 2017

Live Your Life

I had a lovely delivery yesterday from the lovely Kay Halliwell-Sutton (IndigoBlu) and I was inspired to create.
I began by using some of the tissue that my goodies were wrapped in adhering the glue with Slappe it On Matte.   I also applied a coat over the top of the tissue to protect.
These are the goodies that the lovely Kay sent to me. So kind of Kay to remember me even when she was on her travels, Thank you Kay.
I applied IndigoBlu's GeeSso Good Black Gesso over the feather stencil and allowe to dry completely. Once dry I added some delicate splatters of Postbox Red paint.
I added a Paper Doll onto the feather, I love how he sits there pefectly. I also stamped one of the numbers from the stamp set I was sent, they are fantastic.
I also added a chitchat sentiment sticker to complete.

Thanks so much for stopping by. Have a lovely weekend. Tracy x x


Friday, 25 November 2016

Junk Journal

I have finally managed to decorate the front cover of my junk journal created at IndigoBlu at a workshop with Louise Withers.
I opted for a vintage feel to the cover of my journal using a vintage image found on one of my many trips out vintage shopping.
I added a touch of stencilling and added a circle of rusty tin wire around my focal image to act as a spotlight.
The covers are created from recycled cardboard which I have aged with IndigoBlu Hot Cocoa paint.
I added a touch of tissue tape to my design along with a vintage pen nib, rusty heart and button.
I machine stitched some hessian fabric to the binding to add a touch more texture to my design.

Thanks so much for stopping by.

Tracy xxx


Friday, 2 September 2016

A Vintage Journey - Create Inside A Frame

Welcome to another new month with A Vintage Journey, our challenge this month is to "Create Inside A Frame" and our host this month is the lovely Julia.

This is what Julia had to say about the challenge:

"For this month’s challenge we would like you to create something inside a frame. Whatever you use show us how you have incorporated a frame on your vintage; shabby; mixed-media; art journalling; industrial or steampunk project".

I have just received the new releases from IndigoBlu and this seemed the perfect opportunity to combine those products with this month's challenge along with incorporating Fernli Designs laser cut tag.

I began by applying the Super Thick Slap It On over the laser cut tag, applying with a palette knife, using the Hearts Layering Stencil.
I then removed the stencil and dried with my heat tool.
I stamped the owl from the IndigoBlu "Owl Always Love You" stamp using Black Archival Ink and then placed my frame over the design and marked exactly what area I wanted to show within my frame using a pencil mark.
I cut around the stamped image to fit my frame.
I stamped the owl once again but this time onto Metal Foil Tape (sorry about the glare), using StazOn Black Ink.
I painted the tag from Fernli Designs with Black Gesso, applying one good thick layer over the stencilled hearts.
I applied the Gesso to both the tag and the small frame and dried with a heat tool.
The owl was cut from the Metal Foil Tape.
I applied FlitterGlu to a piece of  Phat Foam to create a sticky inkpad, working the glue into the foam with a palette knife.
I dabbed the Phat Foam glue pad onto the frame to apply sticky glue randomly around the frame.
I repeated the same process around the tag.
I then applied Luscious Pigment Powders in Blue and Gold, applying with a soft brush.
I continued to blend the Luscious Pigment Powders across the tag until I was happy with the blend of colours and then spritzed lightly with water to activate the binding agent which then makes them permanent. I repeated the same process for the frame.
To add a touch more interest to the frame I also added Megaflakes Chocolate Box, addig randomly around the edges of the tag.  I repeated the same process to the small frame.
I added a touch of colour to the flowers shown inside the frame with pencil crayons.
I also added twine to the back of the frame for added texture and added delicate splatters of red paint for a contrast.
I stamped the flowers from the IndigoBlu stamp onto Metal Foil and then cut them out and added to the frame and tag for further interest. I also included the fabulous sentiment from the same stamp. This would make a perfect alternative design for a Valentines.
I added metal wire around my focal image to add a touch more texture to the design.
Our sponsor this month is DecoArt; our randomly chosen winner is in for a real treat!

Thanks so much for stopping by. Tracy x x


Sunday, 11 October 2015

See no evil, Speak no evil, Hear no evil.

Morning, hope you are all enjoying your weekend. We have another fabulous challenge for you over at the Love to Create Challenge Blog where the theme is Anything Creative/Mixed Media Goes.
 This week I decided to alter an Artist Trading Block which I have die cut from mountboard using Eileen Hull's 
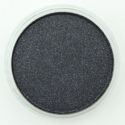
Block Cube Die. I then cut pieces to fit all the sides of my block and coloured each one with a layer of PanPastel Turquoise Tint, to lay down a first layer of colour.
I then placed the Tim Holtz Splotches Layering Stencil onto the background and then applied Turquoise Shade and touches of Turquoise Extra Dark PanPastels over the stencil and then sprayed with a light spray of hair spray to fix the pastels. I added touches of background stamping using the '
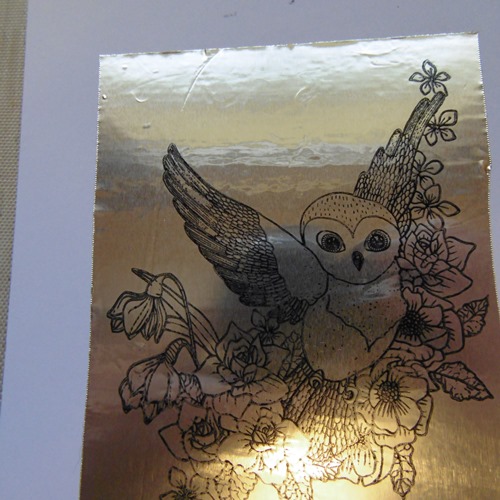
Rugged Edge' stamp set, stamping with Watering Can Archival Ink, using first and second generation stamping.  I then stamped the fabulous 'Jane' image from IndigoBlu with Black Archival Ink.
I repeated the stencilling and colouring with PanPastels around each side of the ATB and again stamped 'Jane' but this time only stamped half her face to this side. I added text to all sides of the cube, see no evil, speak no evil and hear no evil. I also added delicate splatters and scratchy paint lines with Cadmium Red Hue DecoArt Media Fluid Acrylic. I love the pops of red against the background.
On a couple of the sides I have added circles applying DecoArt Carbon Black Fluid Acrylic to a lid and stamping onto the background, then painting the circle with Titanium White Fluid Acrylic and drying with a heat tool. I then coloured the larger circle with Gelatos and blended using my finger. I stamped ART (a Wendy Vecchi stamp) with Black Archival Ink.
To add a touch more texture I also applied DecoArt Crackle Glaze to each of the panels.
I stamped 'Jane' onto a piece of scrap card and then die cut pieces using Tim Holtz postage stamp thinlits label and added shading with PanPastel Turquoise Shade.
I added two broken paintbrushes to the top of the ATB and added drips of paint and rusty wire for added interest.
I would also like to enter my ATB into the Craft Stamper October Take it, Make it Challenge which this month is:

October Challenge:
'Take A Technique' 
Use one or more of the following processes in your art:
Ink Stitch Paint Collage Print Paper
(and include stamping somewhere!)

Thanks so much for stopping by. Tracy x x

http://welove2create.blogspot.co.uk/