Thursday, 2 April 2015

Guest Designer for Fernli Designs

I was absolutetly thrilled to be invited to be a Guest Designer for three months for Fernli Designs, thank you Lou and Tina for inviting me along. Fernli design and supply a fantastic arrange of quality laser cut crafting supplies and I was thrilled to have the opportunity to create with some of their fantastic range.
I was also sent a fantastic arrange of products from DecoArt and I thought I would combine both to create an industrial/steampunk piece.
The laser cut pieces I began with are an extra large tag, an ATC tag, 3" primitive heart and a single wagon wheel (I did not use the smaller one in this piece). I applied DecoArt Gesso to each of the pieces, applying two coats, this gives a good base for the paints I wanted to apply.
I used an Andy Skinner stencil to apply DecoArt Texture Paste over the INDUSTRIAL text and some of the numbers to add texture to my design.
I love adding layers, dimension and textures to my pieces to create a real tactile piece of art.
I also applied DecoArt Paste randomly over my design again to add further texture.
Once I was happy with the texture I then set aside to dry completely.
I then painted the entire surface with a mix of Titan Buff and Prussian Blue Media Fluid Acrylic paint from DecoArt. At this stage I then decided I wanted some texture to the edges so applied some DecoArt Texture Sand.
The smaller of the tags was sprayed with Carbon Black DecoArt Mister and then coated with a coat of Quinacridone Gold Paint to give a rust appearance (inspired by Andy Skinner).
It was then time to add the little touches and more rust details to the background. I added touches of Carbon Black and Quinacridone Gold Paint to some areas of my tag including the lettering, simply applying layers with a paintbrush. I also added numbers to my design again from Fernli Designs, spraying each number with  Carbon Black mister and then adding Quinacridone Gold paint over the top. I also added a dirty wash (as Andy Skinner calls it) to the top of all the painted areas.
I added stencilled numbers to the smaller tag using Titan Buff Paint along with grungy circles using the lid from one of my paints. I then mixed Paynes Grey and Quinacrindone Gold paints together added a touch of water and painted over the Titan Buff paint to give a grungy appearance.
The heart and waggon wheel  from Fernli Designs were adhered together; the heart was painted with Titan Buff paint and stamped with one of Andy Skinner's background stamps and the Waggon Wheel was given a rusty appearance.
I added a couple of pieces of frameworks, again sprayed with Carbon Black Mister and painted with Quinacridone Gold paint. I also included a Chitchat Sticker and Hitch Fasteners to the top of each of the tags.
The Fernli laser cut pieces are fantastic and will take any amount of paint and media products that you can throw at them and trust me I threw quite a few products at these pieces!
I will be back in May and June with two further pieces for Fernli Designs.
Thanks so much for stopping by and taking the time to leave a comment. Tracy x x x

Fernli Designs Shop
Fernli Designs Facebook


Wednesday, 1 April 2015

Wherever I lay my hat that's my home

Today I am showcasing the fabulous Hat's Off and Hats Background stamp sets from Artistic Outpost.
I created a card with shadow frame, I have seen quite a few of these around in blogland and thought I would give one a try and I am really please with how it turned out. The background has been coloured with Gathered Twigs Distress Ink and flicked with water to add an aged vintage feel to my piece.

I added the hats and bike riders to the edges of my frame embossing them with clear embossing powder and I stamped the Hats Background to the centre of my frame. The text is printed on my computer and I added HAT to the centre for added interest.
These images are perfect for a masculine card and I know I will be using them frequently.
I added a metal hook, top hat embellishment and natural twine to embellish.
I also decorated the inside of my card to give a professional finish.

Hope you like my creation for today! Tracy x x x


Tuesday, 31 March 2015

Surprise Baby Shower for Anna-Karin


Anna-Karin Evaldsson is a very special member of the Eileen Hull Inspiration Team. Last year there were a lot of changes in her life, including a move from one continent to another and just a few months later, a new baby! Leo arrived weeks ahead of schedule (and just 20 minutes after reaching the hospital!) but thankfully he and Anna-Karin are both doing well. 

We want to show Anna-Karin how special she is to us, so we are giving her a virtual baby shower today to celebrate Leo's birth! Even though we can't be with her, we send our love and special crafty surprise. We invite you to visit each team member/shower guest's blog to see what they created for this new little guy.


I hope you enjoy your virtual baby shower Anna-Karin, sending you love and best wishes to you and your family.
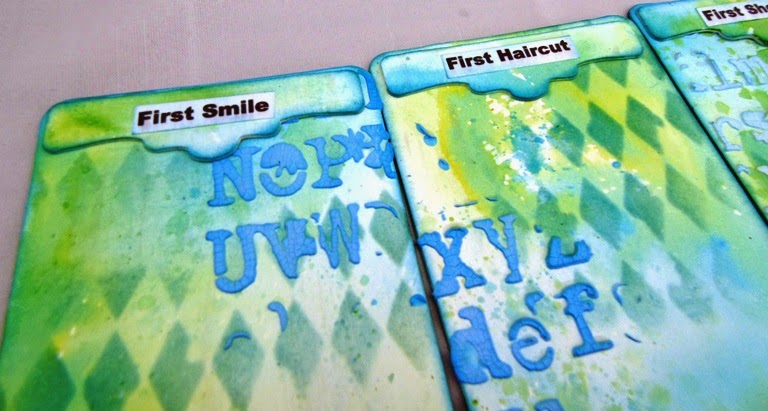
I decided to use the Box, Recipe Card and coordinating  Recipe Card and Label dies to create a box of Leo's firsts, first steps, first haircut etc. I decorated the front of the box with Distress Inks and added layers with the Harlequin Layering Stencil using Mowed Lawn and Salty Ocean Distress Inks.
I added the adorable picture of Leo that Anna-Karin had shown previously on Facebook and highlighted with a wire heart. I also included a touch of stencilling using the Typo Layering Stencil and Wendy Vecchi's Crackled Texture Paste.
I added a touch of stencilling to the side along with Remnant Rubs for added interest. I also added Velcro to close the Recipe Box.
Adore has been added to the opposite side and I added cherish and love Remnant Rubs to the front of the box.
I left the back plain so that Anna-Karin could add a picture of Leo over the coming months.
I decorated six Recipe Cards to coordinate with the box and added a heading to each. I thought this box would tell the story of Leo's first year, something to treasure for the whole family. I decorated each with Distress Inks, stencilling and Crackled Texture Paste. I have coated everything with Mod Podge so that they can be wiped clean should little hands want to handle them as they get older!
I coloured the Crackled Texture Paste with Salty Ocean Reinker, adding different quantities of Reinker to darken the colour on a couple of the cards. I love adding layers to designs.
You can see from this picture that this stencilling is slightly darker in colour to the previous.
Each of the cards has been given a heading which I printed off from my computer and coloured lightly with Distress Inks and then covered with Mod Podge to protect.
The reverse of each of the cards has also been coloured and stencilled and I have added wording using the Valentine Layering Stencil.

Hope your virtual baby shower has put a smile on your face Anna-Karin, we all wanted to let you know how special you are to the team. With all my love. Tracy x x x


Wednesday, 25 March 2015

Artistic Outpost Spring Blog Hop

Time for our Spring Blog Hop with Artistic Outpost.
For this months blog hop I am showcasing my favourite, the BIRDS OF A FEATHER stamp set, adding the focal image to a heart easel. The background of my card has been coloured with Mowed Lawn and Salty Ocean Distress Inks and I have included two further die cut hearts to the background.
The gorgeous bird image has been stamped with Potting Soil Archival Ink and I have added a monocle for added interest, along with remnant rubs.
I also added die cut pieces of chicken wire using Tim Holtz Mixed Media thinlits die along with die cut hearts covered with embossing powders and a touch of rusty wire for added texture and interest. I also added Chitchat stickers coloured with Distress Ink.
FLY has been die cut from mountboard using the Wordplay die and again covered with Wendy Vecchi embossing powders. I also added random stamping to the background using the background stamp from the Birds Of A Feather stamp set.
I actually feel like Spring is around the corner here in the UK and I am really looking forward to spending time in the garden along with all the wildlife it attracts.

My fellow team members have created artwork to inspire you further along the hop.


Thanks so much for stopping by. Tracy x x x 


Sunday, 22 March 2015

Compendium of Curiosities Challenge 24

I thought I would have a bit of fun this week and join in the Compendium of Curiosities Challenge 24, Remnant Rub Resist, page 51 of Tim's Compendium of Curiosities Volume 111.There is a fabulous prize on offer from the Funkie Junkie Boutique and also a wonderful prize from Tim and Mario.
I thought I would have some fun with Tim's Bird Crazy stamp set this week, showcasing them on an ATB using Eileen Hull's block/cube die. I thought this would be perfect to give as a gift with chocolates over the Easter period. My Crazy Birds are dressed in their Easter Bonnet's and have been set against a background using Tim Holtz Remnant Rub Resist technique using Abandoned Coral and Mustard Seed Distress Inks, loving these colours together. I have also added an egg to the top covered with Buttercup embossing powder, inspired by Wendy Vecchi, adding Chitchat stickers for added interest. I have also included the head of a rabbit cut using Tim Holtz Easter Elements die, die cutting several layers and adhering them together to give dimension and then covering the rabbit's head with Vintage Photo Distress Glitter.
These Crazy Birds are great fun and so quirky, I love them.
I picked some moss from my garden and added to the top of my ATB, I love the natural feel this gives and the rabbit looks like he is just peering out from the moss, love it.
I have decorated all four sides using Tim's technique and added a different Crazy Bird to each side. Each bird is wearing a different bonnet for the special Easter holidays! Each hat has been covered with Wendy Vecchi Embossing Powders.
I love these hat's and will be using them again. I think these birds would look great for halloween wearing a halloween hat!
This Crazy Bird has made an extra effort and is even wearing a bow tie lol.

Hope you enjoy my piece today as much as I enjoyed making it.  Thanks so much for stopping by. Tracy x x


Wednesday, 18 March 2015

Friendship Never Melts Away

Today I am shocasing the Winter Walk stamp set from Artistic Outpost.
I wanted to use the stamp set in a different way rather than use it in winter colours I wanted to go for a more rustic appearance.
The background of the card started life as a piece of white card which I coloured with Vintage Photo Distress Ink and then applied Vintage Photo Distress Powder over the top. I then spritzed the background randomly with Black Soot Distress Spray Stain to add to the rusty appearance.
I stamped the focal image with Black Archival Ink stamped onto white card and again shaded with Distress Ink. I bleached out areas on the house in the background .
I added banners stamped with the sentiments along with memo pins and number brads. The sentiments are from the Skating Emporium stamp set.

Thanks so much for stopping by. Tracy x x

Friday, 13 March 2015

Compendium of Curiosities 23 - Collection Folio

When I saw the Compendium of Curiosities Challenge was the Collection Folio, I knew it was the perfect time to make a start on my Mother-in-Law's alternative birthday card, she is 80 in September. The idea behind my folio is to build on it as the year progresses, adding more pieces each month to make this an alternative card to cherish. Inspiration Emporium are kindly sponsoring this challenge and offering a fabulous prize for the winner.
I will avoid going into too much detail as this post is very picture heavy to show all the details. The folio has been covered with the beautiful Wallflower Paper Stash and machine stitched into place, I love adding stitching to this kind of project. The focal image is that of my Mother-in-Law with my husband and two children. I have also included three die cut hearts, cut from mountboard using the new Heartfelt die and covered with Wendy Vecchi embossing powders, adding rusty hearts around the outside edge for a further texture. 13 represents the date of my Mother-in-Law's birthday and I love the Chitchat stickers they fit perfectly. Family and Cherish were die cut from white card using Tim Holtz thinlits dies.
My Mother-in-Law loves her garden and the birds they attract so the Wallflower paper seemed perfect.
Natural twine and embellishments add further interest.
I love these hearts and the rusty hearts to echo the shape.
Flashcards add a further layer of interest to my design.
I don't use papers very often so this was a nice change adding layers using papers and embellishments. I also added touches of stencilling here and there along with Remnant Rubs and wooden birds.
80 has been added using Alpha Parts, covered with Tree Branch embossing powder.
I have die cut tags from kraft card using Tim Holtz Tag and Bookplate die and added them as layers to the folio and I will add more personal pictures of my Mother-in-Law over the coming months.
I highlighted September and 13 on this pocket card my Mother-in-Law's birthday.
Chitchat stickers have been added throughout.
I love the alphabet background on this group of tags, perfect as my Mother-in-Law was a teacher.
Thanks so much for stopping by, hope you like what I have created. Tracy x x x