Friday, 28 December 2018

Enjoy The Little Things

Today I have a post showcasing my newly released A6 Stamp Sketched and Doodles Moments #154 from AALLandCreate. All the new products are available from our Stockists listed HERE.
I began by stamping onto kraft card with Olga's stamp #139 In the Cinema stamp using Vintage Photo Distress Oxide Ink, giving me a lovely vintage backdrop to work with.
I added some Texture Paste over Autour de Mwa's Lotza Dotz Stencil and the paste absorbed some of the Oxide colour which I love.
I stamped the flower, which has now become a firm favourite onto kraft card and then coloured the petals with a white pencil. Rusty wire adds further texture along with a few staples added to the stem.
Delicate splatters of white paint coordinate with the textural elements and lift the design. I also incorported the sentiment from the same stamp set.
Thanks so much for stopping by. Tracy x x

AALLandCreate Web Page
AALLandCreate Facebook Page
AALLandCreate Fanatics Facebook Page
AALLandCreate Boutique.

Friday, 21 December 2018

Time Flies

Today I have a post showcasing my newly released A4 Stamp Time Flies #143 from AALLandCreate. All the new products are available from our Stockists listed HERE.
I opted for a different substrate this time around, I am using one of That's Crafty MDF Chunkies.

  1. Paint the background of the Chunkie with Finnabair Acrylic Paints - Linen and Dark Chocolate, blending the colours with a touch of water to create a seamless backdrop. 
  2. Dry the paint layers with a heat tool.
  3. Ink the Time Flies stamp with Black Archival Ink and stamp part of the image (in this case the clock) onto the background.
I also incorporated some texture to the background, applying Texture Paste over Autour de Mwa's Lotza Dotz Stencil. I opted to leave the stencilling white to give some contrast to my design.
I used an Artist Trading Coin to add further dimension to this piece, stamping the centre of the clock to the coin.
I stamped the butterfly from the same stamp set onto a piece of clay and I am absolutely delighted with the detail that has been retained in the clay.
I didn't forget the sides of my panel, adding some subtle random stamping to each side.
I also included some SnipArt Clock pieces to the background along with some splatters of paint, cotton threads and wire to add further texture.
Thanks so much for stopping by. Tracy x x

AALLandCreate Web Page
AALLandCreate Facebook Page
AALLandCreate Fanatics Facebook Page
AALLandCreate Boutique.


Monday, 17 December 2018

Life is a Journey

Today I have a post showcasing my newly released Border Stamp Numbered Keys #148 from AALLandCreate. All the new products are available from our Stockists listed HERE.
Enjoying my love of vintage with this piece. I began by incorporating some vintage book pages to the background and then added my layered stamped elements.
I stamped the keys onto a piece of kraft card and then stamped them once again onto book pages, tore the page and added this on top of the first stamped image to give me a layered design.
I melted some of Seth Apter's Baked Beeswas and stamped the keys into the melted powder and then layered this element onto my card.
The Beeswax really adds to this design and I love how it turned out.
Thanks so much for stopping by. Tracy x x

AALLandCreate Web Page
AALLandCreate Facebook Page
AALLandCreate Fanatics Facebook Page
AALLandCreate Boutique.

Friday, 14 December 2018

Key To Happiness

Today I have a post showcasing my newly released A4 Stamp Time Flies #143 along with my new Border Stamp Numbered Keys #148 from AALLandCreate. All the new products are available from our Stockists listed HERE.
I opted for a canvas this time around and I love how the images from both stamps combine so well. I began by adding texture to my background and then painting with Distress Paints Antique Linen, Vintage Photo and Tumbled Glass.
My central piece includes the stamped clock image in the background and then the same clock is stamped onto clay to give further dimension and interest to the piece.
I stamped the keys onto mountboard and the added layers of Seth Apter's Baked Beeswax to add further to the vintage feel.
Lots of texture has been included from clay, cotton threads, silver wire and stencilled texture to produce a cohesive design that is both tactile and gives lots of interest.
I added delicate splatters of paint and some vintage book pages.
I kept one of my clay pieces as is rather than paint it to give a contrast to my design.

Thanks so much for stopping by. Tracy x x

AALLandCreate Web Page
AALLandCreate Facebook Page
AALLandCreate Fanatics Facebook Page
AALLandCreate Boutique.

Monday, 10 December 2018

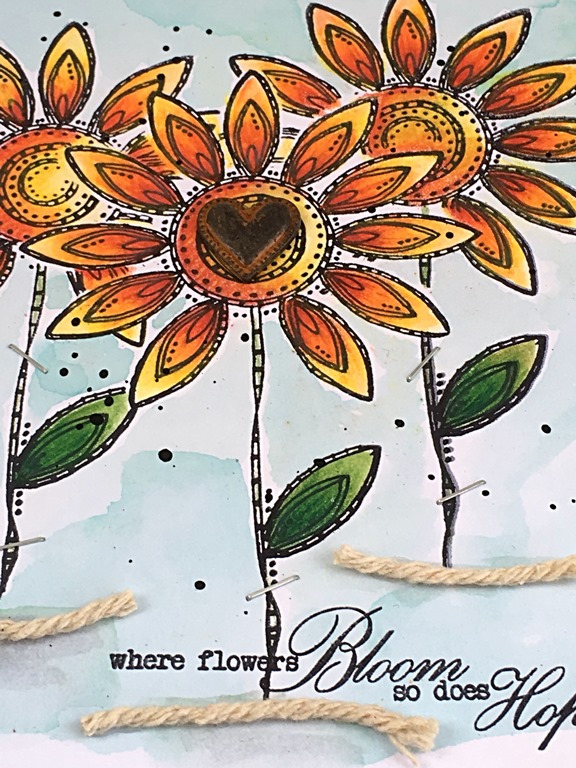
Where Flowers Bloom so does Hope

Today I have a post showcasing my newly released Sketched and Doodles Moments #154 Stamp from AALLandCreate. All the new products are available from our Stockists listed HERE.
I was really pleased with this flower, it looks wonderful coloured with several layers of pencil colour and I can see me using this one in many projects.
I masked my flower to add three blooms to my card and then added three layers of colour using my Inktense Pencils. I also added a rusty heart embellishment to the centre of one for further interest and dimension.
The background has been coloured with Broken China Distress Oxide Ink, swiping the inkpad across my non-stick craft sheet, spritzing with water and then using my waterbrush to apply a wash. I also included some natural twine at the base of the stems to ground my flowers. I also added the sentiment, again from the same stamp set, I adore this sentiment.
I added a few staples to the design for further interest and texture.
Thanks so much for stopping by. Tracy x x


AALLandCreate Web Page
AALLandCreate Facebook Page
AALLandCreate Fanatics Facebook Page
AALLandCreate Boutique.

Friday, 7 December 2018

Blossomed Numbers

Today I have a post showcasing my A4 Blossomed Numbers #109 Stamp from AALLandCreate. All the new products are available from our Stockists listed HERE.
When I am using my designs in projects I like to try and experiment with as many mediums as possible so that you can see the versatility of the stamps. A couple of days ago I was tidying my studio and stumbled across my Inktense Pencils and decided to have a few hours just colouring and relaxing, enjoying the process.

The flower has been coloured with three colours of Inktense Pencils and I have to say I have fallenn in love with these pencils all over again.
 I adore the vibrancy of the flower and the Pencils blend beautifully, I will definitely be using these again.
I set the flower onto a painted background, brayering Turquoise Paint over white card and then adding layers of White Acrylic Paint to lighten. I then stamped my Blossomed Numbers stamp onto the background with Black Archival Ink and overlayed my coloured flower on top for added dimension.
Of course I had to add a touch of texture with some delicate textural stencilling using Autour de Mwa's Lotza Dotz Stencil. I also included some cheesecloth, vintage book pages and sentiment along with some fabric.
This card really lifts the spirits and I hope it has done that for you today too.

These are the products used in my creation today.


Thanks so much for stopping by. Tracy x x

AALLandCreate Web Page
AALLandCreate Facebook Page
AALLandCreate Fanatics Facebook Page
AALLandCreate Boutique.


Monday, 3 December 2018

Garden Bloom

Today I have a post showcasing my A4 Blossomed Numbers #109 Stamp from AALLandCreate. All the new products are available from our Stockists listed HERE.
  1.  Brayer a layer of Ruby Acrylic Paint across a piece of white card.
  2. Add touches of Turquoise Acrylic Paint, applying with your finger.
  3. Whilst the paint is still wet, place the Lotza Dotz Stencil onto the painted background and then wipe over the stencil with a damp baby wipe, this removes some of the paint from the open areas.
  4. Dry these paint layers with a heat tool.
  1. Create another painted background piece with the same paints, applying the paint to a piece of white card with a Brayer.
  2. Apply White Acrylic Paint to the Blossomed Numbers stamp, applying the paint with a piece of Cut 'n' Dry Foam or as I prefer apply with a Brayer. Adding a good even coverage of paint to the stamp.
  3. Stamp the image onto the painted backround and then cut out the flower, cut the flower head and adhere to the decorative panel.
  1. Once you have adhered the flowers securely to the background then apply further texture, applying texture paste over the Lotza Dotz Stencil and then allow the paste to dry completely.
  2. Draw around each of the petals with a Stabilo All pencil and then blend with a water brush. This adds definition to each of the petals.
I adore how all the layers are visible and the texture is fabulous.

Here are the products I used for this project.


Thanks so much for stopping by. Tracy xx

AALLandCreate Web Page
AALLandCreate Facebook Page
AALLandCreate Fanatics Facebook Page
AALLandCreate Boutique.