Wednesday, 17 April 2013

She Knows Her Own Strength

It's time for our monthly blog hop with Artistic Outpost and this month our theme is FLOWERS OR WOMEN.
I decided to showcase both women and flowers in my accordion card which I created using the arch frame die from Tim Holtz, cut from Core'dinations card.
I wanted to work with denim and blues for this piece as I think the images from the COWGIRL STRENGTH work beautifully with these as I can imagine her dress being made of denim and I also love the rust tones combined with the blues.
I lay my accordion flat so that you could see the detail a little better. I used the sized arches die to create the central panels to which I added stencilled stars, stamping the stars with the print from the stamp set using coffee archival ink.
Once I had added the stencilled stars I then coloured the arch with vintage photo Distress Ink and spritzed with water to give a mottled effect, adding walnut stain ink to the edges. I added rusty stars throughout and I have also added a small denim flower cut using the Tattered Florals die, adding a copper brad to the centre. I stamped the sentiment onto white card and coloured with Distress Inks and again spritzed with water, adding two small wooden stars to the side for added dimension.
I used the same sentiment again on this panel but this time I cut the sentiment up, again added a rusty star and a layered denim flower. I stamped my cowgirl onto white card and coloured with Distress Markers, adding a small wooden star to her dress.
Wooden letters spelling STRENGTH to echo the sentiment have been added to the third panel again adding a rusty star and denim flower. I have also added thick natural twine to the bottom of each panel for that rustic earthy feel.
My fellow Design Team members have made some fabulous pieces to inspire you, please pop along and visit their blogs and be inspired along the way.


Artistic Outpost also has a fabulous REFERRAL THEME taking place for April and the theme is ANYTHING GOES using your AO images. There is also a fabulous prize on offer, upload your designs HERE.

Thanks so much for stopping by, Tracy x x 

Monday, 15 April 2013

Sewing Accordion

Yet again this weeks challenge had me thinking about more of my neglected stamps, something I am challenging myself to put right this year. Simon Says Stamp and Show's challenge this week is to use a background stamp in some way, shape or form on your project. You can also use your favourite stamp to create a background, the possibilities are endless.

I dusted off the wallpaper background stamp from the Stampers Anonymous Wallpaper and Wood stamp set to create a wonderful backdrop to showcase all my sewing ephemera.
I have so many stamps in my stamp collection that this wallpaper background stamp has been neglected for some time, however, it took the leading role in this sewing themed piece, embossed with clear embossing powder and coloured with barn door Distress Ink. The Sewing Blueprint stamp set and the Mini Blueprints 3 accessorize my accordion perfectly along with sewing embellishments from Maya Road along with a wood dress form from Kaiser.
All my images have been stamped with black Archival Ink and coloured with a barn door  Distress Marker, applying the marker to my non-stick craft sheet and colouring with a fine water brush. To add a little dimension I have added SEW using Grunge Block letters, colouring with barn door Distress Ink, adding touches of gold Paint Dabber. A brass sewing machine charm adds a little more interest.
I have added faux stitching with a black soot Distress Marker and added all my stamped images to a kraft tag. A wooden dress form has been coloured with Distress Ink and added to the bottom corner, adding DRESSFORM text from the stamp set. Red twine has been added to the top of each tag for added texture and interest.
I have added the spool to the third tag along with a piece of wooden ruler, brass scissor embellishment and some of Tim's ruler ribbon.
This is the reverse of my accordion, decorated with images from the Mini Blueprints 3 stamp set, again all stamped with black Archival Ink and coloured with barn door Distress Marker.
I have wrapped twine around my central tag and secured in place using the tiny attacher and added some sewing embellishments from my sewing box.
I have added more of the ruler ribbon to embellish along with more Maya Road chipboard pieces.
For more great ideas please pop over to the Simon Says Stamp and Show blog and take a look at my fellow team members they have created some inspirational projects. Remember there is also the chance to win a $50 prize from Simon Says Stamp.  I always look forward to seeing your creations each week.


Thanks so much for stopping by and leaving a comment, much appreciated.  Enjoy your week. Tracy x x 


Products Used:

Stampers Anonymous Wallpaper and Wood CMS126 Stamp Set
Stampers Anonymous Sewing Blueprint CMS147 Stamp Set
Stampers Anonymous Mini Blueprints 3 CMS150 Stamp Set
Maya Road Chipboard Sew Cute Mini Embellishments
Kaiser Wooden Dress Form
Black Archival Ink
Barn Door Distress Marker
Black Soot Distress Marker
Non-Stick Craft Sheet
Tim Holtz Detailer Waterbrush

Gold Paint Dabber
May Arts Red Twine String Burlap
Tim Holtz Idea-Ology Ruler Ribbon
Tim Holtz Tiny Attacher


Saturday, 13 April 2013

Spring Is Here

Designing for 100 Proof Press today using the fabulous SHARP OWL.
I sprayed my background with Dylusions sprays and then added sea salt and left it for a few hours and then removed the salt to reveal the mottled background. I used watercolour paper and even added the edges from my paper pad to the card for a little more interest.
I added a lace doily behind my owl to soften a little and then added the owl which has been stamped onto white card with black Archival Ink and coloured with peeled paint Distress Ink with touches of brushed corduroy around the edges.
I found the butterfly button in my collection, added some natural twine and added to the bottom of my card to give a little more interest and dimension. I also added an owl charm to the owl which I coloured with Alcohol Inks and threaded with black twine.
To complete, I added "Spring is here" to the top of my card and to the owl's body and also added some random stamped text to his body too, stamped in coffee Archival Ink.

Thanks so much for stopping by. Enjoy the weekend. Tracy x x

Thursday, 11 April 2013

You Are The Hero In Your Own Story

I've been using the PAPERBOY plate from Artistic Outpost to create a huge textural tag.

I used a black tag and then covered most of the tag with corrugated card to add texture and dimension to the background.
I added the fabulous sentiment from the Paperboy Plate along with a pen nib which I aged with a touch of black Paint Dabber. I also added pencils stamped onto kraft card from the Secretary Pool plate.
I stamped the paperboy and added a touch of shading using a Distress Marker. I added the paperboy to some pieces of vintage newspaper, punching the edges with a paper punch. I also added a lollipop stick which I coloured with Distress Inks and added the text EXTRA! EXTRA! using black Archival Ink. I also added a mini typewriter along with a further stamped pencil and also added a piece of typing paper to my typwriter adding NEWS to the paper. I also added a huge button threaded with twine.
A few more splats and a touch of random stamping on the corrugated card complete my tag.

Thanks so much for stopping by. Tracy x x

Tuesday, 9 April 2013

Steampunk Dressform

I have used the Steampunk Dressform and the Light Bulbs stamps designed by Sam Poole for this weeks DT creation for Creative Expressions.
I created a mixed media canvas board stamping the Steampunk Dressform and Light Bulbs stamps first onto the canvas using black Archival Ink.
Next I added some chicken wire to the canvas board and once secured in place I then began to add my embellishments, adhering with my hot glue gun. I also added dimension to the wings on the dressform, stamping onto acetate with black StazOn ink.
I added wings from Tim's Adornments Regal along with Mini Gears and lots of nuts and bolts from my collection.
A copper letter 'D' has been added to represent dressform and several flowers and Mini Numerals and a Faucet Knob from Tim's Idea-ology range.
A Word Band and a Watch Face Charm have also been included along with any of my rusty finds.
Once everything was secured in place I then spritzed with Dylusions Ink Sprays, taking care to cover the dressform image but allowing the ink to colour the edges so that my images blend into the canvas. Once coloured and completely dry I then dry brushed the whole canvas with Gesso to highlight.

Thanks so much for stopping by. Tracy x x

Monday, 8 April 2013

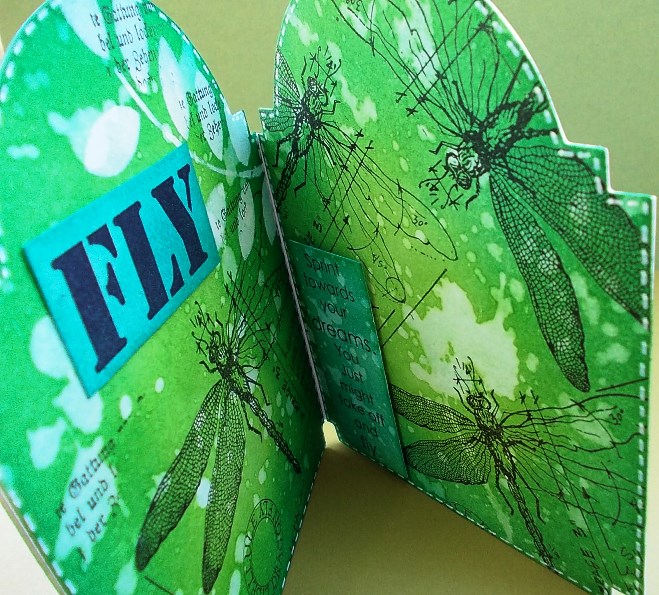
Take Off And Fly

We are taking flight this week with Simon Says Stamp and Show. It's up to you whether you jump on the very popular bird trend, use a feather or create a journal page depicting your travels. Spread your wings and FLY with us all this week.

I am flying on dragonfly wings this week to create my vintage cabinet card.
To be honest my inspiration this week was simply to use another stamp set that I have not yet inked up and as I set myself a challenge at the beginning of the year to use all my stamps, I am forging ahead and sticking with my personal challenge. I really wanted a different shape to showcase the dragonfly from the Stampers Anonymous Classics 1 stamp set and the Vintage Cabinet Card die really appealed this week. I am also really drawn to mowed lawn and salty ocean Distress Inks at the moment, they are my all time favourite!
I coloured my card with mowed lawn Distress Ink and then applied salty ocean over the top flicking water to add blotches here and there, I love this effect. I stamped the dragonfly directly onto the card front and onto a separate piece of card to add dimension to the wings. The wings were again coloured with Distress Inks and I used a fine water brush to bleach out the colour from the wings.  I have added faux stitching around the outside edges with a white gel pen. FLY from the Artistic Outpost Charles and Amelia plate has been stamped onto white card using black Archival Ink, colouring with salty ocean Distress Ink, applying mowed lawn around the edges.
I have added stencilled leaves using Wendy Vecchi's Lovely Leaves stencil using PaperArtsy Snowflake Fresco Finish Paint. To add a further layer of interest I have added some random stamping using the background stamp from the Artistic Outpost Birds Of A Feather stamp plate, using black Archival Ink.
I have decorated the inside the same way as the front panel, adding more dragonfly images stamped with black Archival Ink and adding faux stitching around the edges and again flicking the background with water. I have also added some further stencilled leaves and random stamping.
I have added the fabulous sentiment from the Charles and Amelia plate, again stamped with black Archival Ink and coloured with salty ocean Distress Ink, applying mowed lawn to the edges, adding a few flicks of water for further interest.
FLY has been added stamped onto white card and coloured with Distress Inks.

For more great ideas please pop over to the Simon Says Stamp and Show blog and take a look at my fellow team members they have created some inspirational projects. Remember there is also the chance to win a $50 prize from Simon Says Stamp.  I always look forward to seeing your creations each week.


Thanks so much for stopping by and leaving a comment, much appreciated.  Enjoy your week. Tracy x x 


Products Used:

Stampers Anonymous Classics 1 Stamp Set
Artistic Outpost Charles and Amelia Plate
Artistic Outpost Birds Of A Feather
Tim Holtz Alterations - Vintage Cabinet Card Die
Tim Holtz Detailer Water Brush
Wendy Vecchi Stencils For Art - Lovely Leaves
Distress Inks - Mowed Lawn, Salty Ocean
Archival Ink - Black
White Gel Pen
PaperArtsy Fresco Finish Paint - Snowflake 


Friday, 5 April 2013

100 Proof Press/Genuinely Jane Studios Blog Hop

100 Proof Press is teaming up with Genuinely Jane Studios for a marvelous blog hop that includes inspiration from 13 artists. We would like to invite you to join in on the "Welcome Spring" blog-hopping fun. There are lots of chances to win PRIZES from both 100 Proof Press and Genuinely Jane Studios.

Genuinely Jane Studios handcrafts small and medium sized mini albums, perfect for altered art and stamping. If you have never participated in a blog hop before, this is a great one for you to follow along - we are all very excited to share how we combined 100 Proof Press stamps and Genuinely Jane Studios wooden albums.

Facebook Page - Genuinely Jane Studios
Facebook Page - 100 Proof Press

Blog - Genuinely Jane Studios
Blog - 100 Proof Press 


Our blog hop finishes 5am Monday 8th April (UK time). Winners will be announced on the 100 Proof Press blog and the Genuinely Jane Studio blog, links of both are included above.

I am also offering my own prize to one lucky winner which includes a small star bag, small circle bag, heart shapes, small heart box, Creative Imaginations blank jigsaw for altering, square chipboard album, 2 scalloped heart chipboard albums, 2 accordion books, a glass shaped heart and a canvas. If I receive over 100 comments I will also add a second prize and draw two winners.
I have also included a picture of my giveaway.

100 Proof Press are offering the stamp below as a giveaway on each of the 100 Proof Press Design Teams blogs, a winner will be drawn from each of the blogs. There is also a $30 gift certificate on offer from the 100 Proof Press blog.
This is the stamp that you could win by simply leaving a comment on my blog. It will be sent as a mounted stamp on wood and it is approx. 1.75 inches by 3 inches.
 This is the grand prize giveaway from Genuinely Jane Studios.


If you arrived here from the 100 Proof Press Blog you are in the right place.

I used the TAG ALBUM from Genuinely Jane Studios to showcase some of the images from 100 Proof Press.
I have also included step by steps detailing the steps I took to decorate each tag.
The albums from Genuinely Jane Studios are absolutely fantastic for altering, they take inks, paints and any wet mediums with ease. I began by covering each of my tags with pages from an Alice in Wonderland book.
Once I had covered each tag with old book pages I sanded the edges.
I applied embossing paste through a stencil to add more interest and dimension to each tag.
I added leaves in a couple of areas on each tag and then set aside to dry.
I cut several doilies in half and added to each tag for a further layer of interest.
I then cut a heart from a piece of calico for each tag and stamped the BIRD PARTY and the OWL LOOKING LEFT from 100 Proof Press to each heart using black Archival Ink.
I then added dimensional flowers to each tag before colouring.
I then spritzed each album with Dylusions ink sprays to add colour, spritzing with water to blend the colours.
To add a further layer of interest I added some random stamping to the top of my tag using black Archival Ink.
I added Chitchat stickers to each tag, colouring again with ink sprays to coordinate with the background on each tag.
I added highlights to each bird using a white pencil crayon.
I love how the book pages are still visible and the texture from the doily is fantastic as is the embossing paste.
I have included a full list for the blog hop below. Next on the list is AMY.

Enjoy the blog hop and good luck.

100 Proof Press Blog ($30 Gift Certificate)

Thanks so much for stopping by. Tracy x x