Showing posts with label Altered Art. Show all posts

Friday, 1 September 2017

A Vintage Journey Challenge - Altered Art

Welcome, today sees the start of a new challenge over at A Vintage Journey and this month our host is the lovely Alison who had this to say about her challenge:

"We'd llike you to get creative with recycled objects in a vintage; shabby, mixed media; art journalling; industrial, timeworn or steampunk style, . Turn something unloved and unwanted into a work of art. Try some repurposing - make something new out of something old, or incorporate an unwanted object into your artwork. Think tin cans and jars, old bottles, toothbrushes - the more inventive the better"

Our sponsor this month is Simon Says Stamp who are offering a $25 Gift Voucher for one randomly drawn winner.

I decided to alter a sardine tin which I had saved for a just in case moment and this was one of those moments!
I cleaned the sardine tin inside and out and then sanded the outside of the tin.
I opted to colour the sardine tin with Alcohol Inks Ginger and Rust.
I have to say once I had finished colouring the tin my hands were absolutely covered in ink!
I cut a piece of thick card to fit the inside of the tin and then covered the card with vintage paper from my collection which I then coloured with Vintage Photo Distress Oxide Ink and then spritzed with water. I applied the ink with an Ink Blending Tool.
I dried the card and then added creases here and there to age further.
I added further detail to the background using Tim Holtz Crossed Layering Stencil and Black Soot Distress Oxide Ink. I then spritzed the stencilling with water and allowed the water to sit for a few moments and then dried with a heat tool.
I attached some chicken wire using my Tiny Attacher.
I die cut six ravens using the Tim Holtz Feathers and Ravens die, cut from white card.
I adhered all the Ravens together to create one dimensional Raven.
I added the decorated card panel to the inside of the tin and added a Tim Holtz Baseboard behind for added interest.
I painted the Raven with Black Paint and highligted the embossed areas with a touch of wax. I also added house numbers, coloured with Alcohol Inks to the inside of the tin.
I gave the Raven a hat and also added a Remnant Rub to his body. I also included two small bottles to the inside of the tin which were also coloured with Alcohol Inks and Remnant Rubs also added.
Skulls were added to the outside of the tin sitting on a little cake stand painted with black paint. One skull has been added to a small bottle.
These small sardine tins make perfect shadow boxes.
I had some plastic halloween fence type pieces which I also added to the stand.
 I added a quote chip to the top of my piece along with three skull beads.
Thanks so much for stopping by and I look forward to seeing your creations this month.

Thank you to Simon Says Stamp, our sponsor this month.


Tracy
xx


Monday, 14 March 2016

A Vintage Journey - Destination Inspiration - Terminal 2

Morning everyone, thanks so much for popping by. Today I have a "Destination Inspiration" post to share over at A Vintage Journey.
To see the full project you just need to click HERE to be magically transported.

Hope you enjoy the step by steps. Tracy x x


Friday, 5 February 2016

A Vintage Journey - February Challenge - Industrial

Welcome to a new challenge with A Vintage Journey, our theme this month is INDUSTRIAL, for all the details pop by the BLOG.
I took this opportunity to make something for my hubby for Valentine's Day, something a little different from a card; an altered frame. I began by painting the frame with DecoArt Media Fluid Acrylic Paynes Grey, dried with my heat tool and then applyd a coat of Patina Green Antiquing Cream and I then rubbed over the frame gently with a baby wipe to remove some of the cream and reveal the darker colour below and to add to the aged feel. I then added touches of Transparent Yellow Iron Oxide (Andy Skinner has the Copper Patina Technique HERE in his video).
I then embossed a piece of Metal Foil tape with a Tim Holtz Texture Fade and added the tape to a wooden heart.
I added Black Soot Distress Paint to the heart, applying with my finger.
The excess paint was removed with a piece of kitchen towel.
The black paint gives the heart a fabulous industrial look combined with the Metal Foil Tape.
I then took some time to decide on  my layout, adhering torn book pages from an Alice in Wonderland book to the background. I then added the industrial heart to the frame adhered to a circle of rusty wire. I also included touches of chicken wire from my garden to add further to the industrial feel; adding zing glass beads for added texture and interest.  Delicate splatters of Fired Brick Distress Paint have been added for a pop of colour.
I added a Found Relative to an old circular piece from a watch part and included a jump ring to his eye and Remnant Rub for a further layer of interest.
A touch more Idea-ology with the mini Sprocket Gears along with a "love" ChitChat sticker.
I continued with the layers, adding Film Strip Ribbon and more Remnant Rubs.
I love adding layers to my design and each layer being visible; the delicate splatters of red really pop against the more industrial elements.
To complete my design I added an old pen nib for added dimension.

I would also like to enter this into the Anything But Cute Mixed Media Challenge which this time around is Grungy Love.

Thanks so much for stopping by, I look forward to seeing your entries into our February challenge.

Tracy x x


Sunday, 13 December 2015

A Vintage Journey - Secret Santa

Welcome, so glad you could pop by. Today myself and the team from A Vintage Journey are sharing with you the Secret Santa handmade gifts we gave and received.

Let me start by showing you the gift I received from the lovely Astrid.
I was so thrilled to receive a piece of Astrid's handmade artwork, it is gorgeous and so tactile and I have it on display as I type. Pop by Astrid's blog for all the wonderful detail, this really is a treasure. A huge thank you Astrid.

Now to the gift I created which was sent to the lovely Brenda Brown.
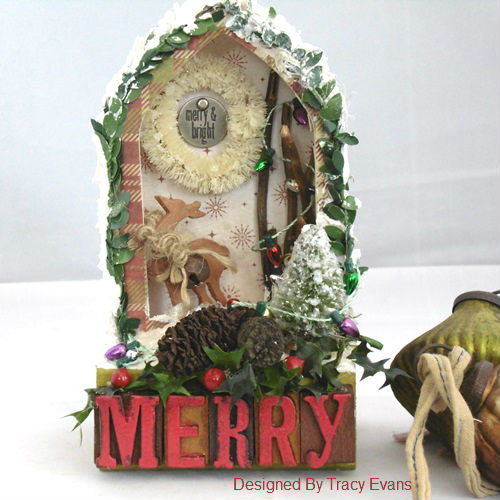
I wanted to create something that Brenda could bring out each year to display with her cards, something that was vintage and dimensional. My fellow team member from another Design Team Lisa inspired me to create this piece.
The arch shadow box is created using Tim Holtz Arch Frame die combined with Eileen Hull's 3D die, which enables you to make any die cut shape 3D. I then used the Sized Arches to create the front panel. I covered the die cut pieces with Tim Holtz Merriment and Yuletide Paper Stash. Once I had all my pieces stuck together I then added Texture Paste around the edges to give the appearance of snow and added Distress Stickles Dry Glitter Clear Rock Candy over the wet Texture Paste to give some shimmer. To add further to the festive feel I added some foliage around the outside edges using Tim Holtz Boxwood Twine.
I die cut the Mini Reindeer from white card, die cutting five layers and adhering them together to give me a dimensional Reindeer that would stand. I then painted the die cut piece with Vintage Photo Distress Paint, adding touches of Ground Espresso Distress Ink around the edges for shading. I added natural twine and a rusty bell to the reindeer for added interest.
I added a Mini Wreath and a Token embellishment to the centre, adding Dry Glitter to the Wreath for added sparkle.
I added some twigs from my garden to add a natural element to the design along with some mini Christmas lights.
Natural mini pinecones, faux ivy and berries have also been included.
To complete I added some Holiday Letterpress which I coloured with Wendy Vecchi  Red Geranium Embossing Powder.
Pop by A Vintage Journey Blog to see all the wonderful handmade gifts we shared.

Tracy x x


Tuesday, 1 December 2015

Eileen Hull Art With Heart Challenge - Favourite Things

Welcome time for another monthly challenge with Eileen Hull's Art With Heart Challenge and this time around we are looking at "Favourite Things".
I love anything that is mixed media, paint, using my dies and so incorporated them all into my pieces today and had great fun along the way.
My angel has a small dolls head added to a cardboard base which I have covered in Alice in Wonderland book pages and then she has been painted with DecoArt Media Fluid Acrylics Cobalt Teal Hue and Yellow Green Light.
I have added a Tim Holtz Monocle to her head along with an icing funnel for her Christmas Hat. She also has a star charm hanging from her Monocle. Her faces has been painted with Titanium White Paint which I allowed to dry and I then added Burnt Umber Media Fluid Acrylic over the top, applying a little paint at a time and then dabbing off the excess with a baby wipe.
Her bodice has pieces die cut from white card using Eileen Hull's Baners and Pennants Thinlits Die, perfect detail for her dress.  I love how the book pages are still visible!
I used Treasure Gold Wax to highlight the detail on the die cut pieces. I also added Textured Snowflakes to the body using Tim Holtz Layering Stencil and added 'angel' using computer generated text. I also added touches of Snow using a DecoArt Snow Writer.
I also decorated an Artist Trading Block, die cut with Eileen Hulls's Block/Cube die. I added the Needle Book to the top of the block but this time around used it in a mixed media piece. The ATB has been painted with DecoArt Fluid Acrylics Cobalt Teal Hue and Yellow Green Light. I have also added stars applying Texture Paste through Tim Holtz Layering Stencil.
The Needle Book has been painted with Titanium White Fluid Acrylic, allowed to dry and then I applied Texture Paste randomly around the book. Once dry I then painted with Burnt Umber Fluid Acrylic, applying a little paint at a time and then dabbing any excess away with a baby wipe. I added a birthday candle to the inside and added 'christmas wish' using computer generated text. I also applied Treasure Gold Wax randomly around the book.
I added a small Christmas tree to the inside of the book set onto some white cheesecloth for added interest and texture. I sprayed the tree with Tarnished Brass Distress Spray Stain.
For added texture I also applied a layer of Crackle Glaze to the ATB and then added Raw Umber Antiquing Cream to highlight the cracks and then added a layer of Matt Medium to seal. I also added delicate splatters of Tarnished Brass Distress Spray Stain.
The stars have had a layer of Texture Paste added to each one and then painted with Titanium White Fluid Acrylic and once dry painted with Burnt Umber Fluid Acrylic, once again dabbing off the excess paint with a baby wipe. Touches of Treasure Gold Wax have also been added to the stars and all the edges of the ATB.
I also included a Sandra Evertson Prima Relic piece to one side which I again painted with DecoArt Fluid Acrylics. She is adhered to a piece of Cheesecloth and I addede 'ange' using computer generated text. I have also added Crackle Glaze randomly around the edges.
I applied Texture Paste over Tim Holtz Stars Layering Stencil to add texture and dimension to the back of the Needle Book.
A Sandra Evertson Prima Relic piece has also been added to the centre of the Needle Book along with a Finnabair metal piece behind. My angel has had rusty bells added which I coloured with Wax and she has a clay star on her wing.

http://www.eileenhull.com/

I would also like to link this to the Emerald Creek Dares Challenge which this time around is "Show us your holiday creations".

Thanks so much for stopping by. Tracy x x