Wednesday, 7 February 2018

TIME FLIES

Today I have a mixed media piece for you using lots of viintage pieces combined with everyday craft items.
I began by coating one of Tim Holtz Etcetera tags with a coat of Texture Paste, applying in an uneven coat to give texture to the background. I then applied a coat of Gesso and once dry I then added a coat of Antique Linen Distress Paint and then dried this layer with a heat tool. I then added a light coat of Vintage Photo Distress Paint, dried lightly and then rubbed away some of the colour. To add a touch more colour I added highlights of Tumbled Glass Distress Paint, wiping away any excess paint as I moved around the tag. I then dried the tag thoroughly with a heat tool.
I added a vintage clock behind my relic piece along with a few smaller vintage pocket watch faces. I love these!
To add further texture to the background I applied Texture Paste over the Tim Holtz Numeric Layering stencil. I highlighted the numbers further with Distress Crayon, smudging with my finger.
I added a Finnabair rusty pocket watch and added vintage watch parts to the inside. I melted some clear embossing powder and then poured the hot melted powder over the watch parts to secure.
The body of the Relic piece has been covered with vintage French book pages and aged with Distress Crayon.
I stapled together some vintage letters to add TIME FLIES to the top of my tag. I love how you can clearly see all the texture and aged feel to this piece in the background.
I added a Tim Holtz Game Spinner to her body and also include some wings from a Finnabair Butterfly embellishment. I also added further vintage watch parts to her wings.
I had total freedom with this piece and it was great fun just to let go and enjoy the process and seeing where it took me.
I love all the delicate layers of colour and the texture gives this piece a real tactile feel.
More vintage pocket watch faces and watch parts added here along with some delicate pieces of confetti.
I really enjoyed creating this piece.

Thanks so much for stopping by. Tracy x x

Tuesday, 6 February 2018

True Friend

Hi everyone and welcome to my monthly post for Eileen Hull. This month as it is the month of love, we are showing our love for Eileen's dies.
I used Eileen's Sizzix ScoreBoards XL Die - Book and Pages, Tinket Box and Frame to create a mixed media card.  We will keep all our UK fans aware re when the dies are available in the UK. The Book Club Dies are now available on  pre order from Sir Stampalot HERE. If you are not a member of the Eileen Hull Fan Club you can join HERE. There is lots of inspiration and the Eileen Hull DT keep you informed re when stock is available and where as soon as we know.
Here is a picture of the die I have used today, a wonderfully versatile die. For my card I have used the front framed piece only.
II began by cutting a piece of white card 4.5" in width by 6.5" in length. I then covered the white card with vintage french book pages adding some Tissue Tape for added interest. I then coated this layer with a coat of Matte Medium.
I was aiming for a more vintage feel to my piece so painted the book pages with a layer of Antique Linen Distress Paint and then dried the paint with a Heat Tool.
I die cut the frame from mountboard using Eileen's die and then covered it with an uneven layer of Texture Paste, applying the paste with a Palette Knife.
Once the Paste was completely dry I then painted it with Antique Linen Distress Paint and then dried the paint with a Heat Tool.
Apply an uneven second coat of Vintage Photo Distress Paint and then dry lightly with a Heat Tool.
Rub away some of the excess paint with a damp baby wipe and then dry with a Heat Tool.
Add the framed panel to the layer of vintage book pages. This frame element is so versatile for so many projects and is only one part of the die.
I then die cut a heart from mountboard and added Texture Paste over an AALLandCreate stencil by Fiona Paltridge. I then painted the heart with a layer of Candied Apply Distress Paint.
To highlight the texture further I applied Prima Metallique Wax White Gold over the top. I then applied Distress Crayon around the edges of the heart to age a little further.
A Paperdoll sits ontop of an Adornment Arrow which has been coloured with Rust Alcohol Ink and I have also included some Idea-ology Nailheads.
Rusty wire adds a further element of texture and ageing and I have also included some Clippings Stickers.
Hope you enjoyed seeing this card as much as I enjoyed creating it. Thanks so much for stopping by.

Tracy x x


Monday, 29 January 2018

Follow Your Heart

Today I have decorated one of Tim Holtz Etcetera tags.
I began by applying a coat of Gesso to the tag and then I added a random layer of Texture Paste to the background, applying the Paste with a palette knife. Once the Paste was completely dry, I then applied a layer of Antique Linen Distress Paint and then dried this layer with a heat tool. I then applied a random layer of Vintage Photo Distress Paint, dried lightly and I then rubbed back some of the paint with a damp baby wipe.
I applied a random layer of Texture Paste through the Linen Layering Stencil to add a further layer of texture to the background. I also included some Tissue Tape, the black of the Tape lifts the design.
I die cut a piece of mountboard using Tim Holtz Heartfelt Die and actually used the cut out pieces and the die cut hearts. The cut out (aperture) piece has had the same treatment as the background of the tag and I also added some gold highlights to the edges of this piece. I applied Gathered Twigs Distress Crayone around the edges of the aperture hearts and also included a couple of Remnant Rubs for added interest.
I added a Quote Chip, smudging some Distress Crayon around the edges to compliment the colours in my design. I also added some vintage French Book Pages to the background.
The die cut hearts were painted with Candied Apple Distress Paint and touches of Gold Mega Flakes were added to the edges.
I added three layers of die cut pieces to the largest of the hearts to give further dimension to my design. I also included scratchy lines randomly around my design, applied with an old credit card.
Screw Heads have also been included to add further dimension and interest to the overall design along with a few more Remnant Rubs, added randomly to the background of my tag.
I added some Bouquet Flowers to the die cut hearts, adding touches of colour to each of the petals. I also wrapped two of the hearts with rusty tin wire for added texture.
I added twine to the top of my tag and added further scratchy lines around the outside edges.

Thanks so much for stopping by.

Tracy
xxx


Saturday, 27 January 2018

Relic

Hi and welcome to another post just for fun, this time a mixed media canvas.
I began by applying a layer of Dina Wakley's Heavy Body Acrylic Turquoise Paint onto the canvas, applying with a large flat brush. I then added a layer of Ocean paint to a piece of watercolour cardstock and then pressed the painted watercolour card stock onto the canvas, just kissing it against the background, this is often referred to as monoprinting. I repeated the same process with Tangerine Heavy Body Acrylic to add a further layer. I repeated these two steps until I was happy with the layers I had achieved.
I die cut Seth Apter's Sunburst from the watercolour cardstock pieces I had used to create the monoprinting in the previous steps. I added three layers to my sunburst to create a more sturdy piece.
I added a few delicate splatters of black paint combined with some Remnant Rubs and a RELIC Quote Chip for added dimension and interest.
A clay face has been added to the centre of my sunburst, adding touches of paint to the clay face with my finger and then wiping back any excess to give an aged appearance. I then added some cotton threads behind for added texture.
A few rusty elements add further interest to my piece, I love adding vintage touoches to a design.
I added relic using computer generated text to my face along with a FRAGILE Remnant Rub.
Thanks so much for stopping by. Enjoy your weekend.

Tracy
xxx


Sunday, 21 January 2018

Be Brave

Welcome, today I have a post just for fun, no other reason than just enjoying the process of creating. If you are looking for my blog GIVEAWAY you can find that HERE.
I added an old vintage book cover to a canvas panel which has been painted with Dina Wakley Heavy Body Acrylics Turquoise and Elephant. I painted with one layer of Turquoise and then whilst the paint was still wet I added a few strokes of the Elephant to add two layers of colour to the background. I left the book cover as was as I loved the torn edges and vintage feel to it.
I added a clay face, which I broke in half and then coloured with touches of the Elephant Heavy Body Acrylic. I dried the paint a little and then wiped away most of the paint leaving only touches of colour in the crevices and cracks.
I also included some torn vintage French Book pages and added a touch of stencilling to the background.
A few rusty elements have been included along with some rusty tin wire, I love using rusty wire in my projects. I also included a Be Brave Quote Chip for added interest, adding a touch of paint to the edges of the quote.
A few cotton threads for added texture along with some cheesecloth fabric.
I added my clay face to a paintbrush which I broke to fit the size of my vintage book cover and I then covered the brush with Texture Paste and then painted with Heavy Body Acrylics. I highlighted some of the texture with touches of wax.
I really enjoyed creating this, taking the time to just enjoy the process of creating just for fun.

Thanks so much for stopping by. Tracy x x

Friday, 19 January 2018

Happy New Year & Giveaway

Hi and welcome to my first blog post for AALLandCreate for 2018. Today I have a card using stamps from AALLandCreate. All stamps and stencils are available from THE BOUTIQUE.

I also have a little giveaway at the end of this post to say THANK YOU for all your support during the past twelve months.
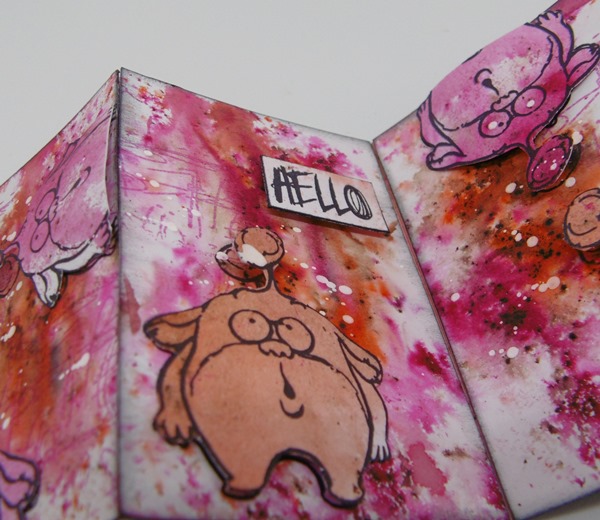
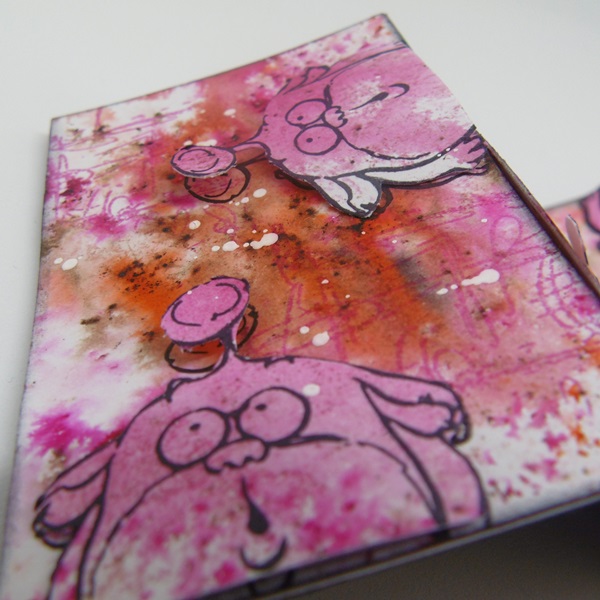
The cute monster I have used in this accordion is designed by Olga and you can find the stamp set HERE.
My background on my accordion is created using Infusions and I could not resist but to add some googly eyes to one of my monsters.
I also added touches of white using a Posca Paint Pen to lift the background a little and my monsters have also been stamped onto an Infusions background.
I have added a touch of black ink around the edges and added the sentiments from the same stamp set.
I have also added a touch of background stamping using Bipasha's background stamp which you can find HERE.
These monsters are great fun to use and add a reall whimsical feel to your designs.

As a huge THANK YOU for all your support over the past year during my journey with AALLandCreate, I have a little giveaway for you.

One randomly drawn winner from this blog post will win this stamp set. I will draw the winner next Friday 26th January.

Thanks so much for stopping by.

Tracy
xxx


Tuesday, 2 January 2018

Choose To Shine

Hi and welcome to my first post for 2018. Today I am showcasing Eileen Hull's Book and Pages, Trinket Box and Frame Scoreboards XL Die.
I opted to use the frame element this time around. This die is so versatile and has so many options. If you would like to see my previous post using this die and a completely different look, you can see that HERE.
I die cut the frame element from mountboard and from black card. The mountboard gives extra dimension to my design. I embossed the black card with Eileen's Daisy Wreath Textured Impressions Folder. I then highlighted all the fabulous embossing with wax and dry brushed with gold paint to highlight further.
I die cut the flowers from black card using Eileen's Stitchy Flowers and Leaf Thinlits Die, applying wax to the edges of the flower and I also included a gold bead to the centre of each.
I also included the floral arch piece die cut using Eileen's Floral Arch and Words Thinlits Die, die cut from white card and painted with gold paint.
I added some faux stitching around the aperture and around the outside edge of the card. I added a clay face to the centre of my aperture and a smaller face behind my flowers. Both faces were painted with black paint and then highlights added with wax.

Thanks so much for stopping by. Hope you enjoyed my first post for 2018.

Tracy
xxx