This month the Eileen Hull DT are showcasing the fabulous
Twist and Style Tool. Eileen has a fabulous video
HERE to show you how to use the tool, its great fun!
I opted for two ATB's and a coordinated card. The Artist Trading Blocks were created using Eileen Hull's
Block/Cube Scoreboards Die.
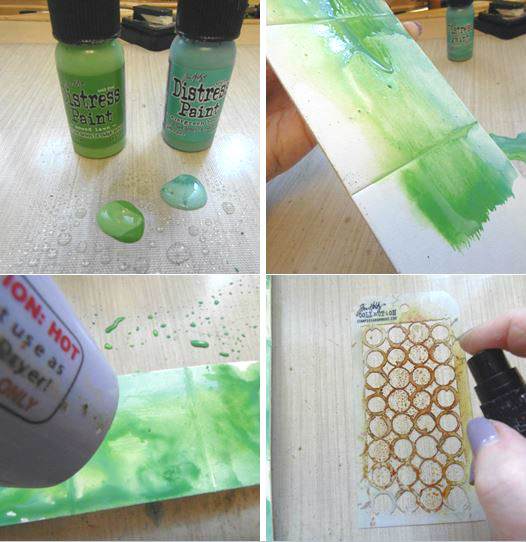
1 I began by die cutting the ATB from mountboard and then I applied Mowed Lawn and Evergreen Bough to a non-stick craft sheet and spritzed with water.
2 Mop up the paint with the die cut pieces.
3 Dry the paint with a heat tool.
4 Take a stencil, apply Vintage Photo Distress Ink directly to the stencil and then spritz with water.
1 Place the inked stencil ink side down onto the die cut pieces and then dab with a piece of kitchen towel.
2 Remove the stencil to reveal the design. Repeat this process for all the die cut pieces.
3 Cut lengths of rusty tin wire, use the Twist and Style Tool to twist and then shape into hearts. Keep the spare lengths of twisted wire for added interest on the projects.
4 Place the wire hearts onto book pages and then pour Liquitex Pouring Medium into the hearts and then allow to dry overnight. Once completely dry, cut out each of the hearts.
I created a coordinated card again using all the techniques above. I added two of the hearts to the card adding paint circles in DecoArt Media Cadmium Red Hue to give a contrast to the design. I also added three of the lengths of twisted wire to the card for added texture.
I love how the text from the Alice book pages are clearly visible within each of the hearts.
I also added some stencilling to the background of the card to add a further layer of interest. I also included some splatters of paint.
I added hearts to the ATB, adding threads of cotton behind for added interest and texture. Again I have added painty circles to the background.
Numbers have been added to the top of the ATB and once again I have added lengths of the twisted wire to echo the design on the card.
Two hearts have been included to the top of the ATB. I love the twisted wire and the Twist and Style Tool makes it so easy.
I echoed the stencilling and circles on each side of the ATB.
Thanks so much for stopping by. Tracy x x