We have a fabulous new release from
Artistic Outpost (available from
Our Daily Bread Designs) and today the Design Team are showcasing some of their designs using the new imagery.
The first new release I am showcasing is
Ice Cream Shoppe.
I thought this card would make a fun birthday card.
I began by colouring the background with Picked Raspberry and Squeezed Lemonade Distress Ink; simply applying with an ink blending tool.
I then used a circular finger dauber to apply Memento Luxe Wedding Dress Ink randomly over the background and then dried with a heat tool. To add further interest to the background I used two random pieces of card from the top of a watercolour pad which I coloured with the same Distress Inks, but this time applying the ink to a non-stick craft sheet, spritzing with water and then mopping up the beads of ink with the card and then drying with a heat tool.
I stamped the ice cream cones onto Distress Coloured card using Black Archival Ink, cut them out and then added to the card front. Squeezed Lemondade Distress Paint was added to a lid and then stamped around the focal imagery. I punched out three small hearts from Distress Coloured card and die cut a tag from white card and added 'ice cream' text using the sentiment stamp. To complete I stamped "Life is better with ice cream" above the scraps of card.
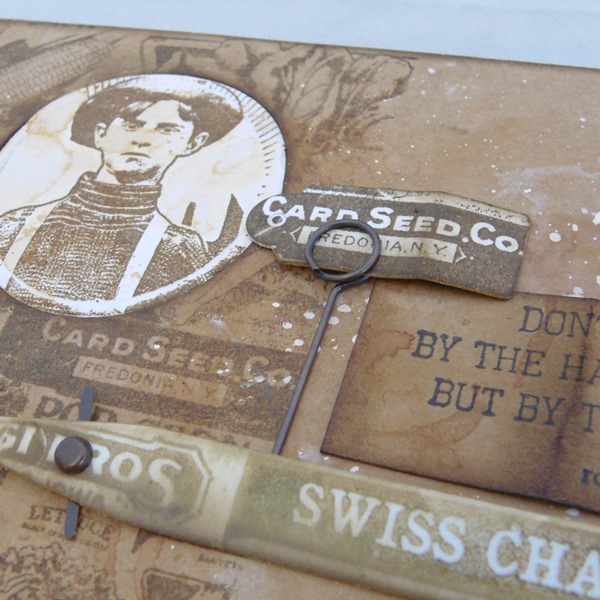
My second sample showcases the
Seed Packets Background,
Harvest stamp set and the
Grunge Elements stamp set.
I began by applying Color Burst crystals (Terre Verte, Burnt Orange) to the background of the white card and then spritzed with water and dried with my heat tool. I then stamped the boy from the Harvest stamp set with Black Archival Ink. I then created a mask, stamping the same image onto a piece of scrap paper; place the mask onto the stamped image and I then die cut a circle from scrap card, discarded the circle and used the aperture and placed this over the card and then stamped the Seed Packets Background into the circular aperture. I also stamped the boy onto the inside of the card.
I drew around the circle and the edges of the boy with a Stabilo All pencil and used my water brush to smudge; this adds definition to the edges of the imagery and makes it pop against the backdrop. I also coloured some areas with coloured pencils.
I then used the Grunge Elements circle and dotty stamps to add further interest to the background, adding miniature pumpkins for added interest. I then added the sentiment to complete along with delicate splatters of Peeled Paint Distress Paint.
My fellow team members have created more inspiration for you, please stop by their blogs to be inspired.
Just for commenting on the Design Team Blog Posts, you have a chance
to win a $15 Gift Certificate to the ODBD Website. You have until
April 1, 2016 at 10:00 PM CDT to leave comments on the participating
designers blogs for a chance to win! One random winner will be selected
from the comments left on the designers blogs, the winner will be
announced on the AO Blog on April 2, 2016, be sure to check back there
to see if you have won!
I will be popping back over the next few weeks with more designs using the fabulous new releases including The Golf Club stamp set which I have not showcased today.
Thanks so much for stopping by. Tracy x x