Showing posts with label Ephemera Background. Show all posts

Thursday, 29 September 2016

HERO

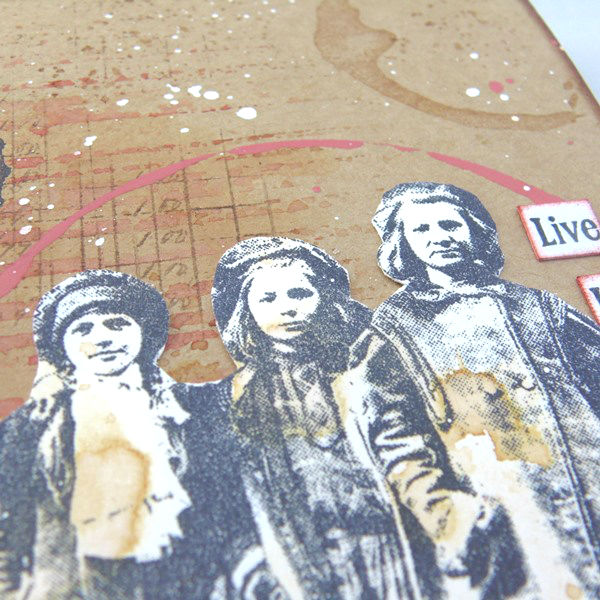
Today I am showcasing the Paperboy stamp set once again from Artistic Outpost.
I have added the Paperboy focal image to a mixed media background.
I added a touch of background stamping using the Ephemera Background stamp and Distress Ink to add a tone on tone effect.
I stamped the Paperboy and then cut out the image and added shading using a grey pencil. This picture shows all the layers added to the background from Gesso resist to inking and stencilling.
Splatters of paint have been included along with Tissue Tape to ground the focal image
Thanks so much for stopping by. Tracy x x


Thursday, 11 August 2016

The most important shot in golf........

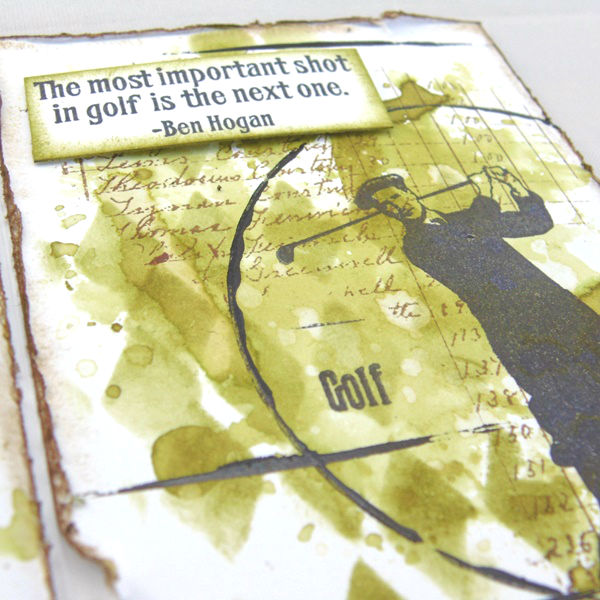
Today I have a masculine card for you for my weekly post for Artistic Outpost. I am using The Golf Club stamp set this time around, available from Our Daily Bread Designs.
I die cut a circle from a scrap of card and then placed the circle onto a piece of white card, holding in place with a piece of low tack tape. I then inked Tim Holtz Stripes Layering Stencil with Vintage Photo and Peeled Paint Distress Ink, spritzed the stencil with water and then lay the stencil over the card, dabbing with a piece of kitchen towel. I then removed the stencil and dried with a heat tool and then removed the circular mask.
I added a touch of colour to the inside circular aperture using Peeled Paint Distress Ink; applying the ink to a piece of recycled plastic packaging, spritzing with water and then dabbing the ink into the circular area and then drying with a heat tool. I also added a touch of background stamping using the Ephemera Backgrounds stamp set. To highlight the circle further I draw around with a Stabilo All pencil and smudged with a waterbrush.
I stamped the golfer into the circle and added the sentiment, colouring the edges of the sentiment with Peeled Paint Distress Ink.
I stamped Live, Laugh, Play to the top of the circle to complete my design.

Thanks so much for stopping by. Tracy x x

Thursday, 21 July 2016

Live, Laugh, Play

Today I am showcasing The Golf Club stamp set from Artistic Outpost, available from Our Daily Bread Designs.
I have opted for a vintage more muted colour palette this time around for The Golf Club imagery. I begann with a piece of kraft card which I coloured lightly with Vintage Photo Distress Ink; applying the ink to a piece of recycled packaging, spritzing with water and then smooshing the ink across the backdrop and then drying with a heat tool. I distressed the edges of the card with scissors and then applied Vintage Photo Distress Ink to age further.
I applied Vintage Photo Distress Ink to Tim Holtz Striped Stencil; simply swiping the inkpad directly over the stencil and then spritzed with water and placed the inked stencil onto the background, dabbing with a piece of kitchen towel and I then removed the stencil and dried with a heat tool. I also included a touch of background stamping using the Ephemera Backgrounds stamp set and Black Archival Ink.
I stamped the lady golfer onto a piece of white card which I had coloured with Vintage Photo Distress Ink, cut out the image and then added to the card front. I applied white paint to a lid and then stamped the circle around the golfer to add a spotlight. I also added some torn pieces from the top of my watercolour pad, again coloured lightly with Vintage Photo Distress Ink to age. I then added these below the golfer to ground the image. I also included text and the sentiment from The Golf Club stamp set again aged with Vintage Photo Distress Ink. Delicate splatters of white paint lift the design.
I also stamped the lady golfer onto the inside of my card.

Thanks so much for stopping by. Tracy x x


Thursday, 14 July 2016

Summer Artist Trading Block

This week I am showcasing the Ice Cream Shoppe stamp set from Artistic Outpost, available from Our Daily Bread Designs.
This time around I decided to create a summer ATB using the imagery from the Ice Cream Shoppe stamp set using a vibrant uplifting colour palette of Picked Raspberry and Squeezed Lemonade. I applied one colour to a piece of recycled plastic packaging, spritzed with water and then smooshed the ink onto the panel and then dried with a heat tool . I repeated the process with the second colour and again dried with a heat tool. I repeated this process until I was happy with the coverage of colour. I then added some background stamping using the Ephemera Backgrounds stamp set. I then stamped the focal image with Black Archival Ink and added the sentiment.
I continued with the same background around each side of the ATB adding further stamping from the Ice Cream Shoppe stamp set.
I love how you can see all the layers in the background and the black outline really does make the colours pop.
A touch more stamping to complete the sides of the ATB.
The top of the ATB has been decorated in the same way and I added a banner stamped using the Country Life stamp set.

Thanks so much for stopping by. Tracy x x

Thursday, 30 June 2016

Paperboy

Welcome to my weekly post for Artistic Outpost. Today I am showcasing the fabulous Bottle Caps Background stamp and the Paperboy stamp set, available from Our Daily Bread Designs.
I began with a 4" x 6" piece of card, colouring the background with Vintage Photo and Fired Brick Distress Inks. I applied each of the inks to a piece of reclycled plastic, spritzed with water and then pressed the ink onto the background. I repeated this process for both colours; continuing until I was happy with the coverage and then dried with a heat tool. I flicked droplets of water onto the background and then dried to add bleached out areas.
I added touches of background stamping using the Ephemera Backgrounds stamp set and Vintage Photo Distress Ink.
I stamped three of the Bottle Caps onto the background using Black Archival Ink and then stamped the Paperboy onto a scrap of card that had been coloured with Vintage Photo Distress Ink. I cut out the image and then added to the card. I also included a bottle cap with the text from The Golf Club stamp set.
Thanks so much for stopping by. Tracy x x


Thursday, 23 June 2016

The Game of Golf

Today I am showcasing a masculine card using the fabulous Golf Club stamp set from Artistic Outpost, available from Our Daily Bread Designs.
I began by adding removable tape to all the edges of my card; masking the outside edges so that only the central panel is visible for decoration. The central panel was then coloured with Peeled Paint Distress Ink and dried with a heat tool.
I then placed Tim Holtz Harlequin Stencil onto the panel and then blended Vintage Photo Distress Ink randomly over the stencil to add a further layer to the background. I then flicked the background with water to add bleached out areas and then dried with a heat tool. I then stamped the golfer onto the background with Black Archival Ink. I created a mask of the golfer, placed this over my stamped image and then stamped the background stamp over the top and then removed the mask. I applied Carbon Black Fluid Acrylic to an old lid and stamped a circle around the imagery.
To add further interest I added a touch of random stamping to the background using the Ephemera Backgrounds stamp and Fern Green Archival Ink. I also included some painted scratchy lines using an old credit card.
I added the sentiment Live, Laugh, Play to the background and added a stamped image to the inside of the card. I also included delicate splatters of Peeled Paint Distress Paint to the background once I had removed the removable tape.

Thanks so much for stopping by. Tracy x x


Thursday, 2 June 2016

I Scream, You Scream, We All Scream For Ice Cream!

I have been playing with the Ice Cream Shoppe stamp set this time around from Artistic Outpost. All stamps are available from Our Daily Bread Designs.
I decided to create invites this time around which I thought would be perfect for a birthday party.  I began by die cutting three Recipe Cards from white card using Eileen Hull's die. The background has been coloured with Picked Raspberry and Squeezed Lemonade Distress Inks. I applied each colour to a piece of recycled plastic packaging, spritzed with water and then dabbed the ink onto the background and then dried with a heat tool. Repeated the same process with the second colour and dried once again. I repeated this until I was happy with the coverage of colour.
I added a touch of background stamping using the Ephemera Backgrounds stamp and Picked Raspberry Distress Ink.
I printed off computer generated text which I die cut using one of Tim Holtz Thinlits Labels adding a touch of colour with Picked Raspberry Distress Ink. I also used part of the sentiment to add Ice Cream three times to each of the invites.
I stamped the ice cream cone with Black Archival Ink onto each of the invites. I also thought that these would make great recipe cards. You could add a homemade ice cream recipe to the back.
For added interest I included painted circles and scratchy lines using Picked Raspberry Distress Paint. I added Black Soot Distress Ink to the edges for definition.

Thanks so much for stopping by. Tracy x x


Thursday, 19 May 2016

Live, Laugh, Play

Today I am showcasing the Bottle Caps Background stamp and the Paperboy stamp set from Artistic Outpost, available from Our Daily Bread Designs.
I opted for a neutral backdrop created with Vintage Photo Distress Ink; applied to plastic packaging, spritzed with water and the ink pressed onto the background and then dried with a heat tool. I then applied Fired Brick Distress Ink to the Stripes Layering Stencil, spritzed with water and then lay the inked stencik onto the background, dabbing with a piece of kitchen towel and then removing and drying with a heat tool,
I also added touches of background stamping using the Ephemera Backgrounds stamp set, stamped with Potting Soil Archival Ink. I then stamped three of the bottle caps only using the Bottle Caps Background stamp and Black Archival Ink. I also added Live, Laugh, Play from The Golf Club stamp set.
I used stamps from the Grunge Elements stamp set to age the background further and to add more layers of interest.
I recycled a bottle cap and added one of the stamped bottle caps to the centre. This adds dimension to the design.
I added the children from the Paperboy stamp set to the bottom of the card, and coloured the imagery with a touch of Vintage Photo Distress Ink to age. I also added a painty circle over the imagery using Fired Brick Distress Paint and an old lid. Live, Laugh, Play was added once again, this time to the edge of the circle.

Thanks so much for stopping by. Tracy x x


Thursday, 12 May 2016

The Game of Golf

Today I am showcasing The Golf Club stamp set from Artistic Outpost, available from Our Daily Bread Designs.
I love this stamp set for masculine designs.

I began by applying Peeled Paint Distress Ink to a piece of plastic packaging, spritzing with water and then pressing the ink onto the background and drying with a heat tool. I then applied Vintage Photo Distress Ink to Tim Holtz Stripes Stencil; simply press the inkpad directly onto the stencil and then spritz with water. Press the stencil onto the background, pressing on the back with a piece of kitchen towel and then remove the stencil and dry with a heat tool.
I also added a touch of random background stamping using the Ephemera Background stamp and Potting Soil Archival Ink. I then stamped the golfer with Black Archiva Ink onto the background. I created a mask of the golfer, placed the mask onto the stamped image and them stamped the image once again with Black ink. I used an old lid, applied DecoArt Burnt Umber Fluid Acrylic to the lid with my finger and then stamped the lid over the focal imagery.
I used a mix of the stamps to add Golf, Club, Ball to the background; drew around each word with a Stabilo All pencil and then smudged with a water brush. I also added the Live, Laugh, Play sentiment with Black Archival Ink. To add a further layer of interest I added splatters of Burnt Umber paint.

Thanks so much for stopping by. Tracy x x


Thursday, 14 April 2016

Live, Laugh, Play - Artistic Outpost

Welcome to my weekly post for Artistic Outpost, today I am showcasing the Bottle Caps Background stamp and the Paperboy stamp set available from Our Daily Bread Designs.
I began by using a background created as a masterboard. I simply brayered Dylusions paint randomly onto the background and then dried with my heat tool. I added a touch of random background stamping using the Ephemera Background stamp and Vermillion Archival Ink.
I then created a stencil by die cutting a circle from scrap card and using the aperture as the stencil. I placed the stencil onto the background and then stamped the Bottlecaps background stamp into the circular aperture using Black Archival Ink. I repeated this process to add three circles to the background. To highlight the circles further I drew around each with a Stabilo All pencil and then used a water brush to smudge.
I stamped the Paperboy with Black Archival Ink, onto a section of the masterboard; where the paint was only lightly applied using the image from the Paperboy Stamp set, cut him out and then added him to the background. I also added scratchy paint lines using an old credit card along with some delicate splatters of paint. 'Live', 'Laugh', 'Play' were added from The Golf Club stamp set, stamping with Black Archival Ink onto a piece of the masterboard background piece.
I love how all the layers are visible!
Thanks so much for stopping by. Tracy x x


Thursday, 7 April 2016

Golf Accordion - Artistic Outpost

Today I am showcasing one of the new releases from Artistic Outpost, The Golf Club stamp set, available from Our Daily Bread Designs.
When I received this set I knew I wanted to create a card for my husband who loves golf so I opted for an accordion card, giving me plenty of space to use lots of imagery from the stamp set.
I began by applying Peeled Paint Distress Ink to a piece of plastic packaging; simply press the inkpad directly onto the plastic packaging and then spritz with water. Place the plastic packaging onto the background of the card and smoosh the ink with your finger. This makes alignment of the ink far simpler; you can add it exactly where you want it. I repeated this process for all three panels and then dried with a heat tool. I then pressed any remaining ink onto the background once again and dried again with a heat tool.
I then placed the Tim Holtz Harlequin stencil onto the background and applied Peeled Paint Distress Ink over the stencil, giving a further layer of interest and a tone on tone effect. To add a further layer I then added some background stamping using the Ephemera Background stamp, stamping with Potting Soil Archival Ink. I did not add the stamp to an acrylic block I used it as is to give a more random feel. I then stamped the lady golfer with Black Archival Ink. I also used part of the sentiment to add 'Golf' text for added interest. I then added DecoArt Carbon Black Fluid Acrylic to an old lid and stamped that over the focal image. I also included some scratchy paint lines using an old credit card and added the fabulou sentiment to complete this panel.
The second panel was decorated in the same way as the first but this time I used the flags as the focal image. I also included the advertisement from the stamp set and live, laugh, play.
The third panel is stamped with the gentleman golfer. I applied Vintage Photo Distress Ink around the edges for definition.

Thanks so much for stopping by. Tracy x x


Thursday, 15 October 2015

Christmas Robin

Time for my weekly post for Artistic Outpost.
I have another Christmas card for you this week, I hope working ahead will make it a little less of a rush nearer to the Christmas season! I applied Drawing Gum randomly to my background and allowed to dry. I then applied water to the card with a paintbrush and then dipped my paintbrush into Brushos and dipped into the wet areas on my card, I then moved the card around to allow the ink to run and then dried with my heat tool. I then rubbed away the Drawing Gum; any ink resists the Gum.
I then stamped the Robin from the Birds of a Feather stamp set onto the background using Potting Soil Archival Ink. To add further interest I added stencilled stars randomly to the background using Fired Brick Distress Ink and the Stars Layering Stencil.
I added touches of background stamping using the background stamp from the Ephemera Backgrounds stamp set. I then stamped the sentiment 'Happy Christmas' from the Snowy Woods stamp set. To add a further layer of interest I added delicate splatters of Tarnished Brass Distress Paint.

Thanks so much for stopping by. Tracy x x