Thursday, 8 June 2017

AALLandCreate Exclusive Product Release

I am absolutely delighted to have a second release of new stamps and coordinated stencil with AALLandCreate. A huge thank you to Autour De Mwa for all his hard work in coordinating everything and making all this possible. THANK YOU.

Stamp Set - Available HERE
Stencil - Available HERE
Stamp and Stencil - Available HERE


You can find my first stamp release HERE.

I was so excited to create my first sample using my new stamps and I began with a mini tag book using Tammy Tutterow's Spellbinders Mini Tag Book Die.


I coloured the background of my pages with Dina Wakley Heavy Body Acrylics Lime and Turquoise.
I then stamped my heart stamp with Black Archival Ink and then used my finger to blend Turquoise Heavy Body Acrylic around the heart.
I decorated each page in the same way using all my stamps from my stamp set. I added markings using stencils and a credit card with Tangerine and Magenta Heavy Body Acrylics.
I added my hand drawn sentiment to the left hand side of this page and also added some random machine stitching for added texture.
I love these colours together combined with a touch of white to lift the whole page.
I used part of my imagery on this page along with some more markings and random machine stitching.
I love this star, I can see I will be using this for some Christmas makes too.
I love using circles in my designs so I knew I had to include a circle in my stamp set.
I love working with these colours, one of my favourite combinations.
AALLandCreate also have a Facebook Page which you can find HERE should you wish to show any of your artwork using our stamps.
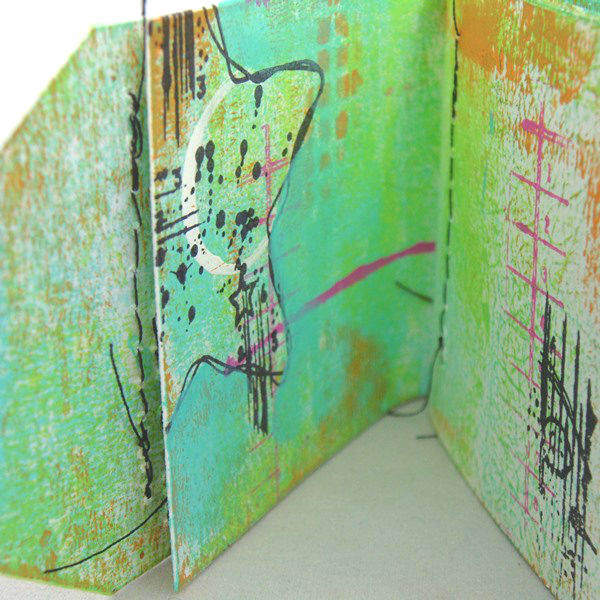
The pages of my book have all been tied together with coordinated twine and I also added touches of black stamping for further detail.
Thanks so much for stopping by. Tracy x x

Tuesday, 6 June 2017

Eileen Hull and Stampotique Collaboration

This month Eileen Hull's DT are collaborating with Stampotique Originals for a month of inspiration.
I decided to create a colourful Passport book using Eileen Hull's Scoreboard XL Passport Die which is one of my favourites and I decorated each page using Stampotique Stamps.
I began by die cutting the Passport Book from mountboard and then I brayered each piece with Dina Wakley Heavy Body Acrylics, ink this case I used Turquoise and Lime.
I then stamped Kassa's Bloom with Black Archival Ink onto both my front and back covers. I painted each of the flowers with Dina Wakley Acrylics, Tangerine, Ruby, Lemon, and Turquoise paints. Once the paint was completely dry I then stamped over the top again to add the lines of the flower back into the image. I used my Tim Holtz Stamp Platform for this process so that I could stamp straight over the top of the paint.
Stamping over the top of the paint once again adds all the detail back into the image which was lost during the painting process. I then added a few highlights of turquoise and Lemon Paint to the flower.
I then added delicate splatters of white paint to lift the design further and also added the WISH word again using Black Archival Ink.
I added a few more highligts of white to the wording, again to just lift the imagery once more.
I added three pages to the inside of my Passport Book, again die cut from mountboard. This page has the Take Your Time image on the right and Spidergrass stamped on the left hand side. I stamped the Spidergrass image with Dina Wakley Paints and Black Archival Ink, to add layers and give dimension to the page. I also added delicate splatters of white and black paint along with scratchy lines added with an old credit card.
My next page has Wally stamped in Black Archial and painted with Dina Wakley Paints.
My last pages have the Spidergrass once again along with paint splatters and scratchy paint lines.
I fastened my pages with coordinated twine. I love the combination of the turquoise, lime and more vibrant orange, red and yellow.


Thanks so much for stopping by. Tracy x x


Friday, 2 June 2017

A Vintage Journey - Canvas

Welcome to a new challenge for A Vintage Journey. Our host this month is the lovely Nikki and our challenge is Canvas.

Here is what Nikki had to say about the challenge:

"Let's work with canvas this month in our vintage; shabby; mixed media; art journaling, industrial, timeworn or steampunk style. It doesn't matter how as long as some canvas is a dominant feature of your project.  Perhaps you may use a canvas in the traditional way or use the reverse to create a shadow box? Canvas boards are fabulous to work on or perhaps you have some canvas sheets which can be cut and adhered to another surface"

I decided to decorate a canvas for Nikki's challenge using Tim Holtz products.
I began with circles created from an old lid and Cracked Pistachio Distress Paint.
I painted each of the circles with Cracked Pistachio, Evergreen Bough and Peacock Feathers Distress Paint, applying the paint with my finger.
I added a touch of shading around the circles using Cracked Pistachio Distress Ink spritzed with water and then painted with a water brush.
A touch more shading with Peacock Feathers Distress Crayon.
Smudge the Crayon with your finger to add shading and shadows around the circles.
Continue to add more layers with the Distress Crayon until you are happy with the depth and definition.
Apply Texture Paste over the Linen Layering Stencil to add yet a further layer of interest and texture to the design.
I die cut the Layered Leaf from mountboard and then coloured with Distress Oxides. I added cotton threads for added texture.
I also included some Remnant Rubs and some random stamping using the background stamp from the On The Farm Stamp Set.
I added a quote chip and some random scratchy lines with Ripe Persimmon Distress Paint.
I also added touches of the Ripe Persimmon Distress Paint to the background of the canvas, applying the paint to a scrap piece of white card and then dabbing the card lightly onto the background.
Index Clips have also been added and some random splatters of paint. I then added Cracked Pistachio Distress Crayon around the edges of the canvas.

Our sponsor this month is Shimmerz Paints who will be offering one randomly drawn winner a $25 voucher.


Thanks so much for stopping by. Tracy x 


Tuesday, 23 May 2017

She Could Believe

I have created a card today using Tim Holtz products.
The background has been created with Distress Paints Squeezed Lemonade, Fired Brick, Peacock Feathers, Twisted Citron and Ripe Persimmon. All added to my non stick craft sheet spritzed with water and mopped up with my card. I applied three colours first and then took time to layer the colours one by one.
I added a Paper Doll holding a Wildflower to echo the Wildflowers in the background.
Some doodling with a white pen to lift the whole design.
A Clippings Sticker for the sentiment.
A touch of background stamping using the background stamp from Tim Holtz On The Farm stamp set.
Thanks so much for stopping by. Tracy x x

Monday, 8 May 2017

See Possibility Everywhere

I thought I would make something a litte different today, using Tim Holtz products.
I created my background using Distress Oxide Inks Vintage Photo, Fossilized Amber and Broken China.
I drew a body from white card and then coloured with Distress Oxide Broken China and then added a monoprint using Tim's number stencil and Vintage Photo Distress Oxide Ink. I also added Remnant Rubs for added interest along with wings using Tim Holtz Detailed Butterflies Mini Die.
I added two Index Clips for added interest and texture along with some delicate splatters of Black Soot Paint.
I added a head which is a mould, and added Remnant Rubs to her face for added interest. I also included some chicken wire for added texture in the background.
I love how all the layers are visible in my design, I love adding lots of layers.
I added die cut pieces from Tim Holtz Cityscape, Metropolis die to the base of her dress, all coloured with Distress Oxides.
I would also like to enter this piece into the Simon Says Stamp Monday Challenge where the theme is "It's A Frame Up".

Thanks so much for stopping by, have a lovely week. Tracy x x